简介 Prometheus 是任何一个高级工程师必须要掌握的技能.那么如何从零部署一套 Prometheus 监控系统呢?本篇文章将从 Prometheus 的原理讲起,手把手带你用一个最简单的例子部署一套 Prometheus 监控系统.
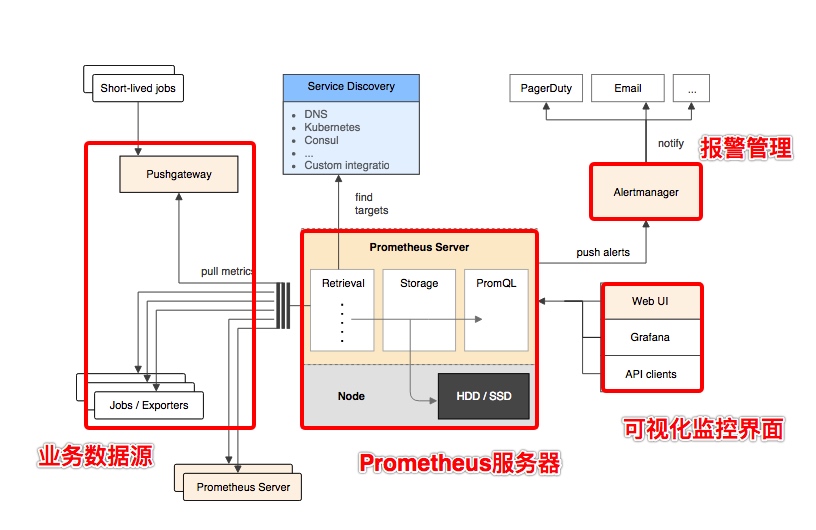
基本原理 Prometheus的基本架构如下图所示:
从上图可以看到,整个 Prometheus 可以分为四大部分,分别是:
Prometheus Server 是 Prometheus组件中的核心部分,负责实现对监控数据的获取,存储以及查询.
业务数据源通过 Pull/Push 两种方式推送数据到 Prometheus Server.
Prometheus 通过配置报警规则,如果符合报警规则,那么就将报警推送到 AlertManager,由其进行报警处理.
Prometheus 收集到数据之后,由 WebUI 界面进行可视化图标展示.目前我们可以通过自定义的 API 客户端进行调用数据展示,也可以直接使用 Grafana 解决方案来展示.
简单地说,Prometheus 的实现架构也并不复杂.其实就是收集数据、处理数据、可视化展示,再进行数据分析进行报警处理. 但其珍贵之处在于提供了一整套可行的解决方案,并且形成了一整个生态,能够极大地降低我们的研发成本.
安装运行 Prometheus 服务端 Prometheus 服务端负责数据的收集,因此我们应该首先安装并运行 Prometheus Server.
1
2
3
4
5
6
7
8
cd /optsystemctl disable firewalld && systemctl stop firewalld wget https://github.com/prometheus/prometheus/releases/download/v2.45.0/prometheus-2.45.0.linux-amd64.tar.gz tar -zxvf prometheus-2.45.0.linux-amd64.tar.gz
下载后解压,可以看到如下目录结构:
1
2
3
4
5
6
7
8
9
10
11
12
13
14
15
16
17
18
19
20
[root@localhost opt] prometheus-2.45.0.darwin-amd64 ├── console_libraries │ ├── menu.lib │ └── prom.lib ├── consoles │ ├── index.html.example │ ├── node-cpu.html │ ├── node-disk.html │ ├── node.html │ ├── node-overview.html │ ├── prometheus.html │ └── prometheus-overview.html ├── LICENSE ├── NOTICE ├── prometheus ├── prometheus.yml └── promtool 2 directories, 14 files
其中 data 目录是数据的存储路径,也可以通过运行时的 --storage.tsdb.path="data/" 命令另行指定.Prometheus.yml 是 Prometheus的配置文件,prometheus 是运行的命令.
启动prometheus服务,其会默认加载当前路径下的prometheus.yaml文件.当然我们也可以手动指定配置文件地址:
1
2
3
4
5
6
7
8
9
10
11
12
mv prometheus-2.45.0.darwin-amd64 prometheuscd prometheusmkdir datavim prometheus.yml - targets: ["0.0.0.0:9090" ] ./prometheus --config.file=prometheus.yml --storage.tsdb.path="data/"
1 2 3 4 5 6 7 8 9 10 11 12 13 14 15 16 17 18 19 20 21 22 23 24 25 26 27 28 29 30 global: scrape_interval: 15s evaluation_interval: 15s alerting: alertmanagers: - static_configs: - targets: rule_files: scrape_configs: - job_name: "prometheus" static_configs: - targets: ["localhost:9090" ]
正常的情况下,你可以看到以下输出内容:
1
2
3
4
5
6
7
8
9
10
11
12
13
14
15
16
17
18
19
20
21
ts=2023-07-17T12:13:50.792Z caller=main.go:534 level=info msg="No time or size retention was set so using the default time retention" duration=15d ts=2023-07-17T12:13:50.792Z caller=main.go:578 level=info msg="Starting Prometheus Server" mode=server version="(version=2.45.0, branch=HEAD, revision=8ef767e396bf8445f009f945b0162fd71827f445)" ts=2023-07-17T12:13:50.792Z caller=main.go:583 level=info build_context="(go=go1.20.5, platform=linux/amd64, user=root@920118f645b7, date=20230623-15:09:49, tags=netgo,builtinassets,stringlabels)" ts=2023-07-17T12:13:50.792Z caller=main.go:584 level=info host_details="(Linux 3.10.0-1160.el7.x86_64 #1 SMP Mon Oct 19 16:18:59 UTC 2020 x86_64 localhost.localdomain (none))" ts=2023-07-17T12:13:50.792Z caller=main.go:585 level=info fd_limits="(soft=4096, hard=4096)" ts=2023-07-17T12:13:50.792Z caller=main.go:586 level=info vm_limits="(soft=unlimited, hard=unlimited)" ts=2023-07-17T12:13:50.794Z caller=web.go:562 level=info component=web msg="Start listening for connections" address=0.0.0.0:9090 ts=2023-07-17T12:13:50.796Z caller=main.go:1019 level=info msg="Starting TSDB ..." ts=2023-07-17T12:13:50.798Z caller=tls_config.go:274 level=info component=web msg="Listening on" address=[::]:9090 ts=2023-07-17T12:13:50.798Z caller=tls_config.go:277 level=info component=web msg="TLS is disabled." http2=false address=[::]:9090 ts=2023-07-17T12:13:50.803Z caller=head.go:595 level=info component=tsdb msg="Replaying on-disk memory mappable chunks if any" ts=2023-07-17T12:13:50.804Z caller=head.go:676 level=info component=tsdb msg="On-disk memory mappable chunks replay completed" duration=8.094µs ts=2023-07-17T12:13:50.804Z caller=head.go:684 level=info component=tsdb msg="Replaying WAL, this may take a while" ts=2023-07-17T12:13:50.804Z caller=head.go:755 level=info component=tsdb msg="WAL segment loaded" segment=0 maxSegment=0 ts=2023-07-17T12:13:50.804Z caller=head.go:792 level=info component=tsdb msg="WAL replay completed" checkpoint_replay_duration=37.328µs wal_replay_duration=349.098µs wbl_replay_duration=163ns total_replay_duration=424.146µs ts=2023-07-17T12:13:50.805Z caller=main.go:1040 level=info fs_type=XFS_SUPER_MAGIC ts=2023-07-17T12:13:50.805Z caller=main.go:1043 level=info msg="TSDB started" ts=2023-07-17T12:13:50.805Z caller=main.go:1224 level=info msg="Loading configuration file" filename=prometheus.yml ts=2023-07-17T12:13:50.807Z caller=main.go:1261 level=info msg="Completed loading of configuration file" filename=prometheus.yml totalDuration=1.289744ms db_storage=5.51µs remote_storage=4.965µs web_handler=505ns query_engine=2.431µs scrape=882.742µs scrape_sd=35.132µs notify=52.15µs notify_sd=13.842µs rules=4.135µs tracing=25.558µs ts=2023-07-17T12:13:50.807Z caller=main.go:1004 level=info msg="Server is ready to receive web requests." ts=2023-07-17T12:13:50.807Z caller=manager.go:995 level=info component="rule manager" msg="Starting rule manager..."
输入 http://192.168.64.195:9090/graph 可以看到如下页面,这个是 Prometheus 自带的监控管理界面.
NodeExporter 监控主机 下载 Node Exporter NodeExporter 是 Prometheus 提供的一个可以采集到主机信息的应用程序,它能采集到机器的 CPU、内存、磁盘等信息.
我们从官网获取最新的 Node Exporter 版本的二进制包.
下载解压后运行 Node Exporter,我们指定用 8080 端口运行:
1
2
3
4
5
cd /optwget https://github.com/prometheus/node_exporter/releases/download/v1.6.0/node_exporter-1.6.0.linux-amd64.tar.gz tar -zxvf node_exporter-1.6.0.linux-amd64.tar.gz cd node_exporter-1.6.0.linux-amd64/./node_exporter --web.listen-address 127.0.0.1:8080
启动成功后,可以看到以下输出:
1
2
ts=2023-07-17T12:18:19.690Z caller=tls_config.go:274 level=info msg="Listening on" address=127.0.0.1:8080 ts=2023-07-17T12:18:19.690Z caller=tls_config.go:277 level=info msg="TLS is disabled." http2=false address=127.0.0.1:8080
配置 Prometheus 的监控数据源 现在我们运行了 Prometheus 服务器,也运行了业务数据源 NodeExporter.但此时 Prometheus 还获取不到任何数据,我们还需要配置下 prometheus.yml 文件,让其去拉取 Node Exporter 的数据.
我们配置一下 Prometheus 的配置文件,让 Prometheus 服务器定时去业务数据源拉取数据.编辑prometheus.yml 并在 scrape_configs 节点下添加以下内容:
1
2
3
4
5
6
7
8
scrape_configs: - job_name: 'prometheus' static_configs: - targets: ['0.0.0.0:9090' ] - job_name: 'node' static_configs: - targets: ['localhost:8080' ]
上面配置文件配置了两个任务.一个是名为 prometheus 的任务,其从「0.0.0.0:9090」地址读取数据.另一个是名为 node 的任务,其从「localhost:8080」地址读取数据.
配置完成后,我们重新启动 Prometheus.
1 ./prometheus --config.file=prometheus.yml --storage.tsdb.path="data/"
查询监控数据 配置完 Prometheus 读取的数据源之后,Prometheus 便可以从 Node Exporter 获取到数据了.那么接下来我们如何查看到这些数据呢?答案是:Prometheus UI!
Prometheus UI 是 Prometheus 内置的一个可视化管理界面,我们通过 http://localhost:9090 就可以访问到该页面.
通过 Prometheus UI 可以查询 Prometheus 收集到的数据,而 Prometheus 定义了 PromQL 语言来作为查询监控数据的语言,其余 SQL 类似.
接下来我们访问 http://localhost:9090,进入到 Prometheus Server.如果输入「up」并且点击执行按钮以后,可以看到如下结果:
可以看到 Element 处有几条记录,其中 instance 值为 localhost:8080 的记录,value 是 1,这代表对应应用是存活状态.
1 up{instance="localhost:8080", job="node"} 1
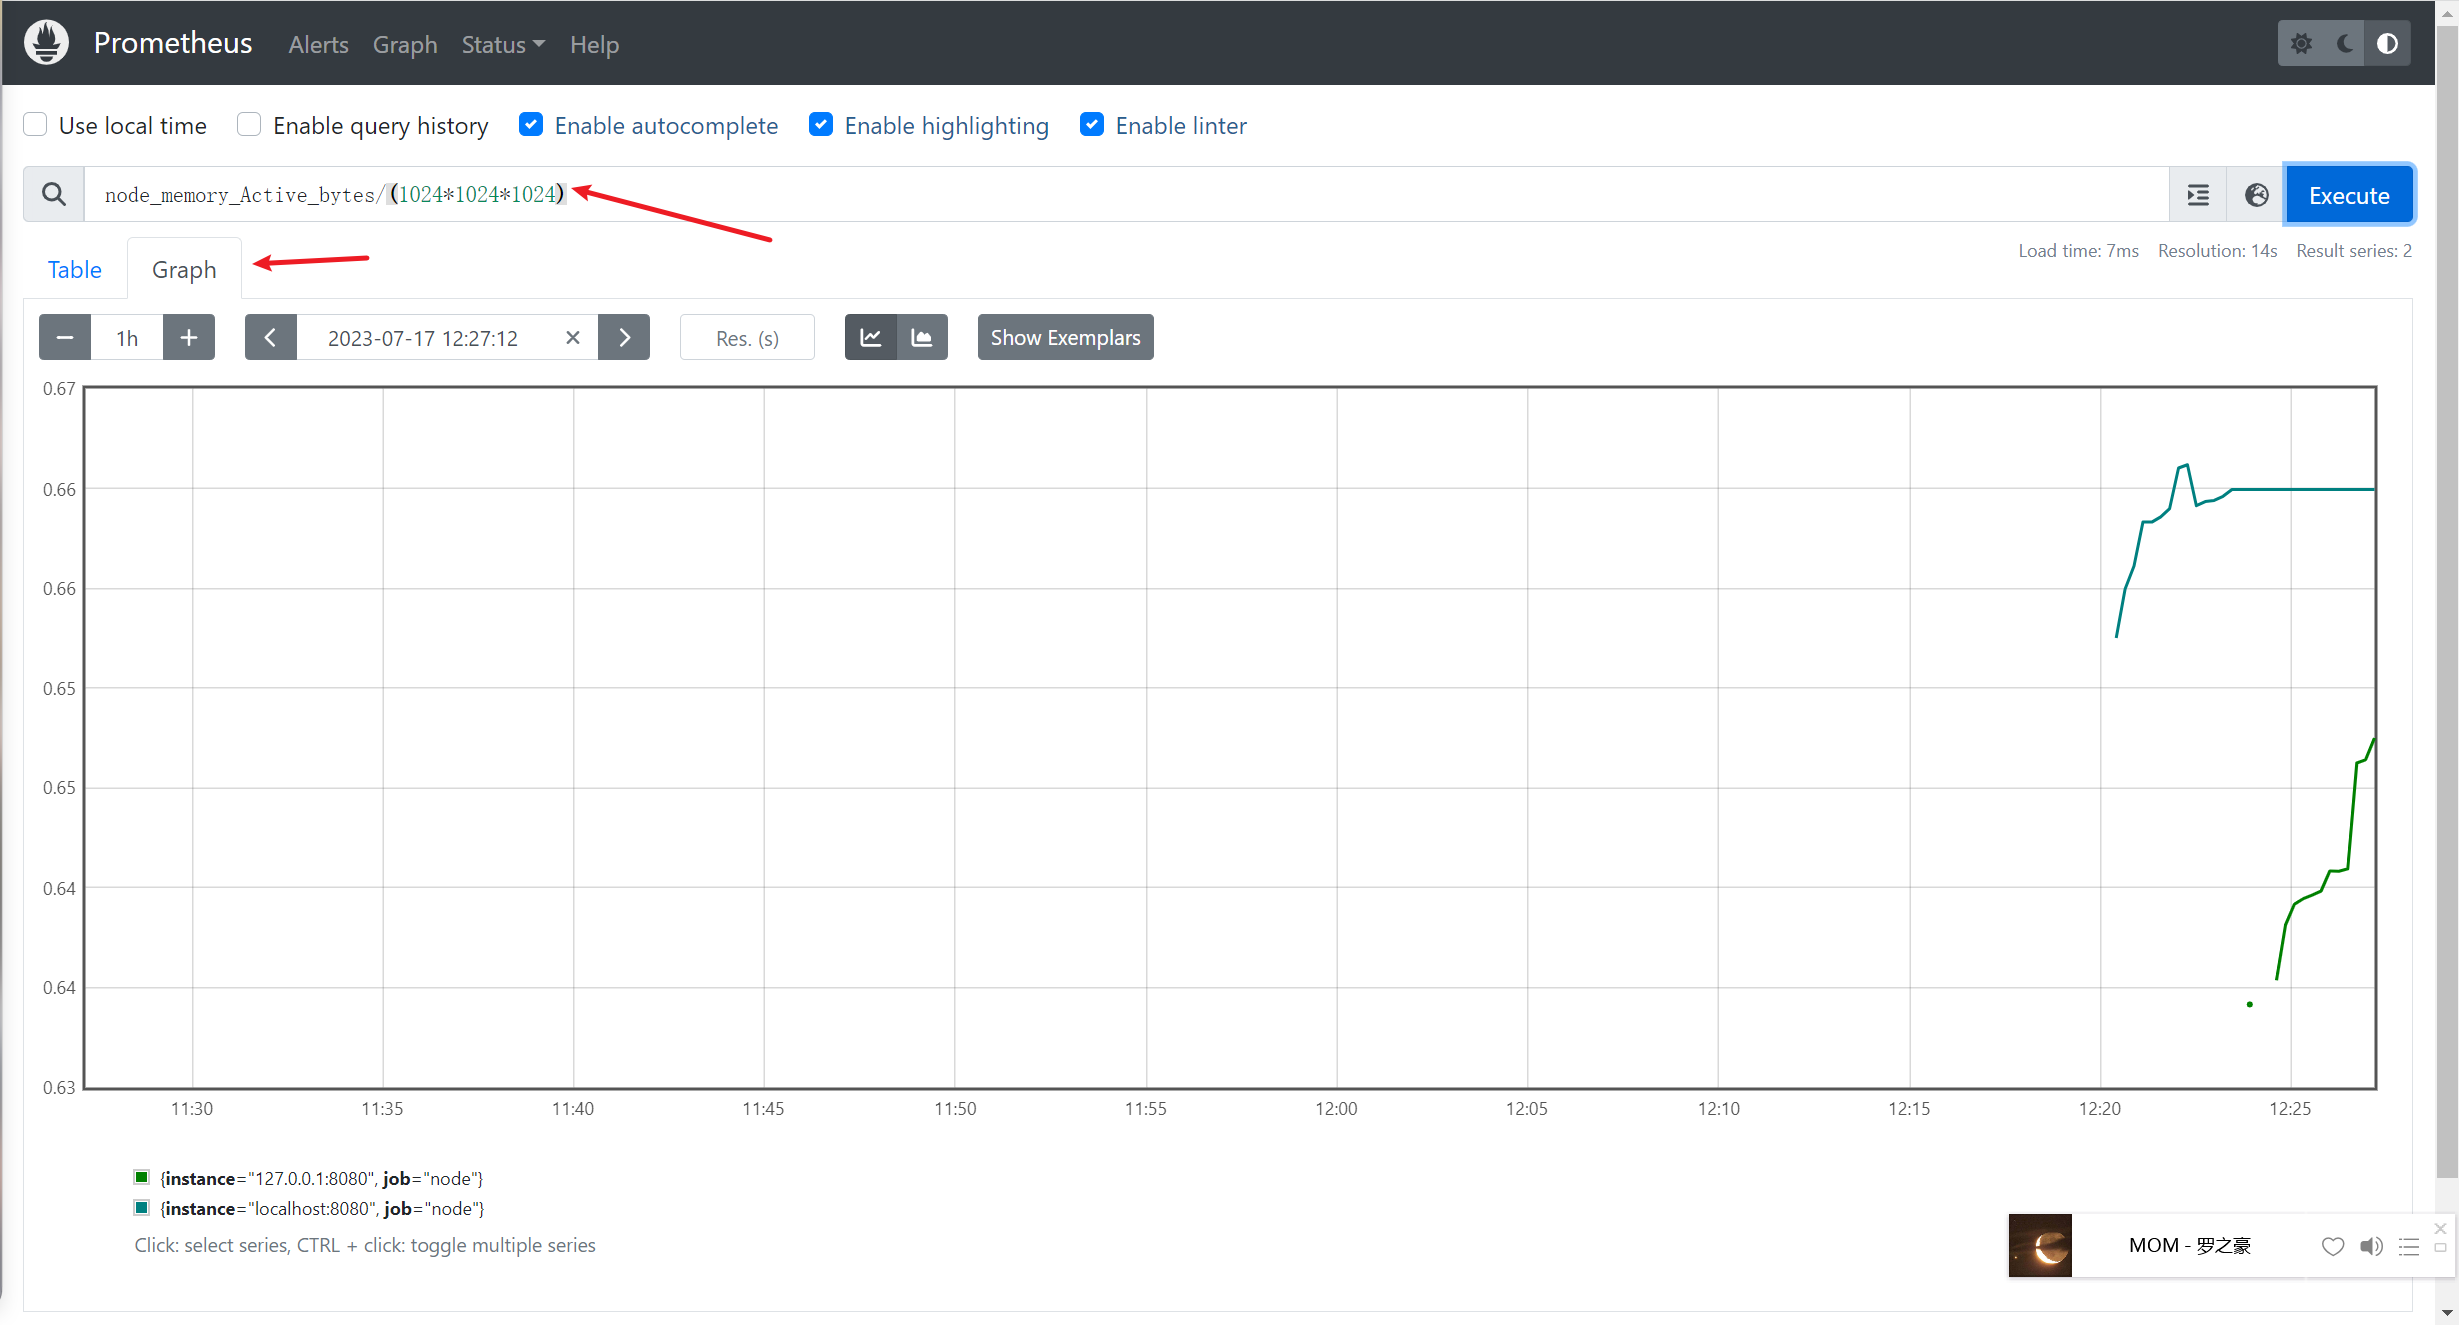
例如查看我们所运行 NodeExporter 节点所在机器的内存使用情况,可以输入 node_memory_Active_bytes/(1024*1024*1024) 查看.
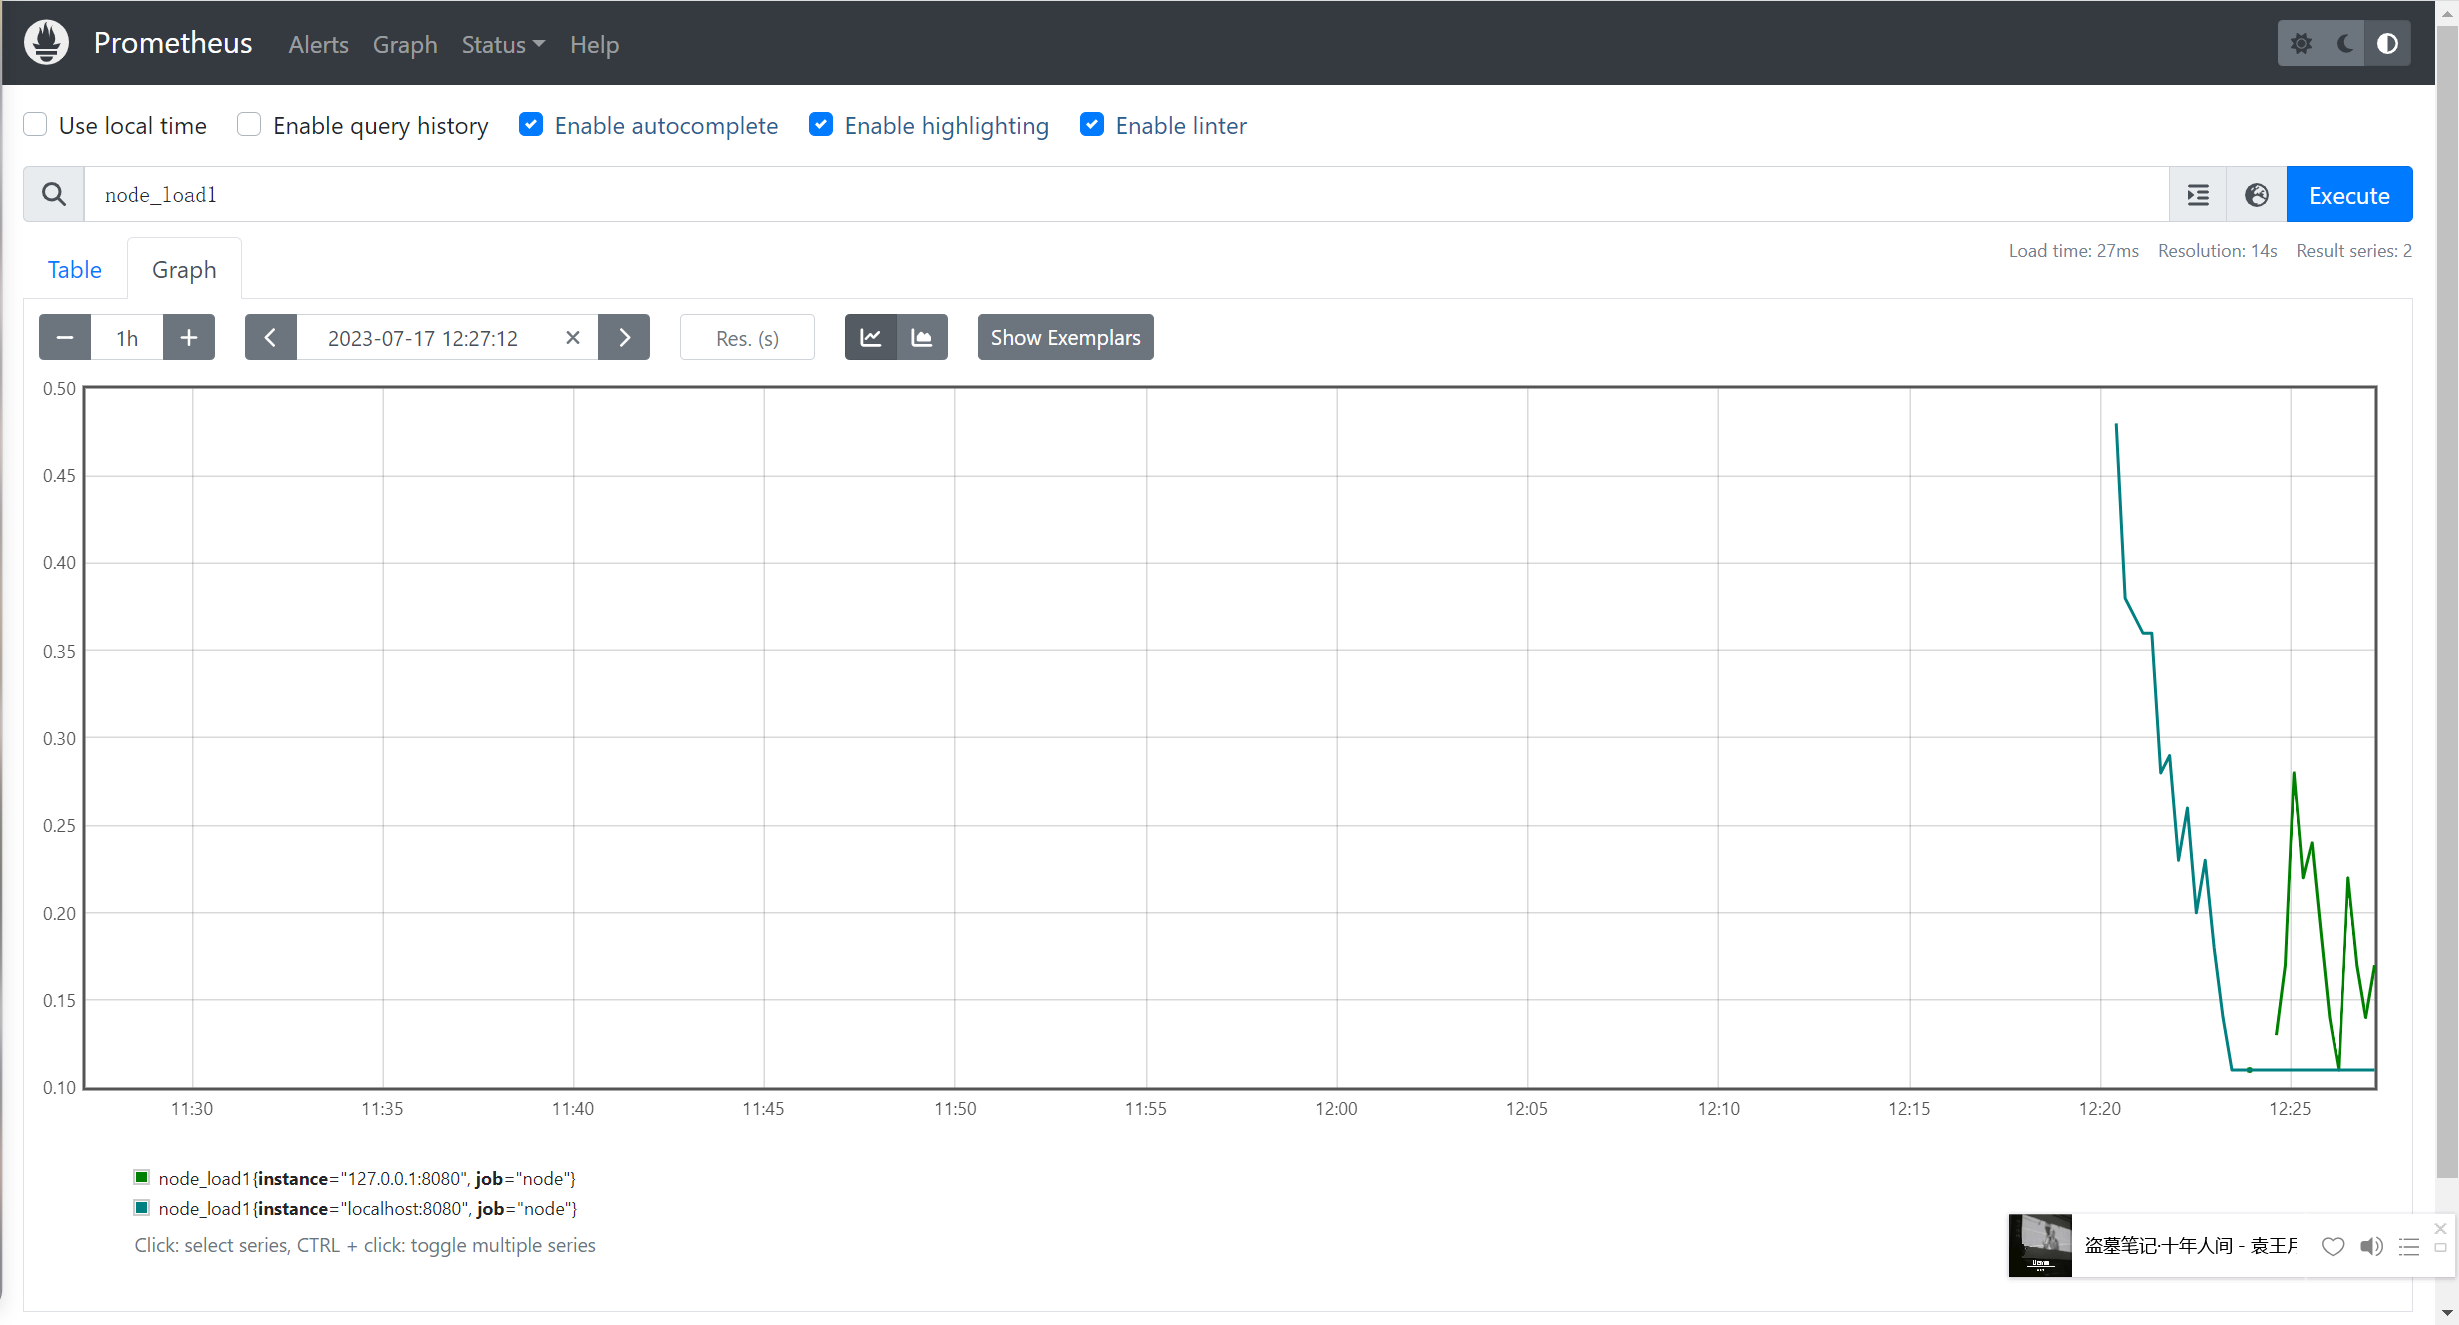
查看 NodeExporter 节点所在机器 CPU 1 分钟的负载情况,可以输入 node_load1 即可查看.
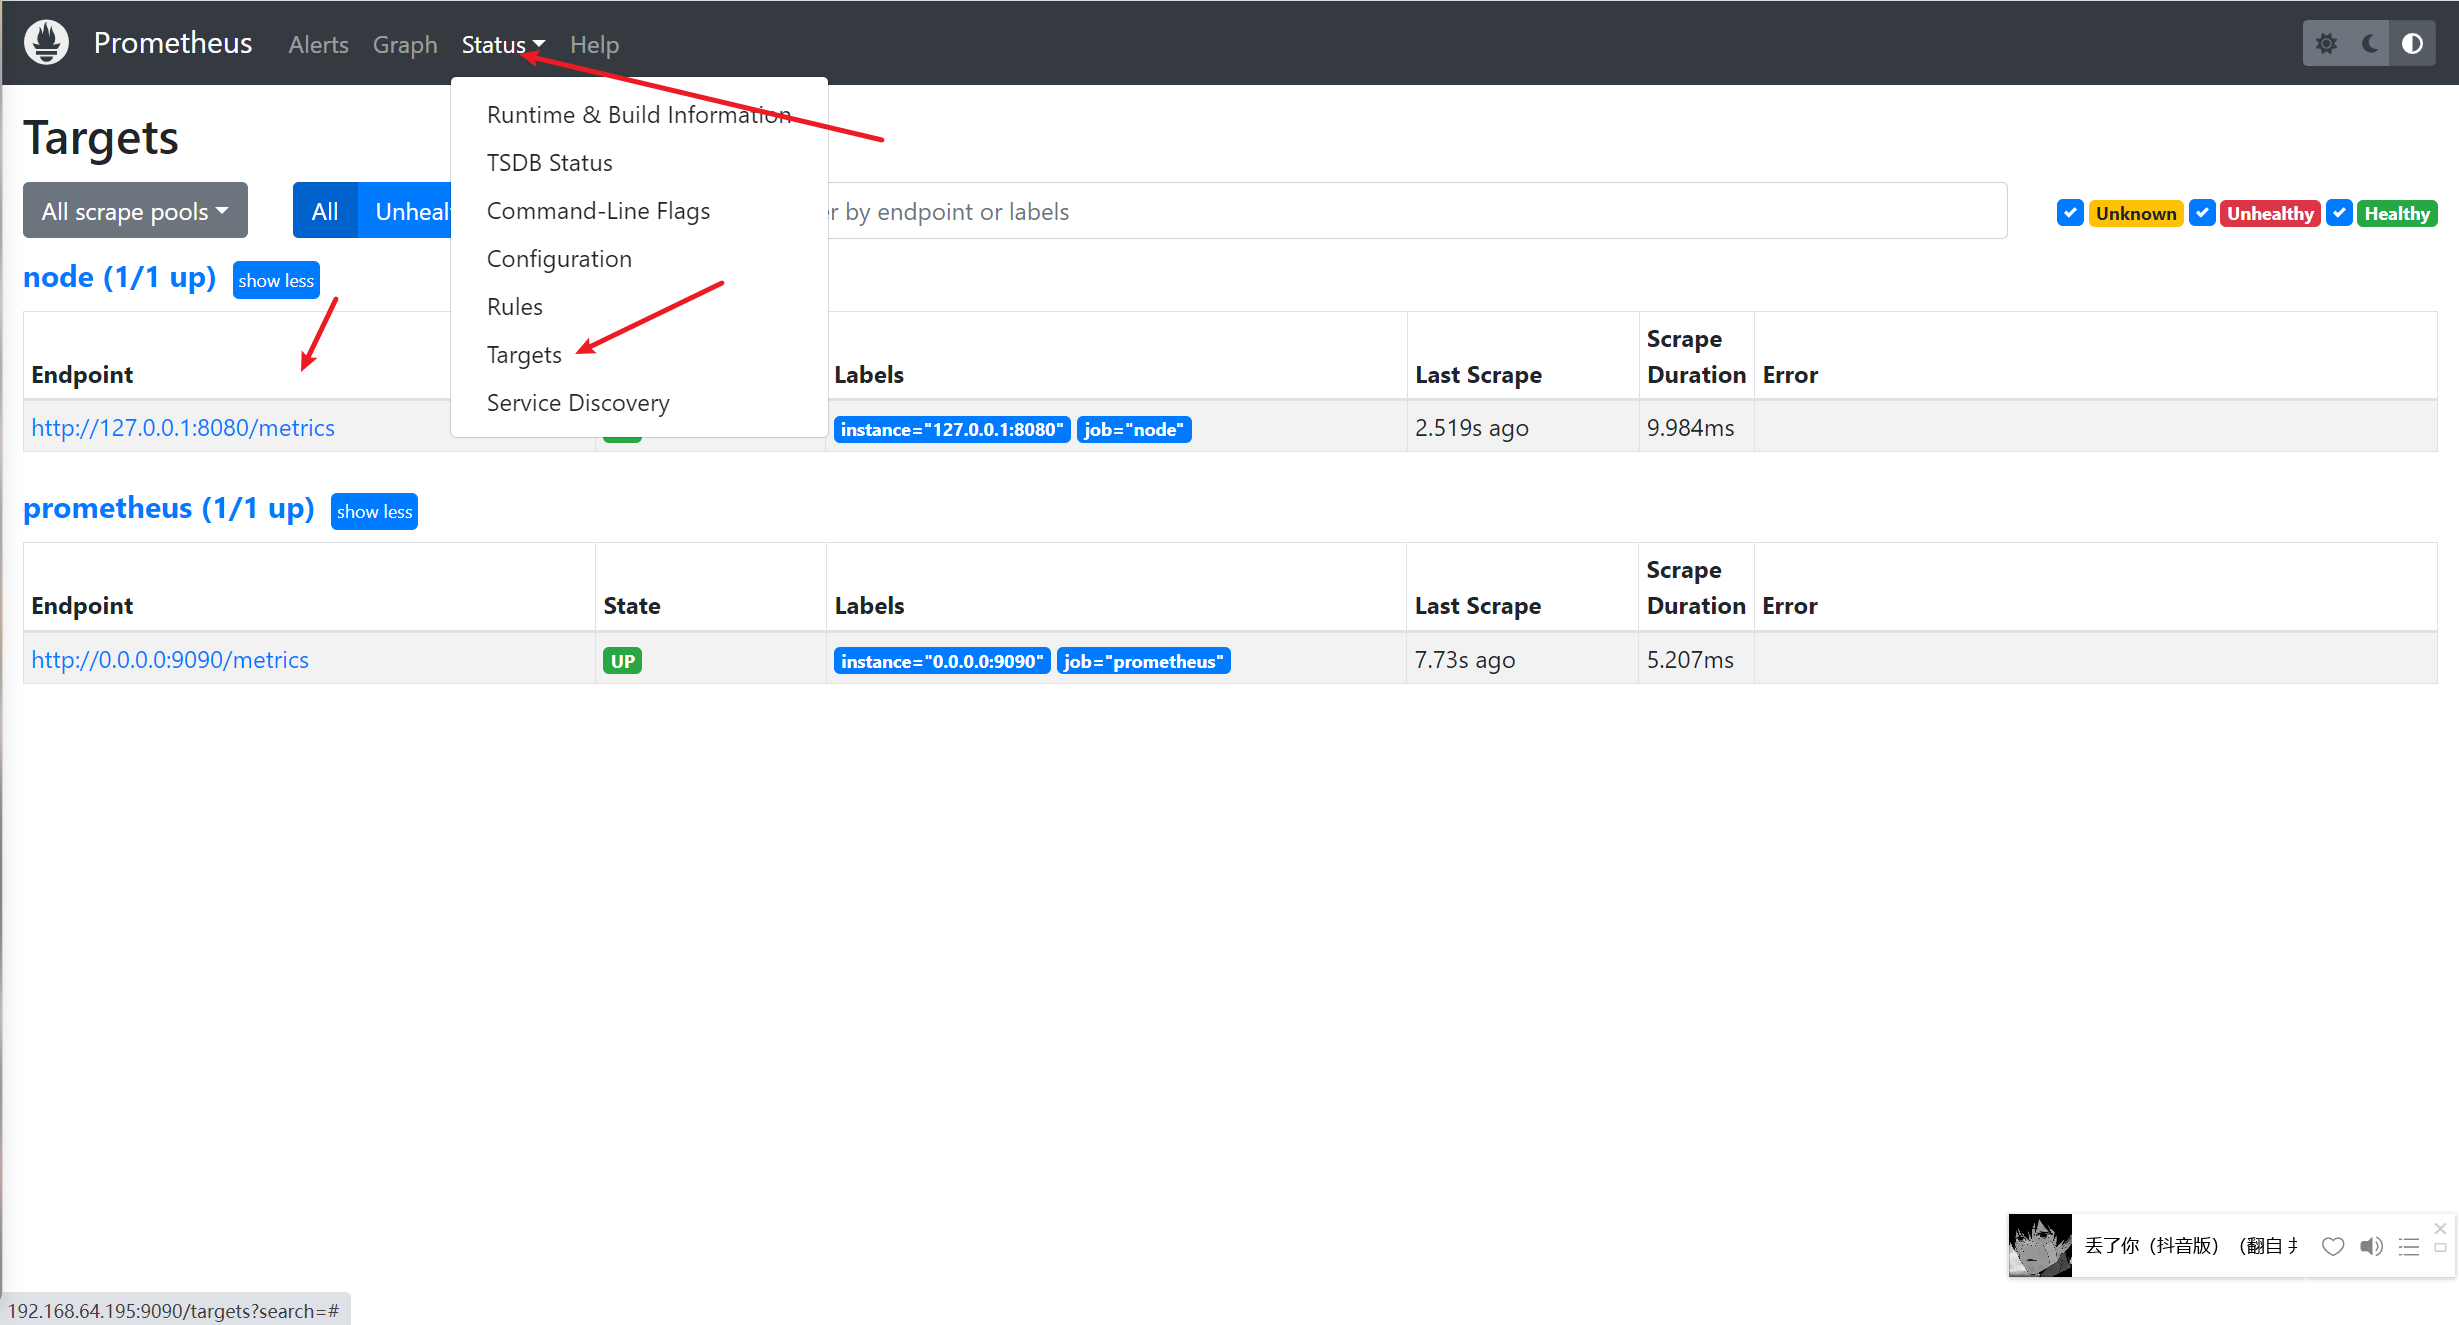
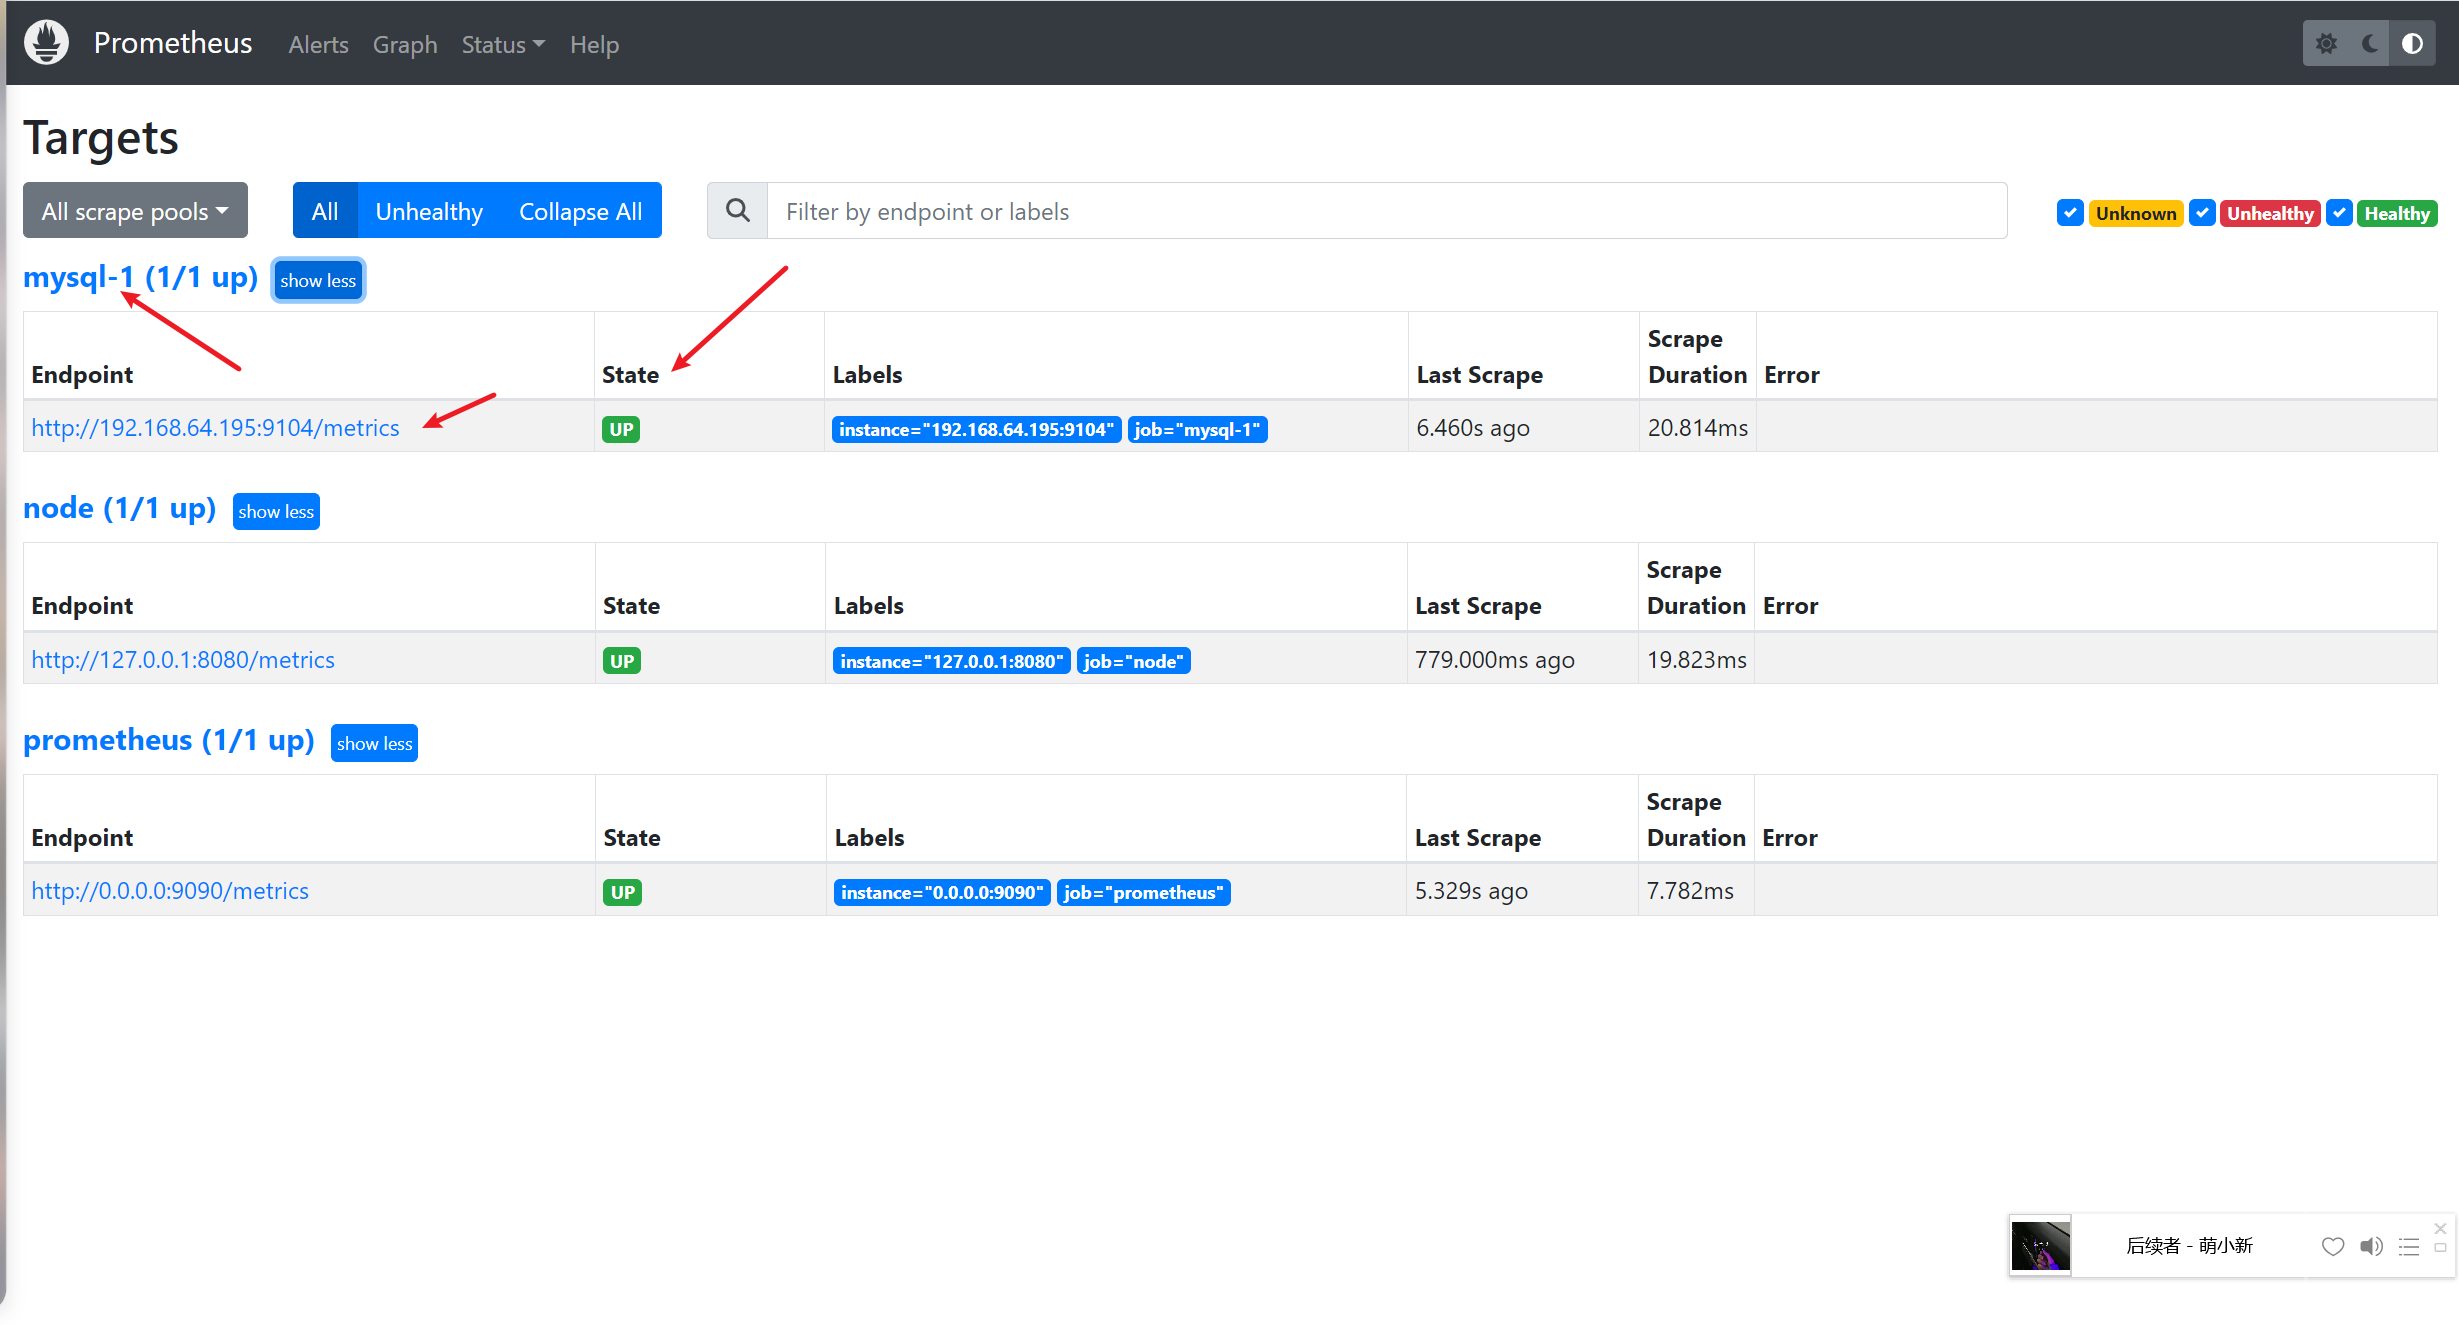
点Status–>Targets–>就可以看到监控的本机
到这里,我们基本上为完成了数据的收集过程,即数据从业务侧收集到 Prometheus 侧,并且还学会了如何使用 Prometheus 自带的控制台.
MysqldExporter监控MySQL 下载 MysqldExporter 在被管理MySQL服务器上安装mysqld_exporter组件
1
2
3
4
5
6
7
8
9
10
11
12
13
14
15
16
17
18
19
20
21
22
23
24
25
26
27
28
29
30
31
32
33
34
35
36
37
38
39
40
41
42
43
44
45
46
47
48
49
50
51
cd /optwget https://github.com/prometheus/mysqld_exporter/releases/download/v0.15.0/mysqld_exporter-0.15.0.linux-amd64.tar.gz tar -zxvf mysqld_exporter-0.15.0.linux-amd64.tar.gz mv mysqld_exporter-0.15.0.linux-amd64 mysqld_exporteryum install mariadb mariadb-server -y systemctl start mariadb systemctl enable mariadb mysql_secure_installation Remove anonymous users ? [Y/n] y Disallow root login remotely? [Y/n] n Remove test database and access to it? [Y/n] y Reload privilege tables now? [Y/n] y mysql> grant select ,replication client, process on *.* to 'mysql_monitor' @'localhost' identified by '123' ; Query OK, 0 rows affected, 1 warning (0.00 sec) mysql> flush privileges; Query OK, 0 rows affected (0.03 sec) mysql> exit Bye vim /opt/mysqld_exporter/.my.cnf [client] user=mysql_monitor password=123 nohup /opt/mysqld_exporter/mysqld_exporter --config.my-cnf=/opt/mysqld_exporter/.my.cnf &netstat -lnptu | grep 9104 tcp6 0 0 :::9104 :::* LISTEN 32688/mysqld_export
添加监控项 回到prometheus服务器的配置文件里添加被监控的mariadb的配置段
1
2
3
4
5
6
7
vim /opt/prometheus/prometheus.yml - job_name: 'mysql-1' static_configs: - targets: ['192.168.64.195:9104' ]
回到web管理界面点Status–>Targets–>就可以看到监控的MySQL服务器了
查询监控数据 回到主界面搜索mysql相关参数 mysql_global_status_threads_connected
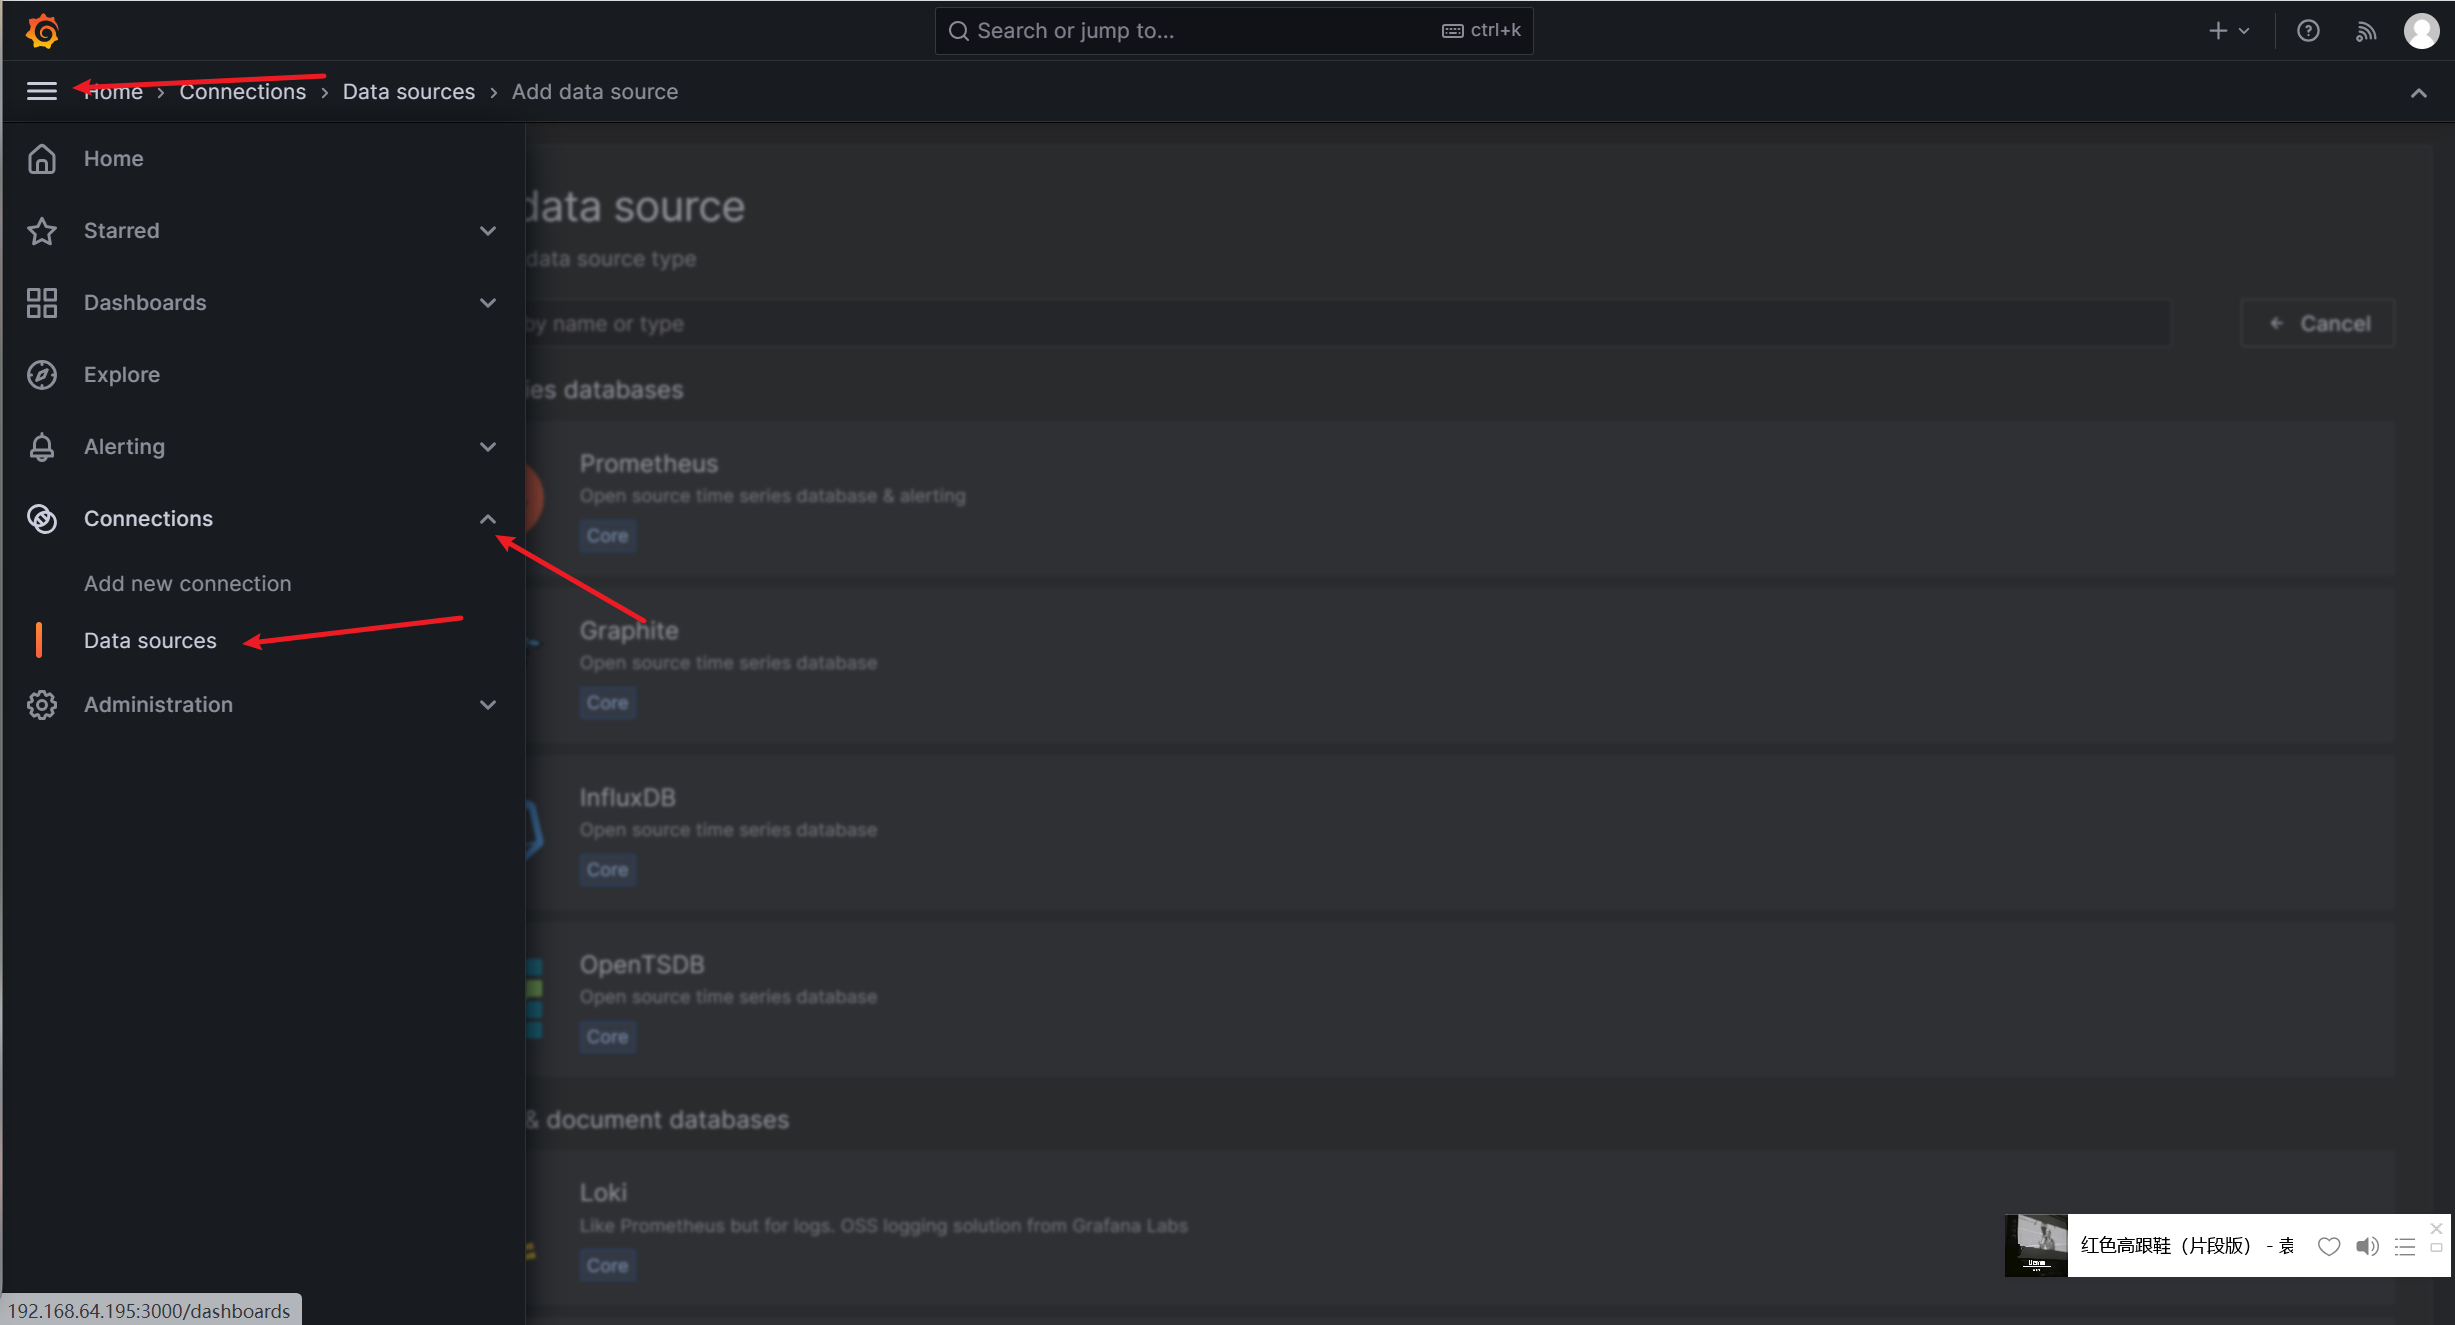
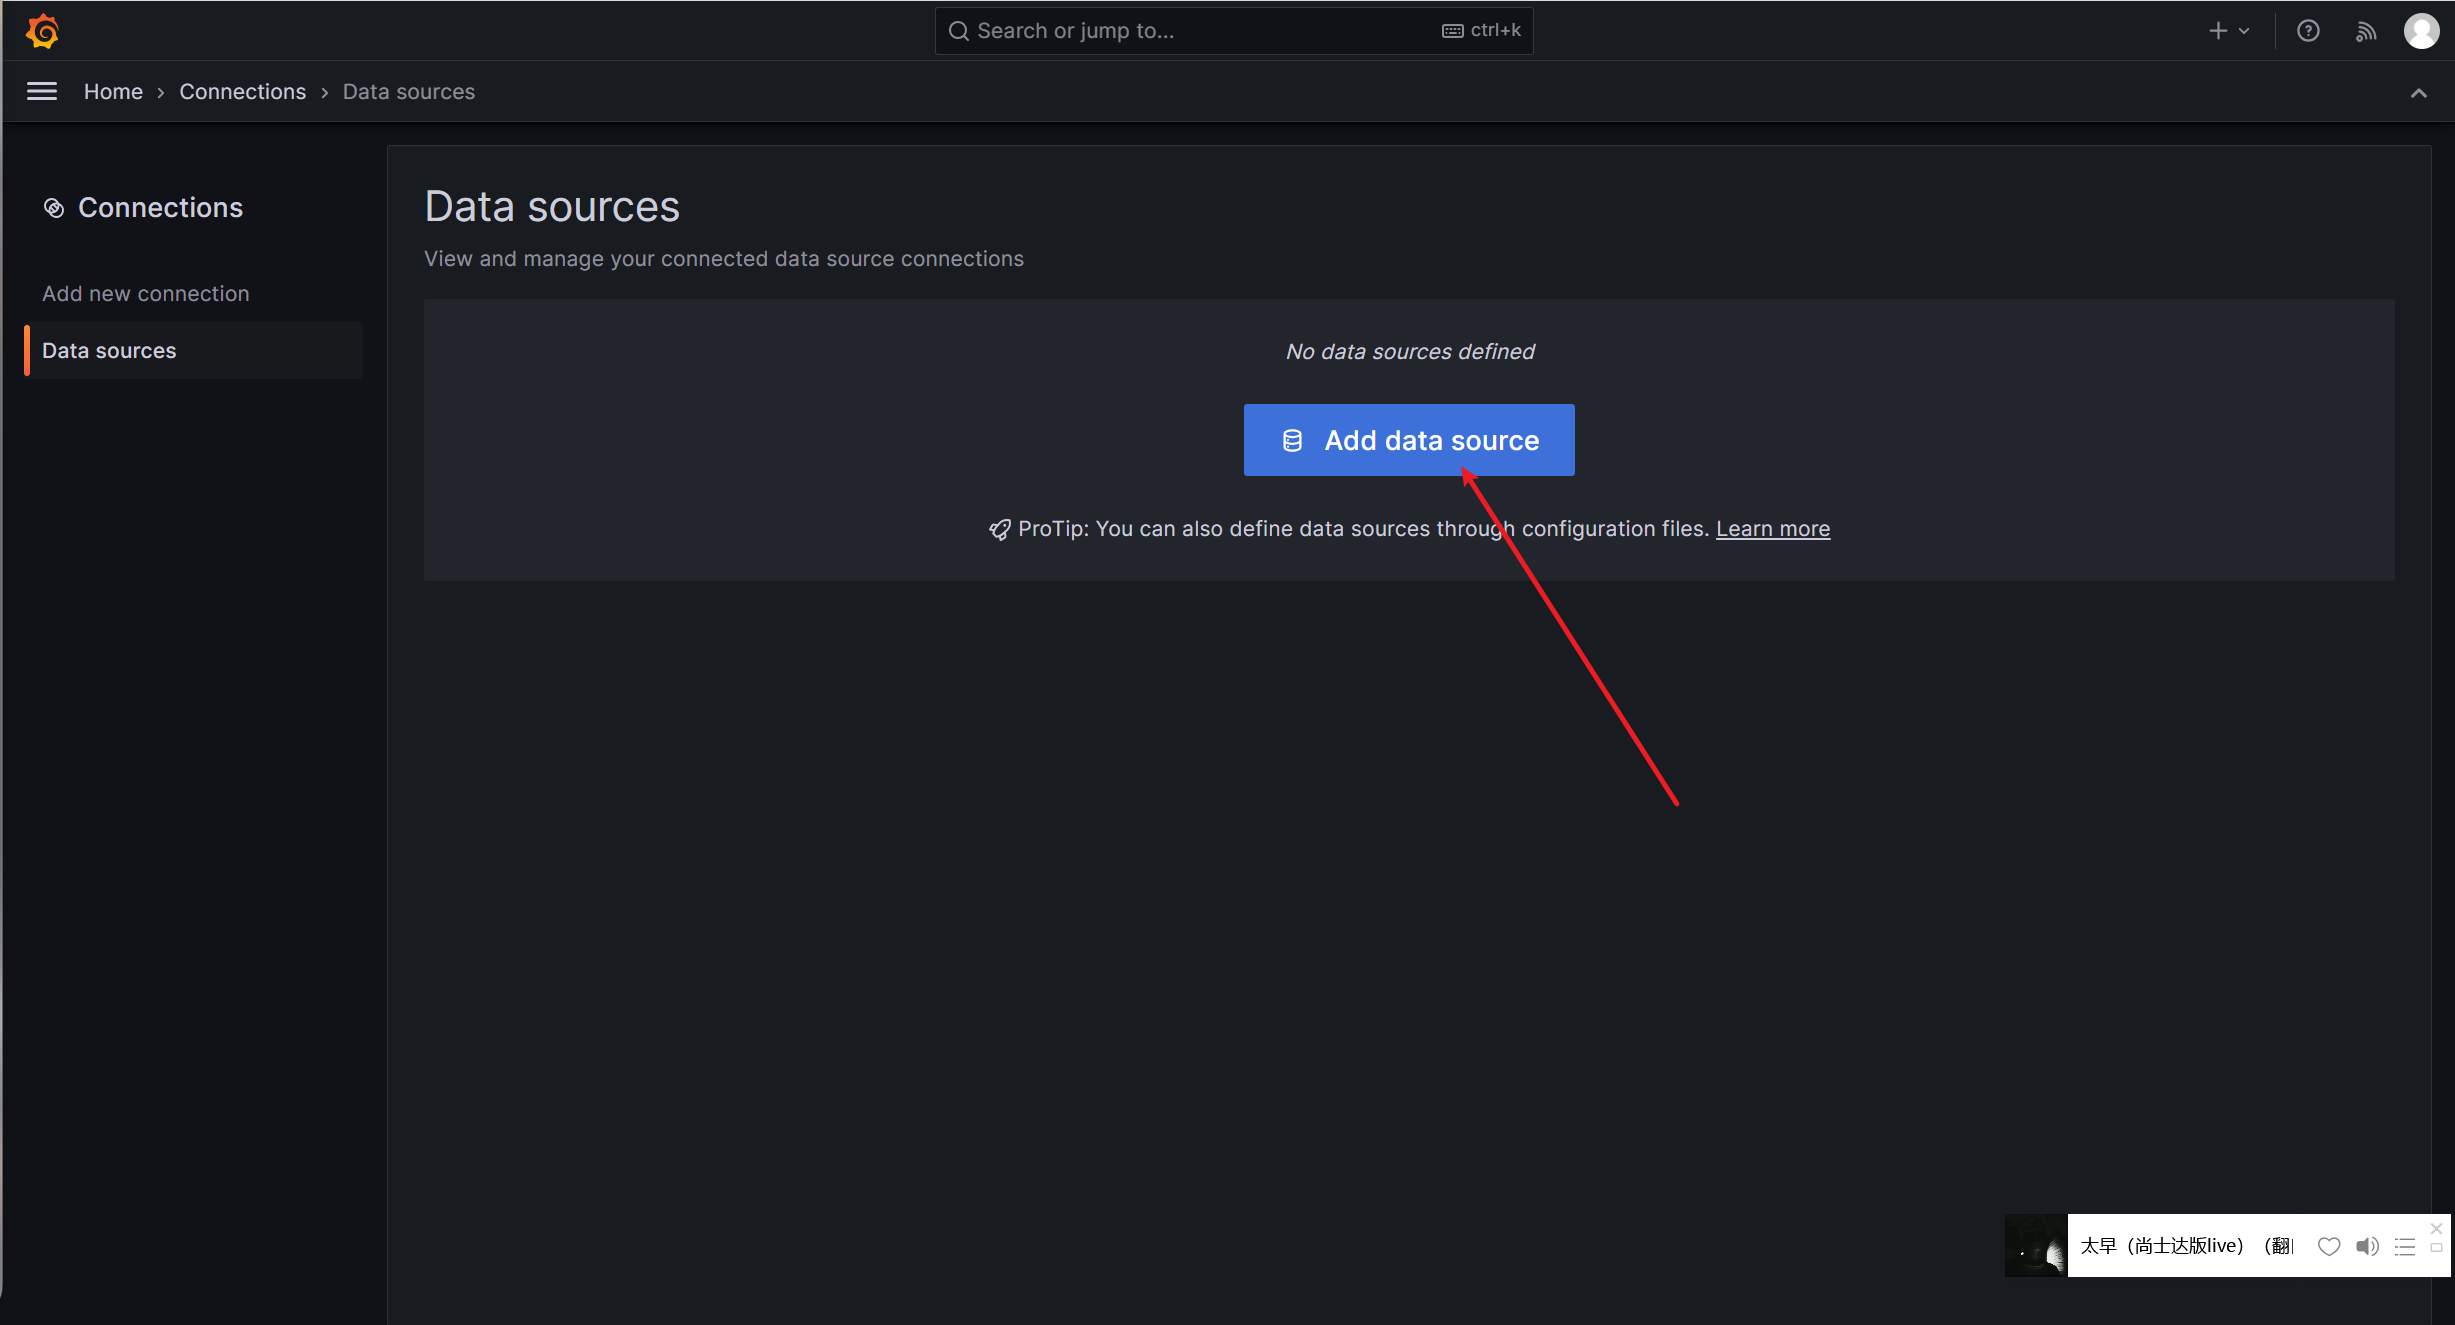
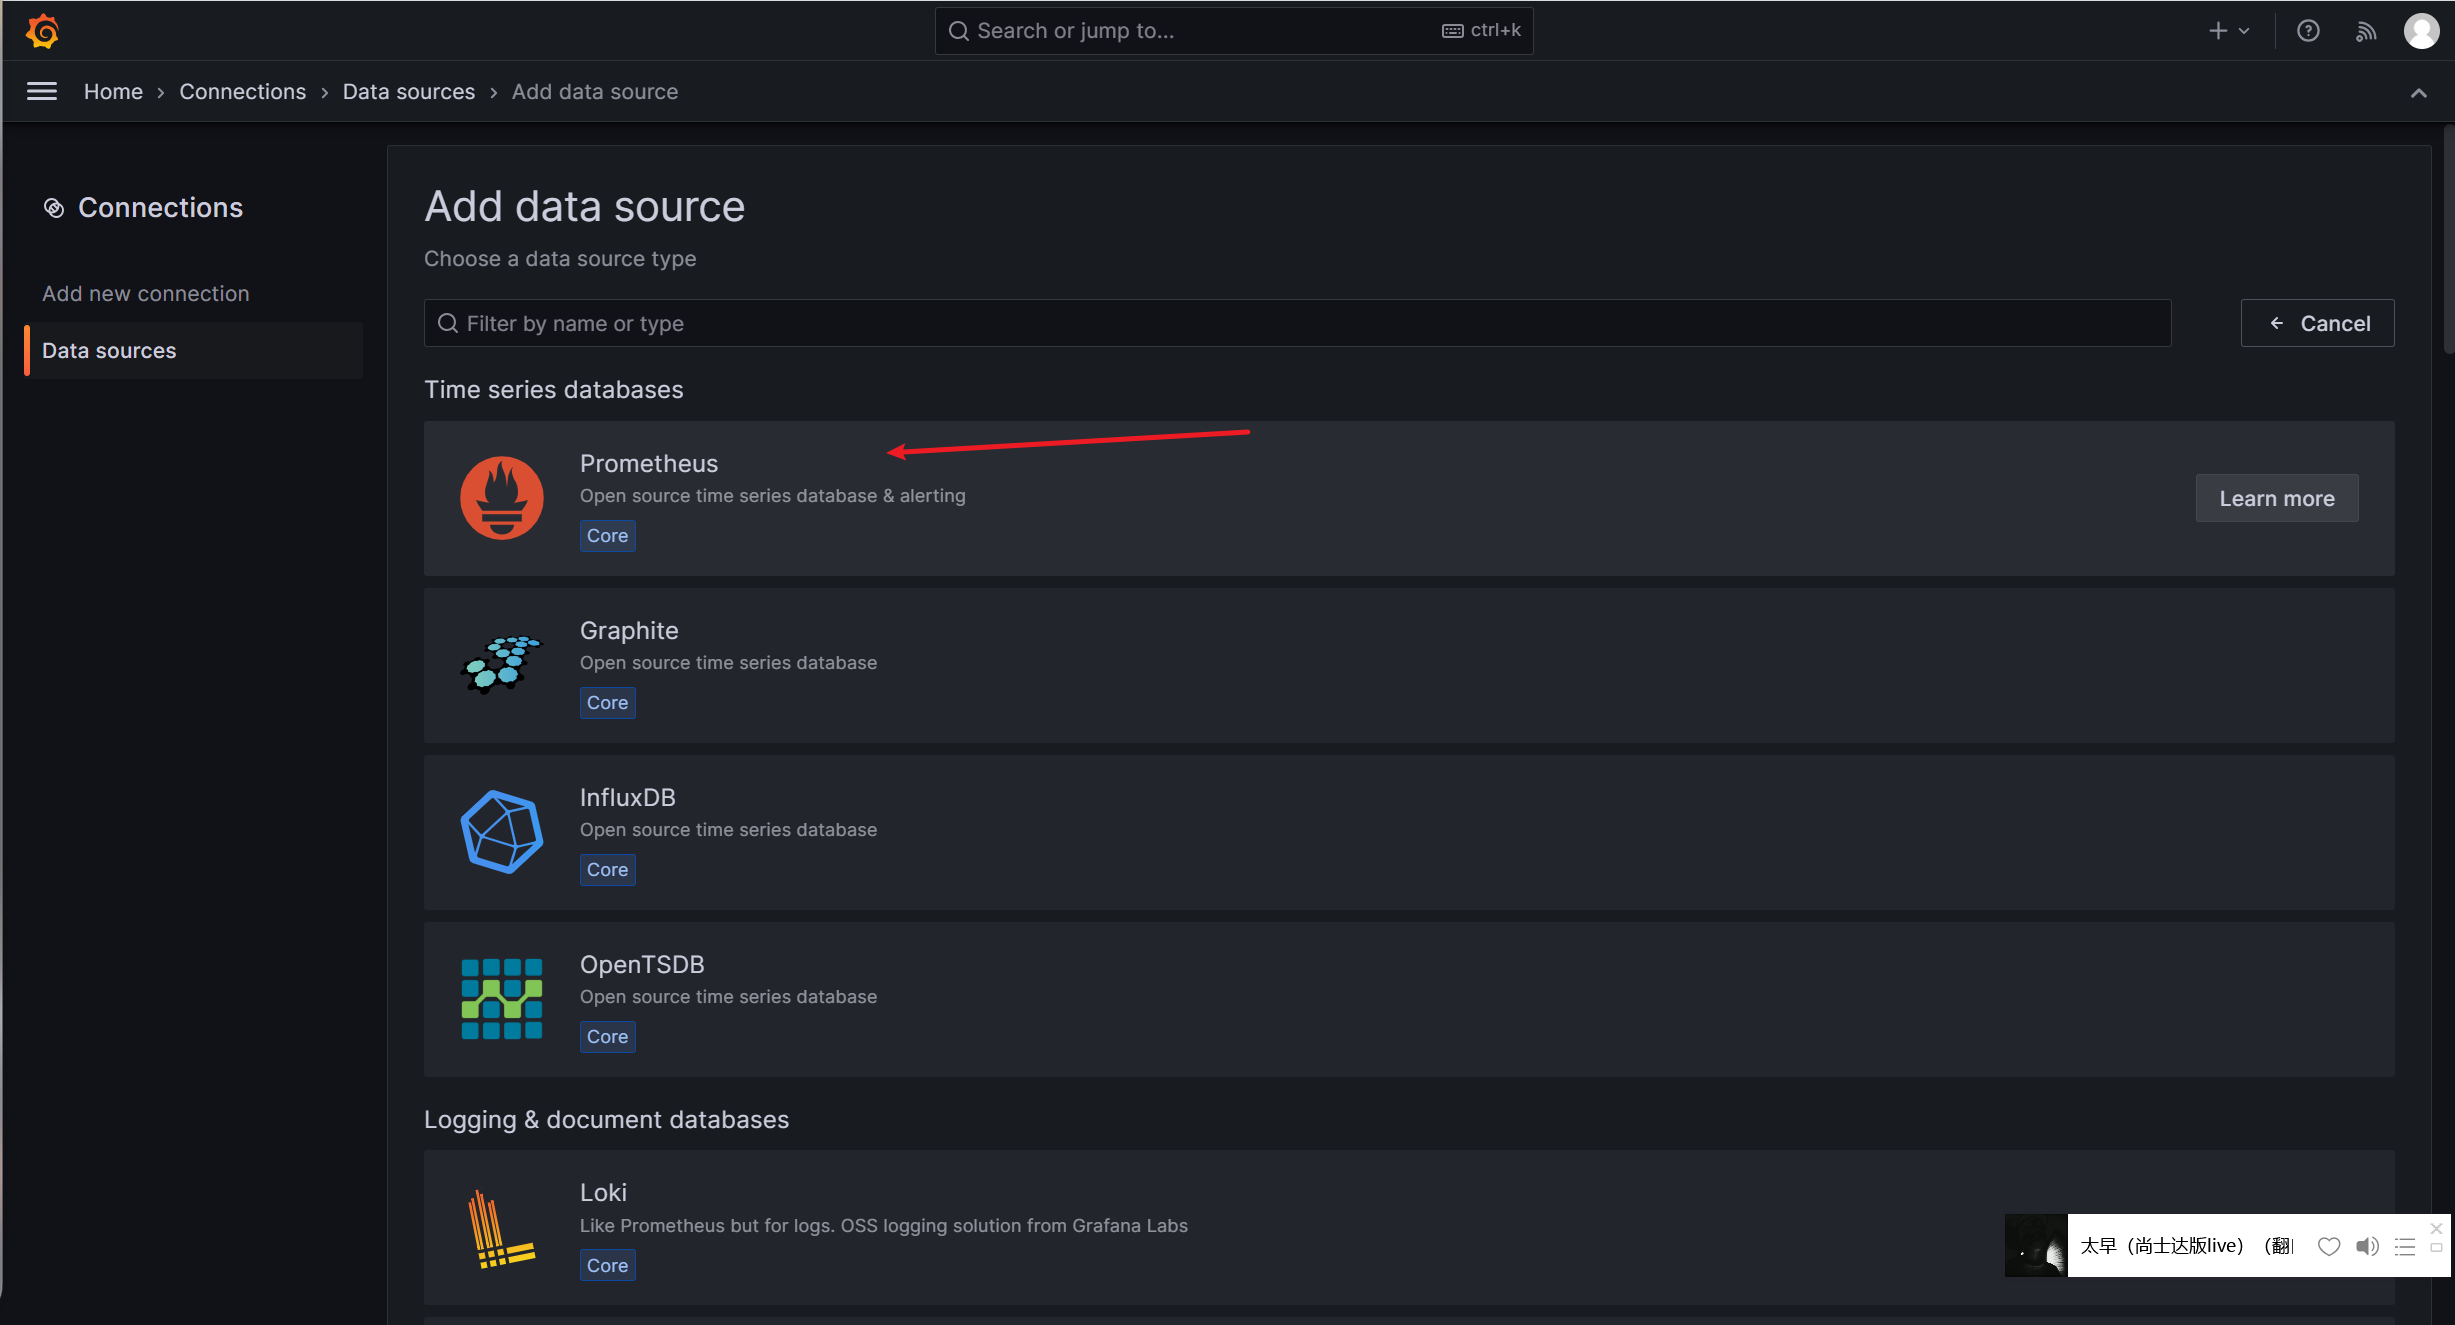
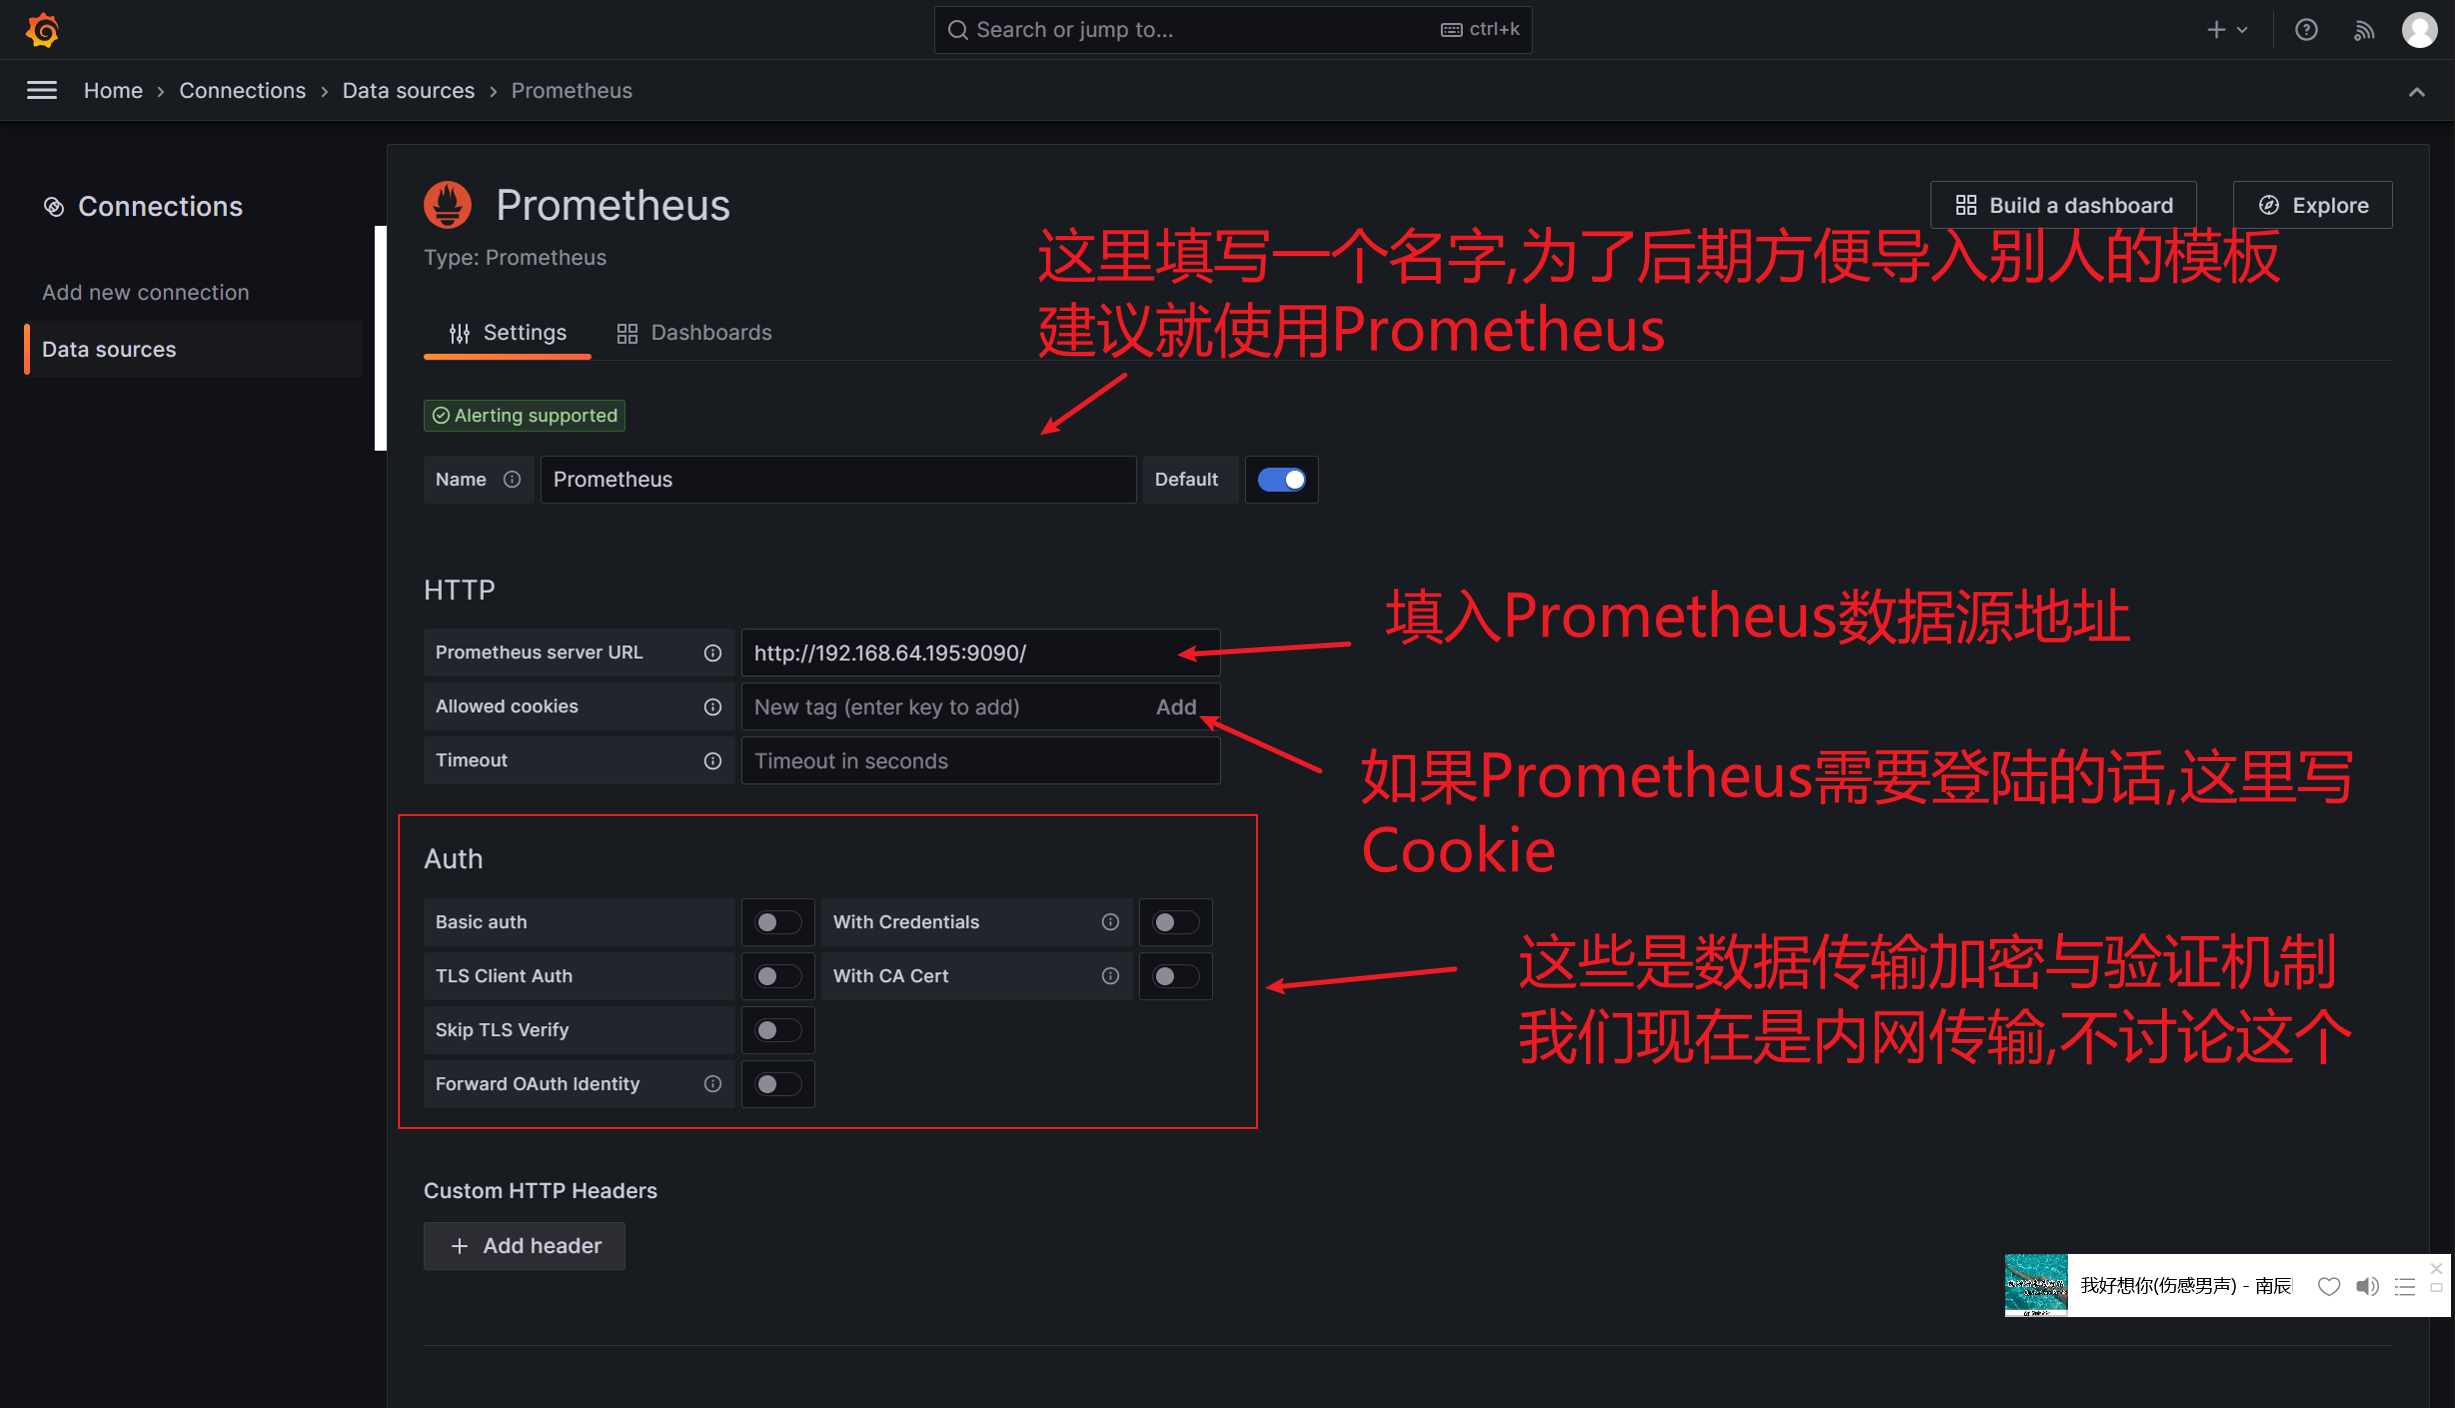
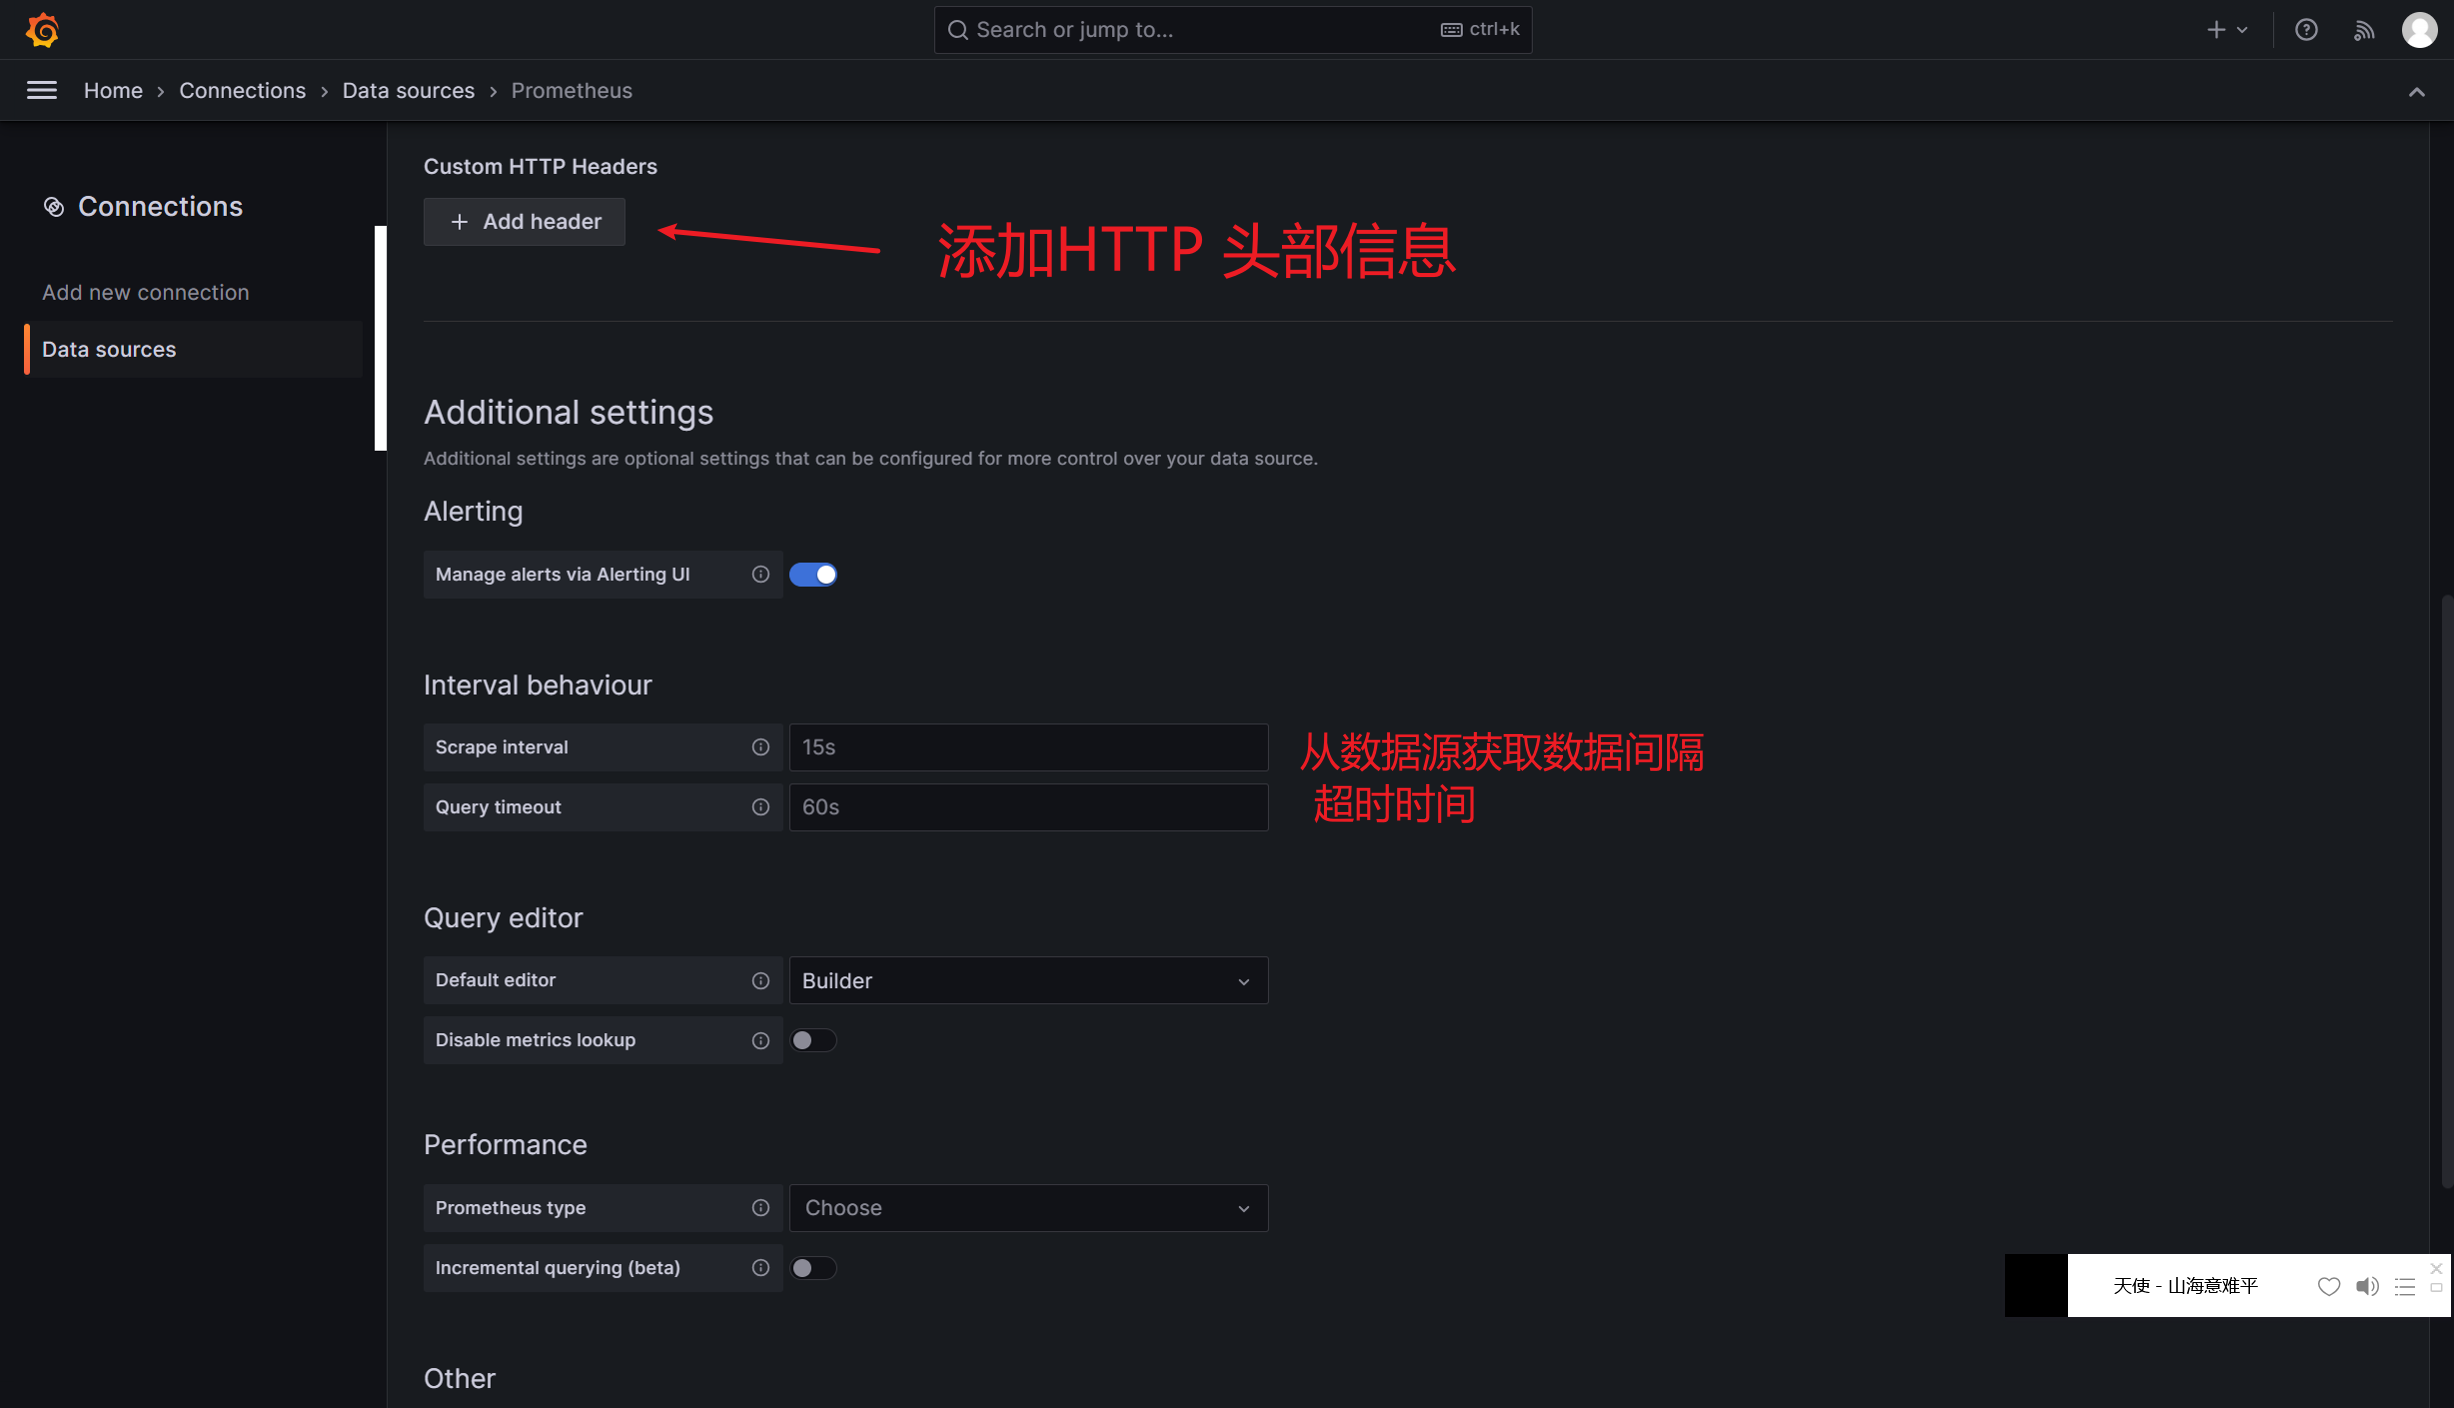
Grafana可视化 Grafana图形显示系统监控数据 在Grafana上添加Prometheus数据源 我们把prometheus服务器收集的数据做为一个数据源添加到grafana,让grafana可以得到prometheus的数据
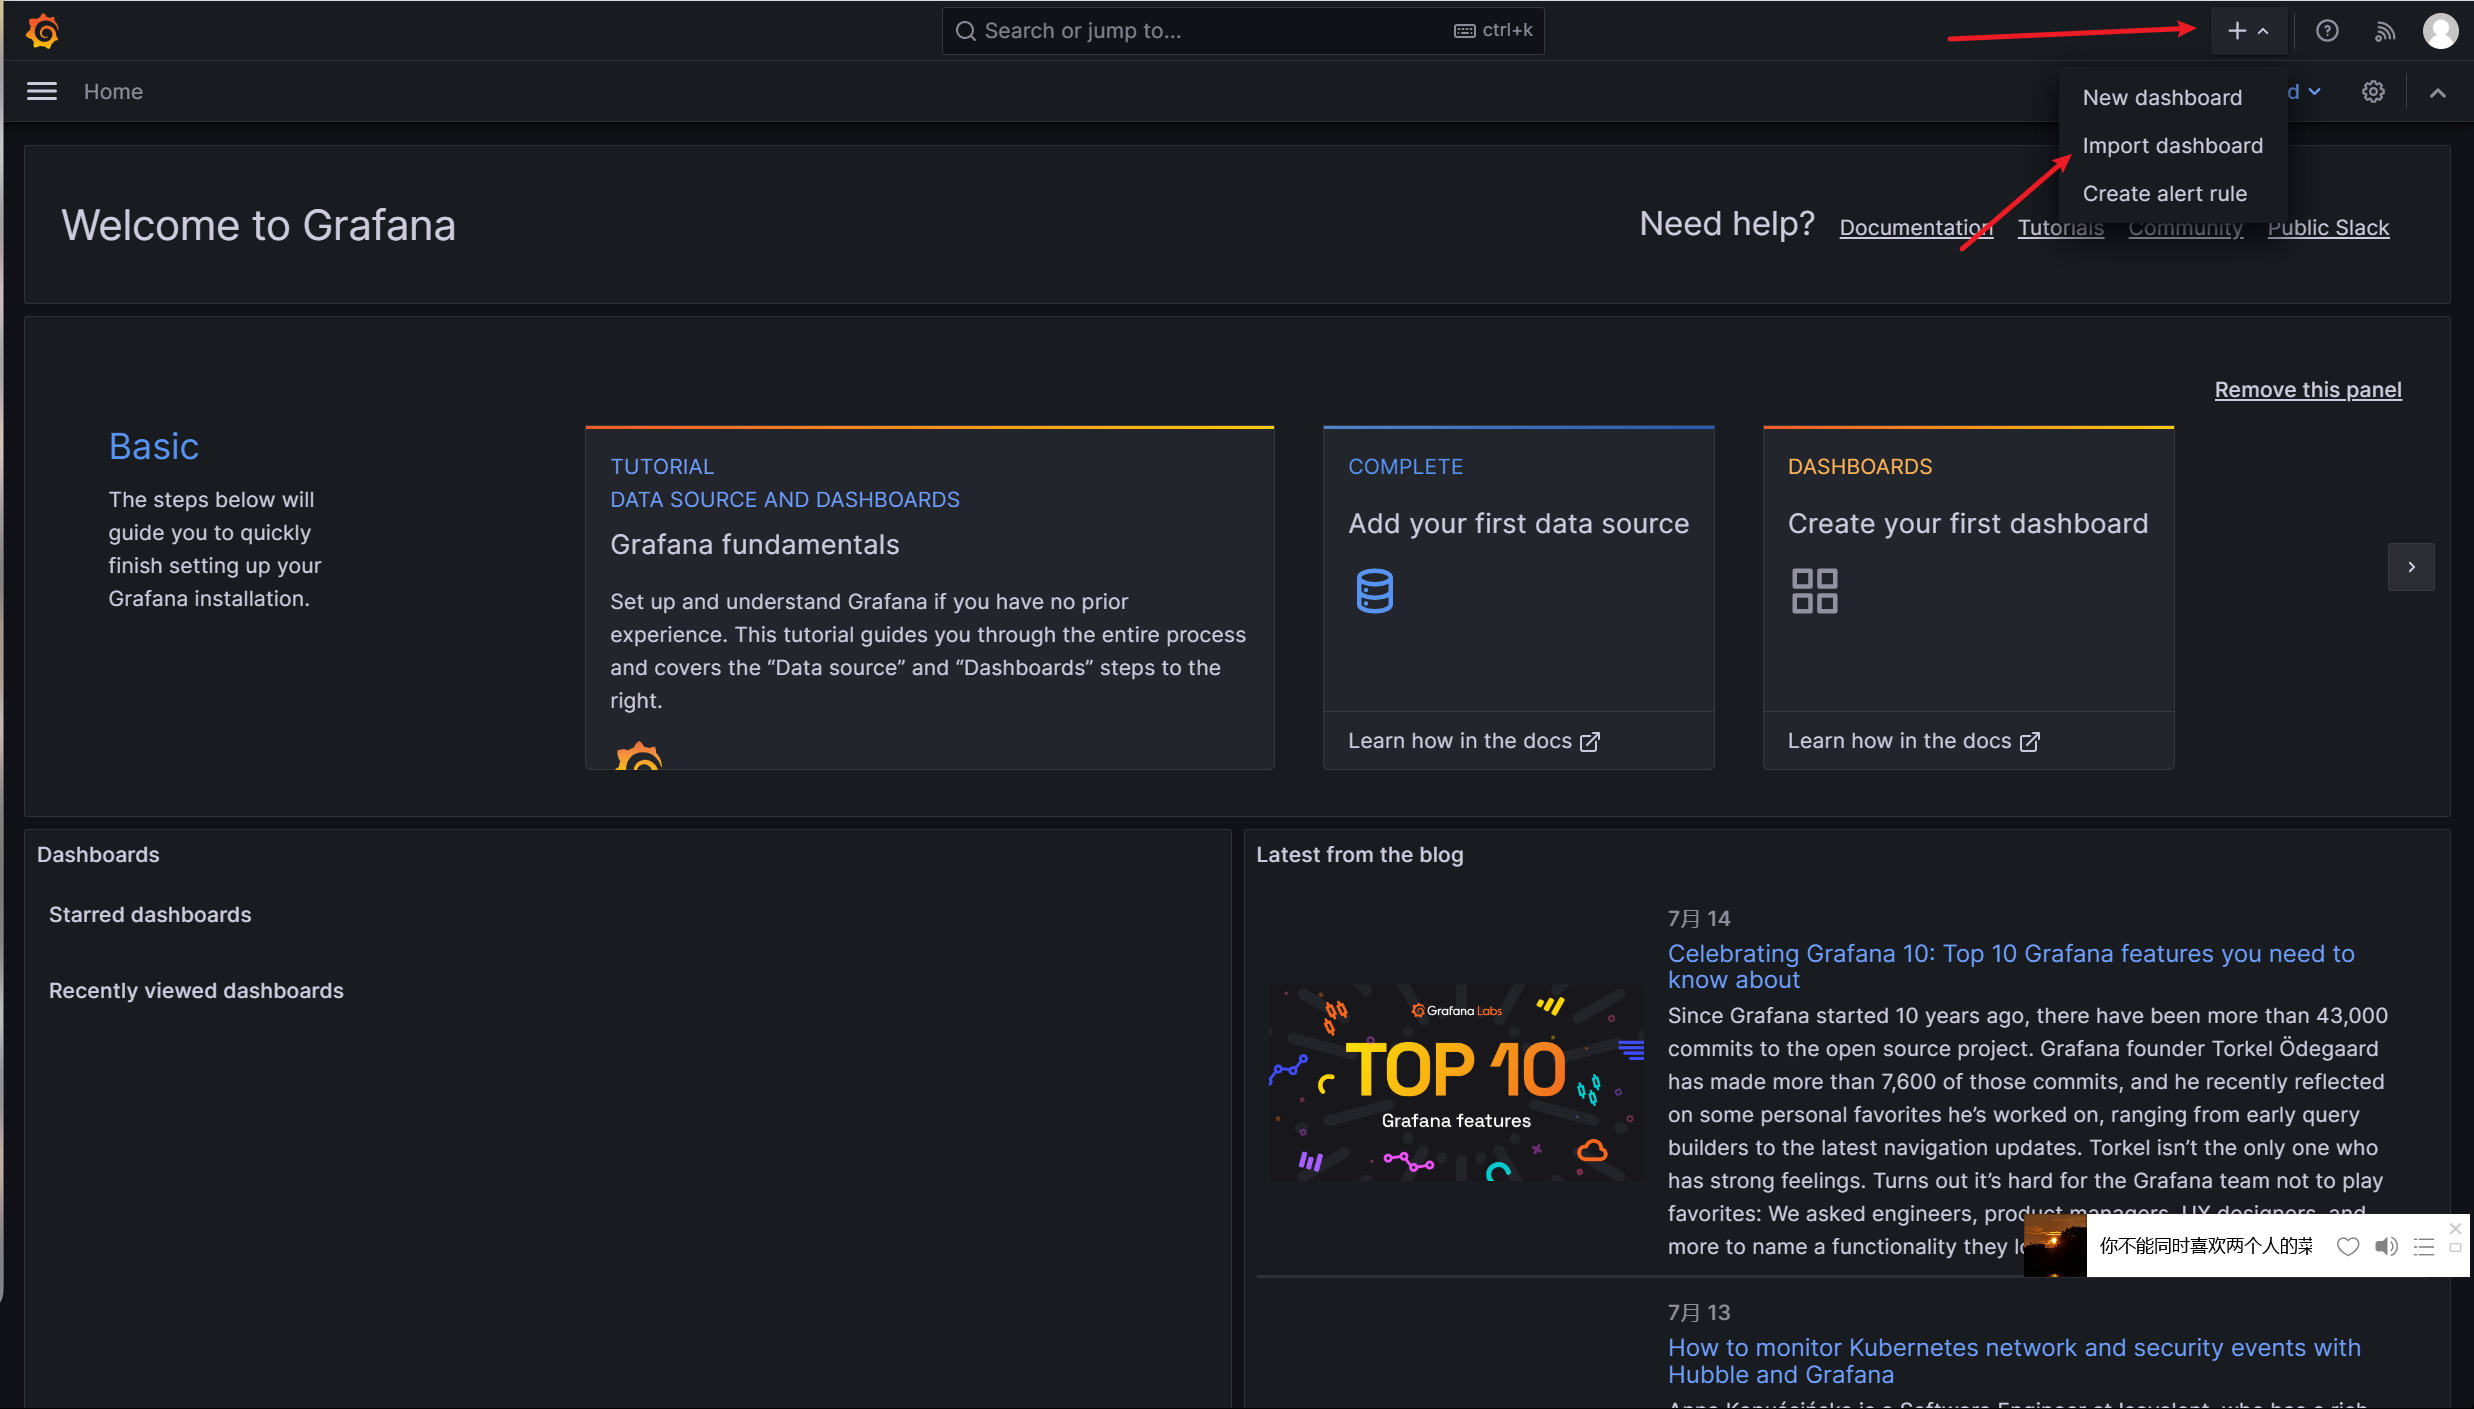
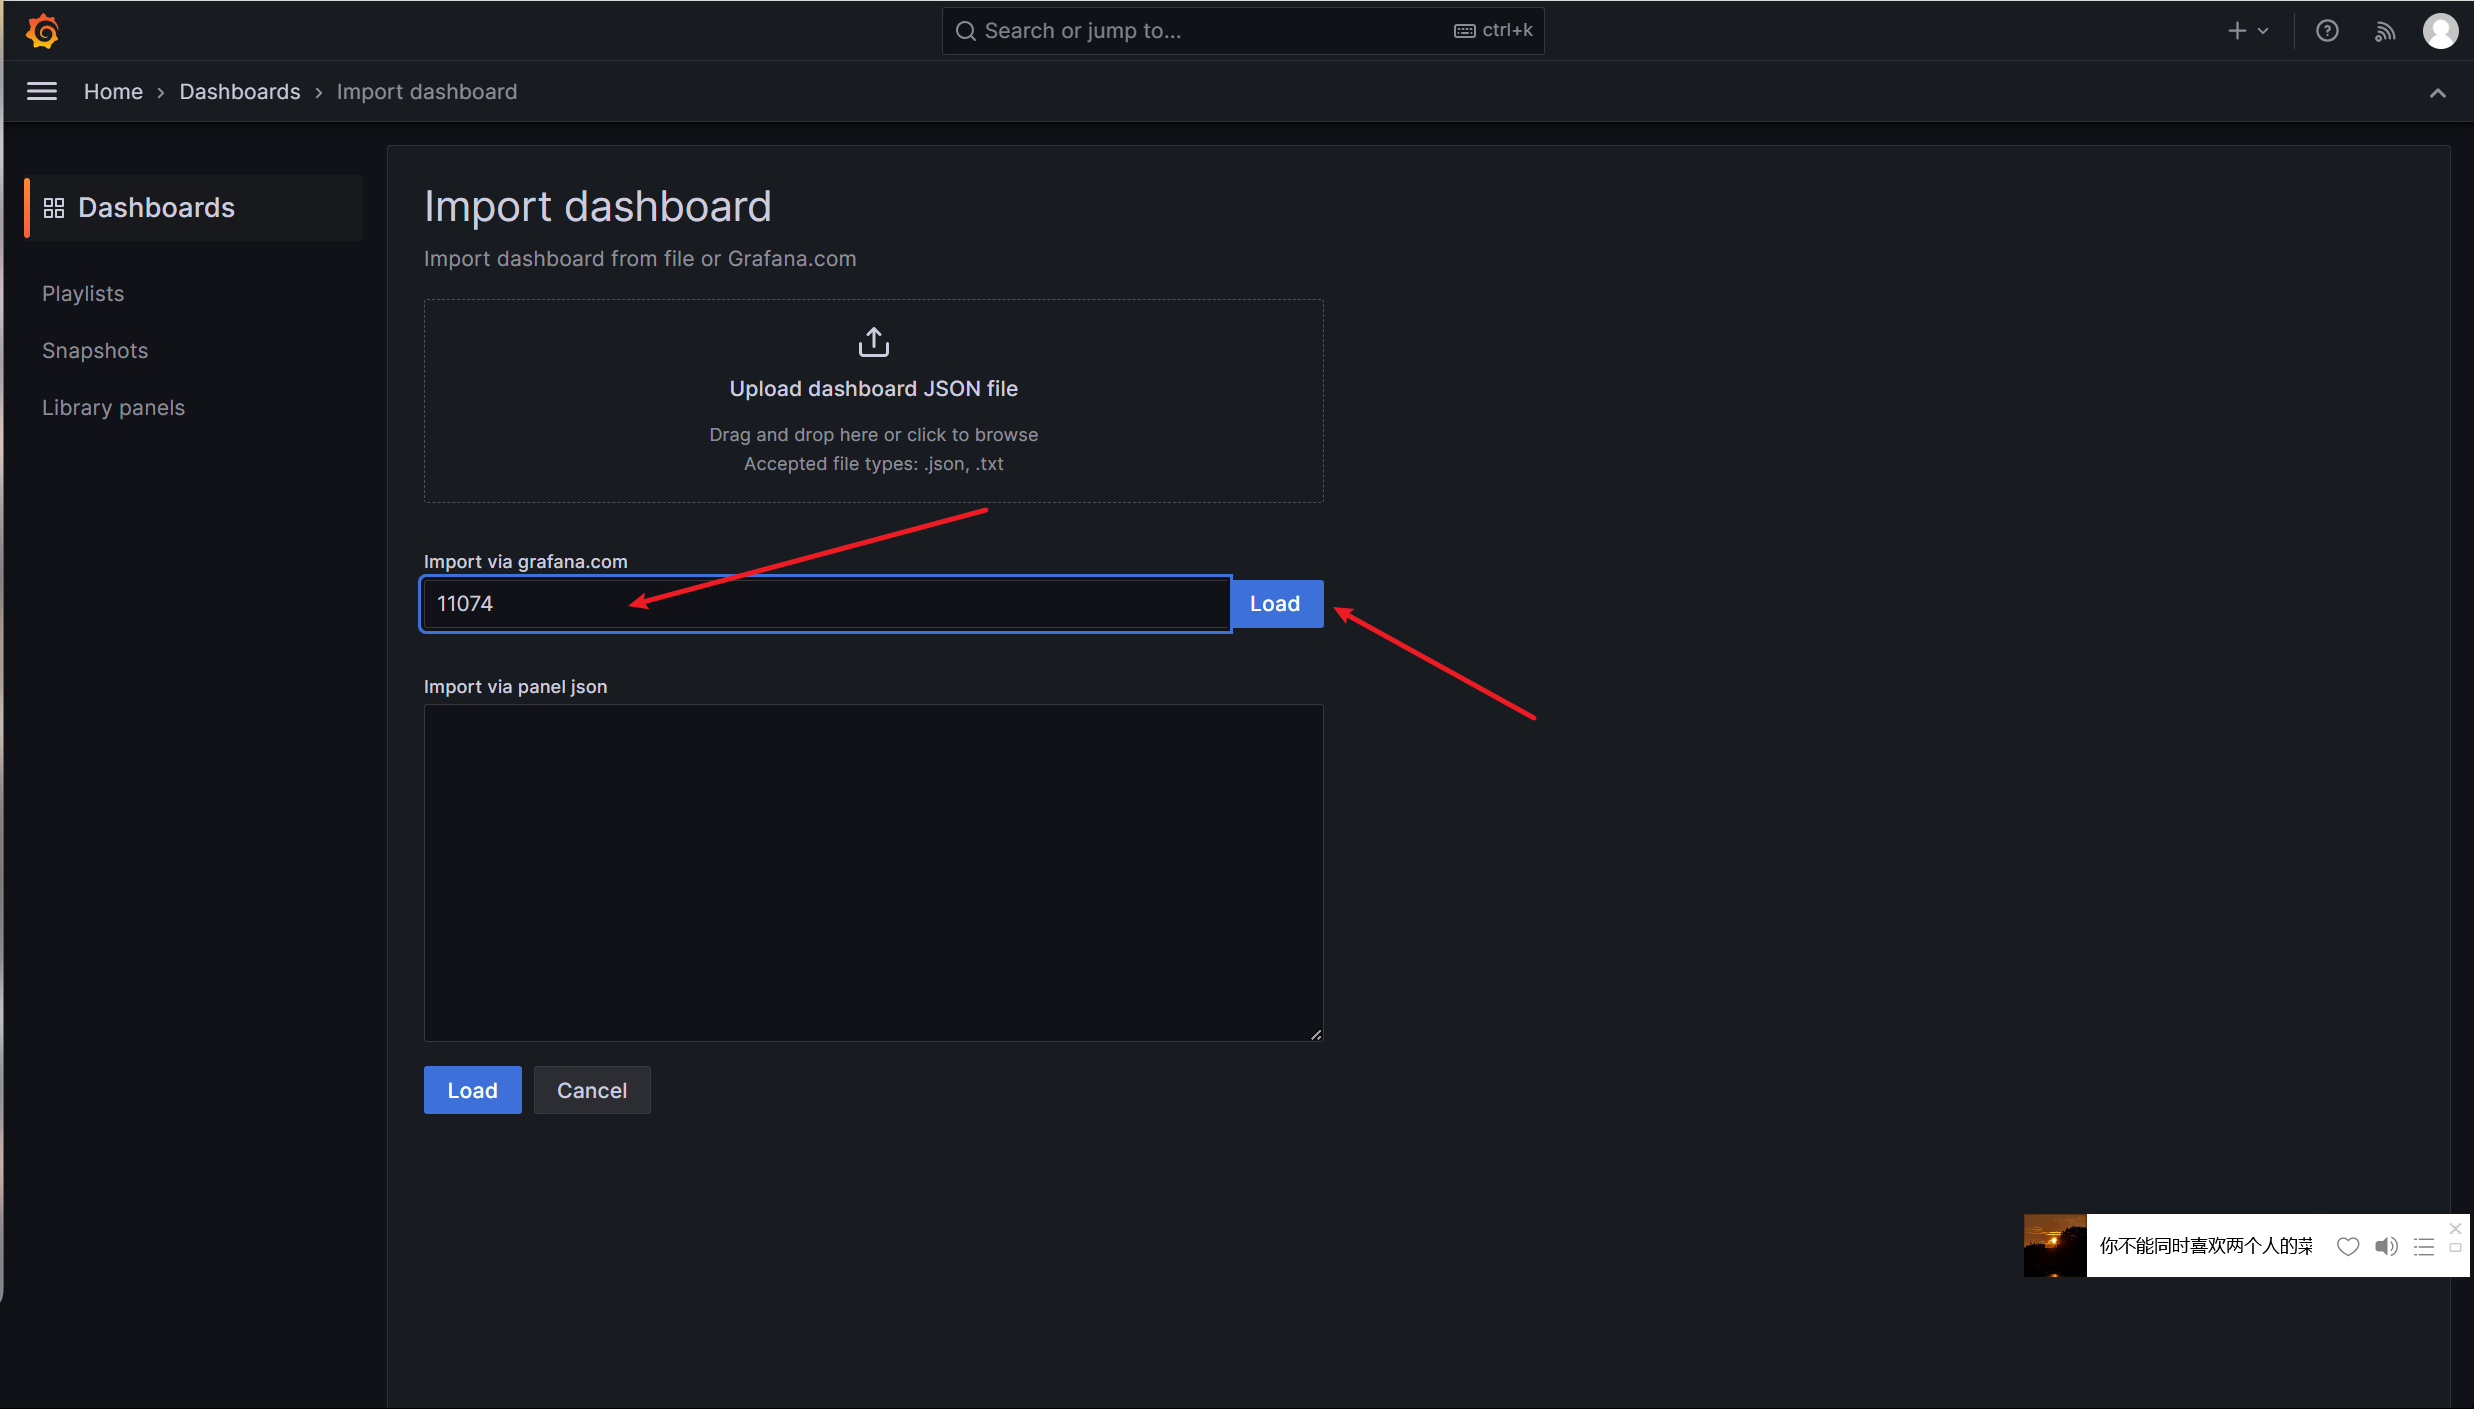
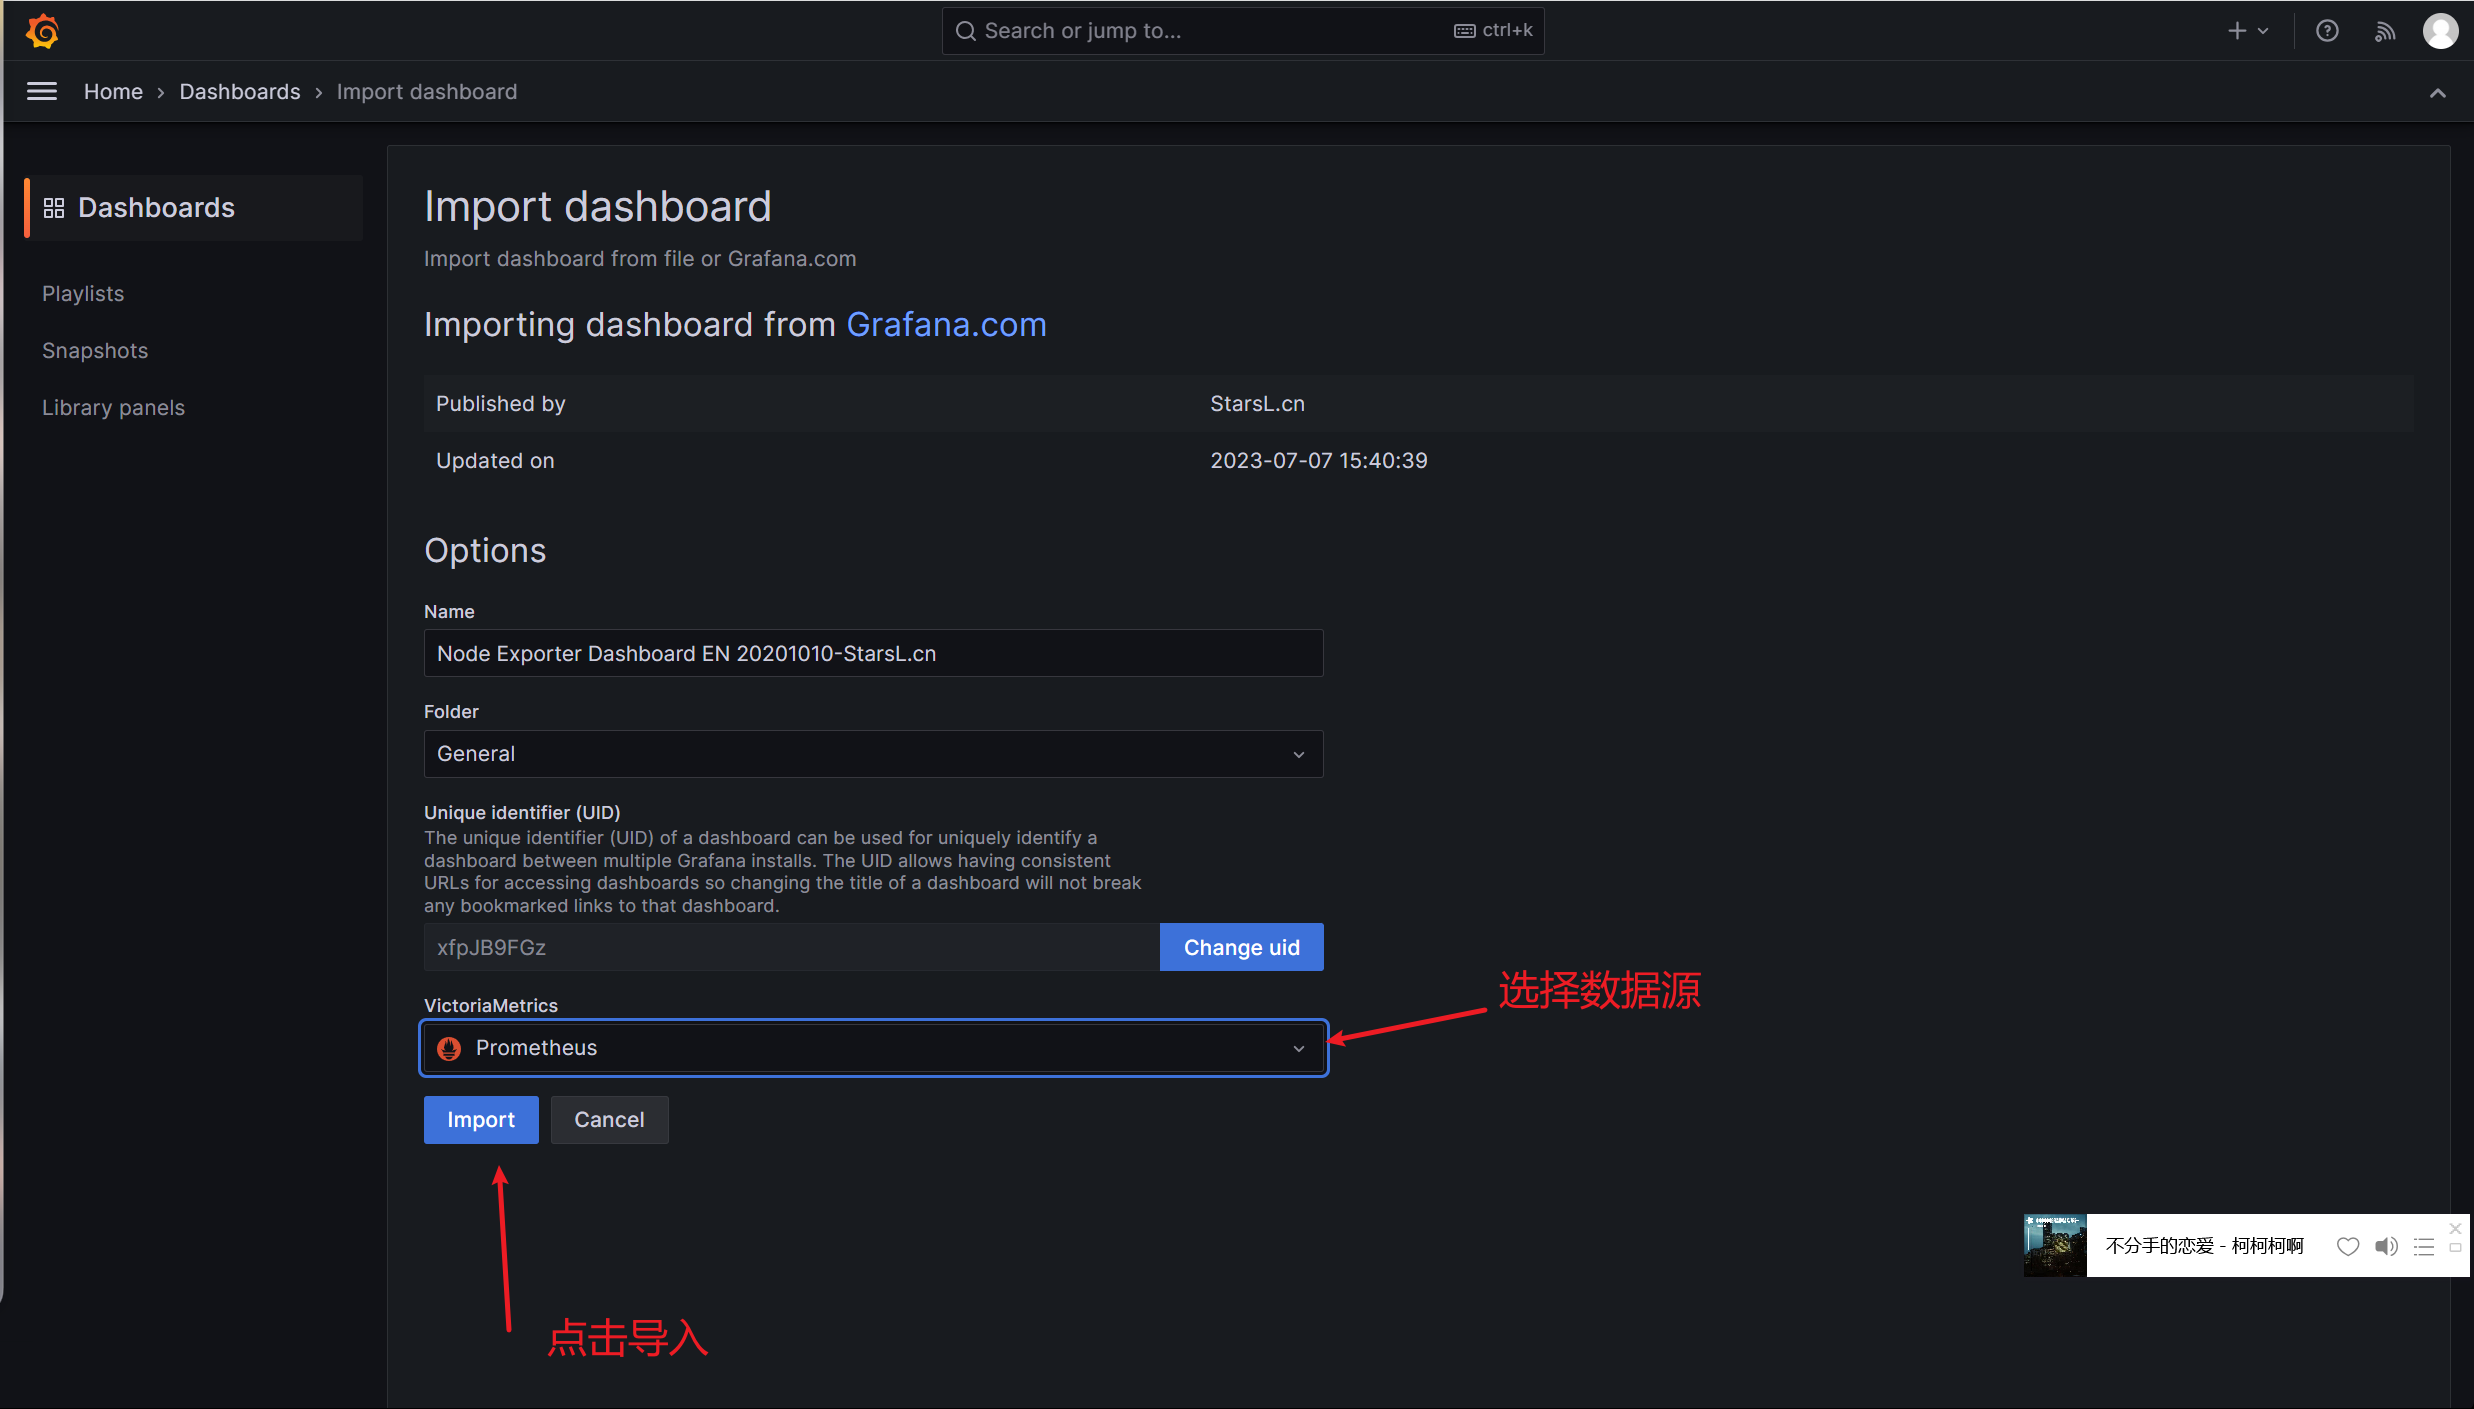
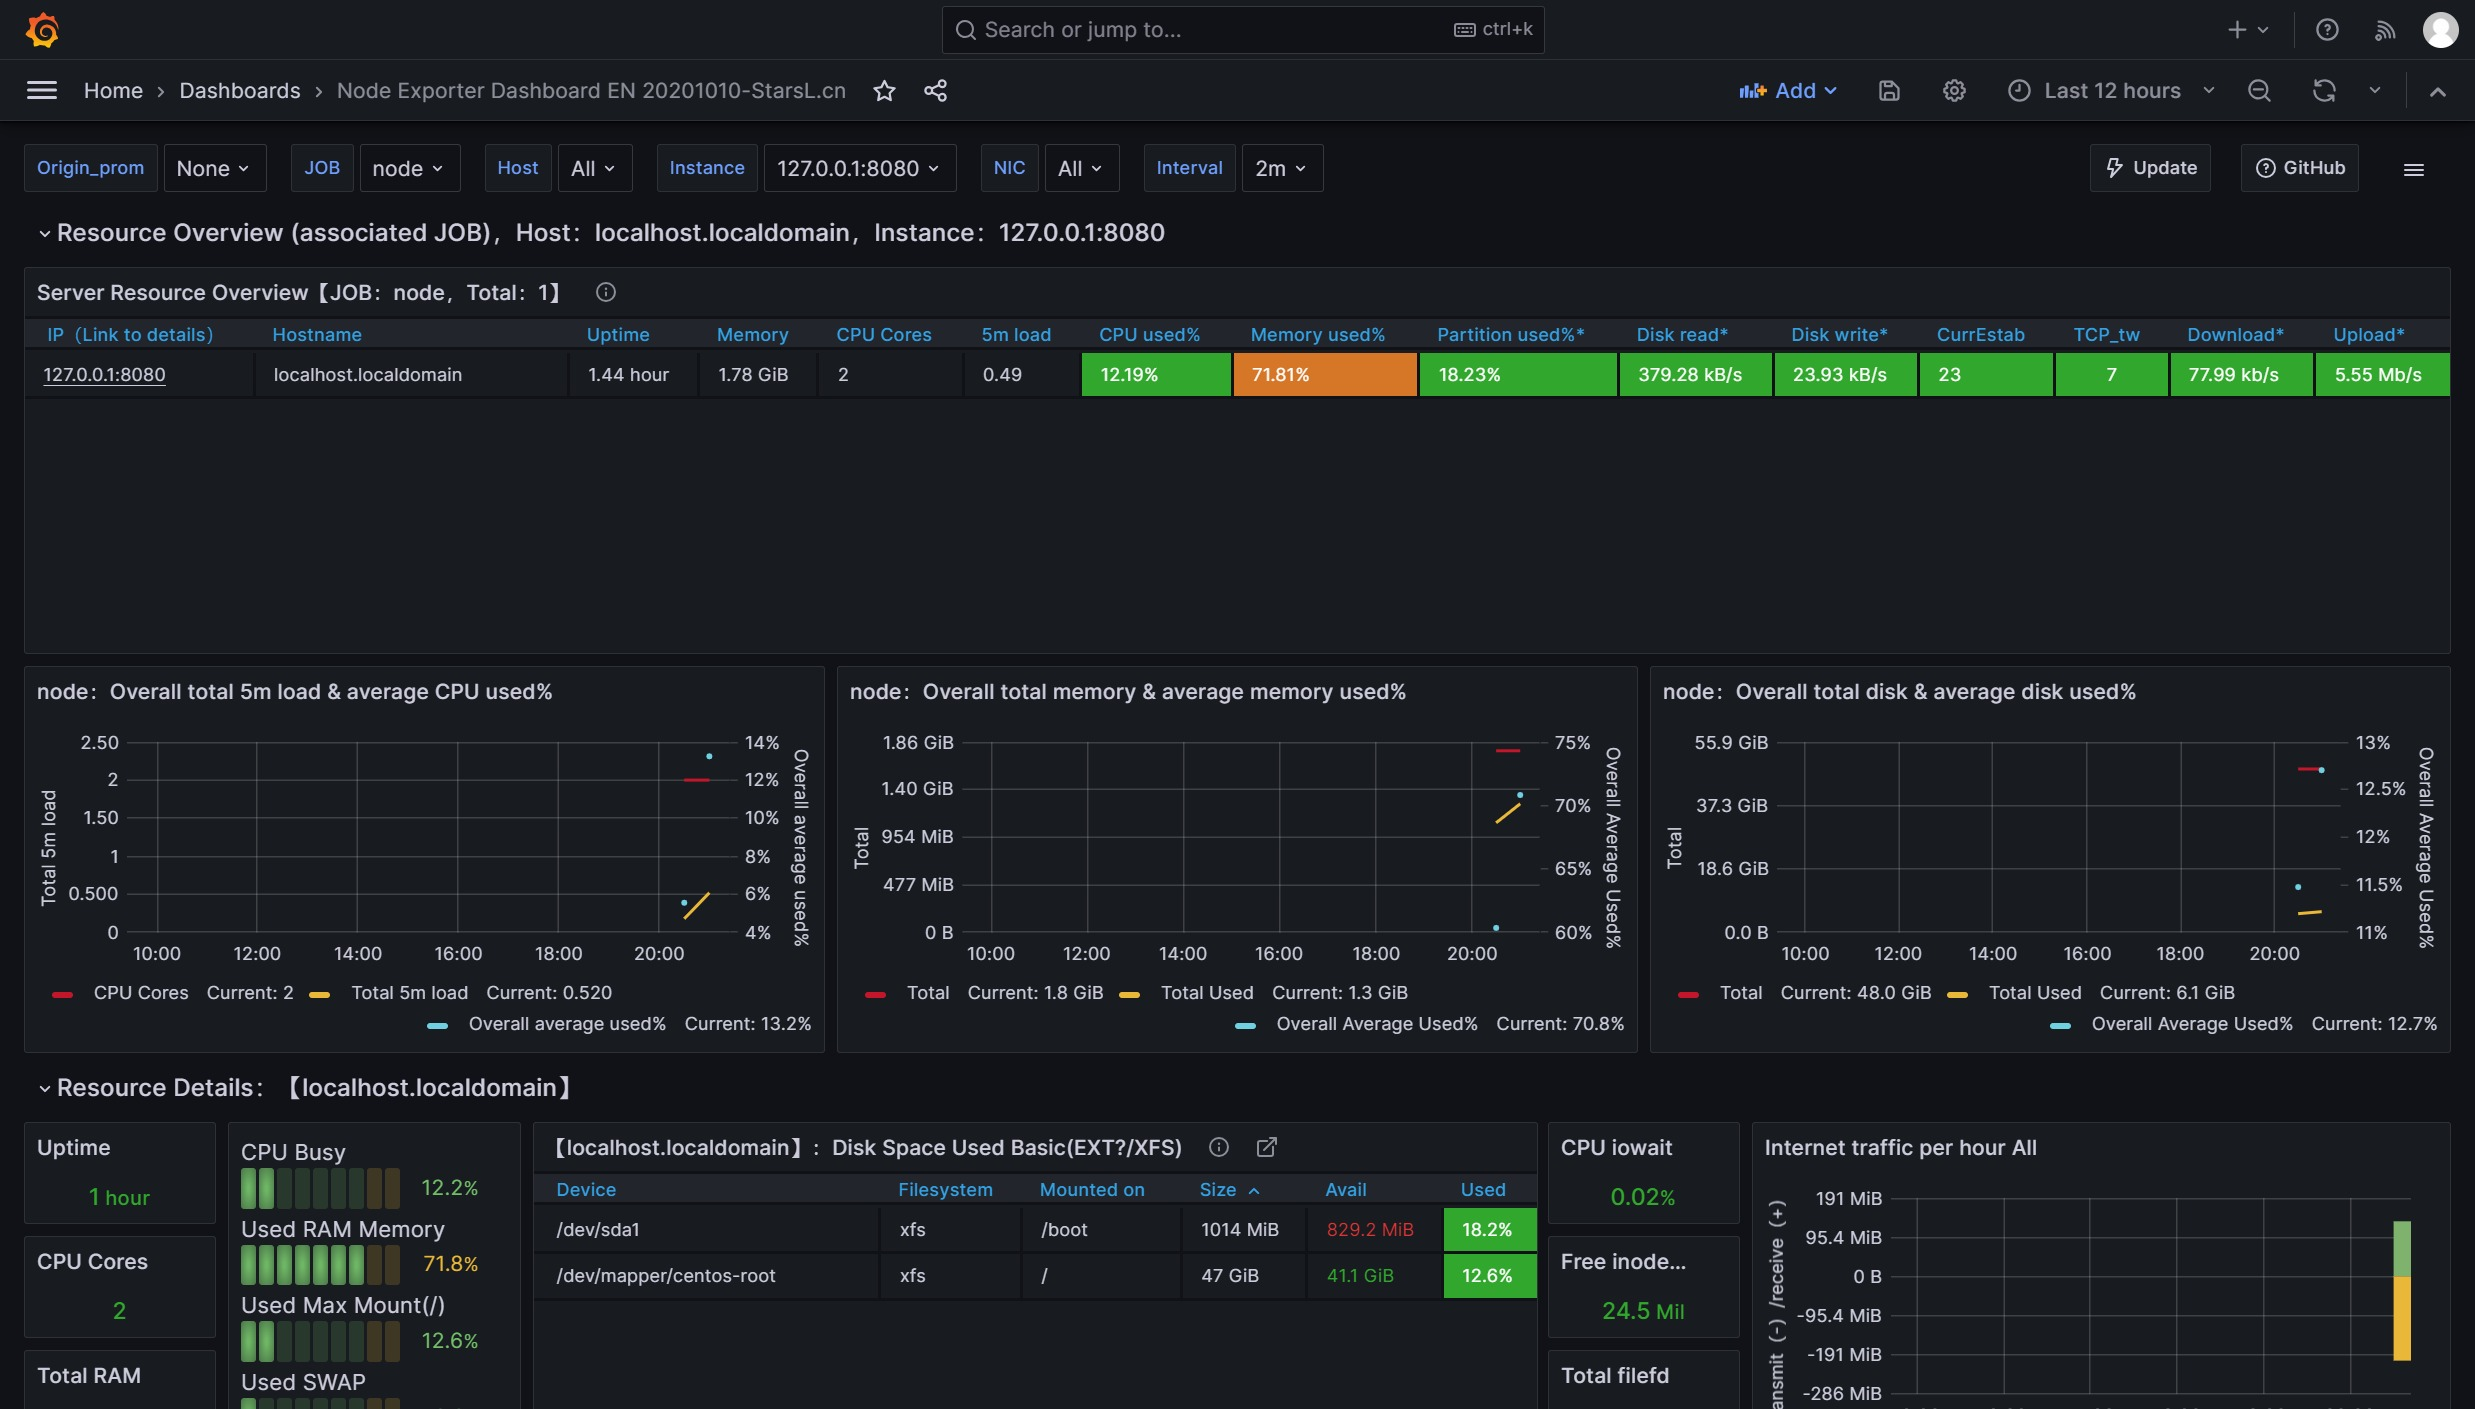
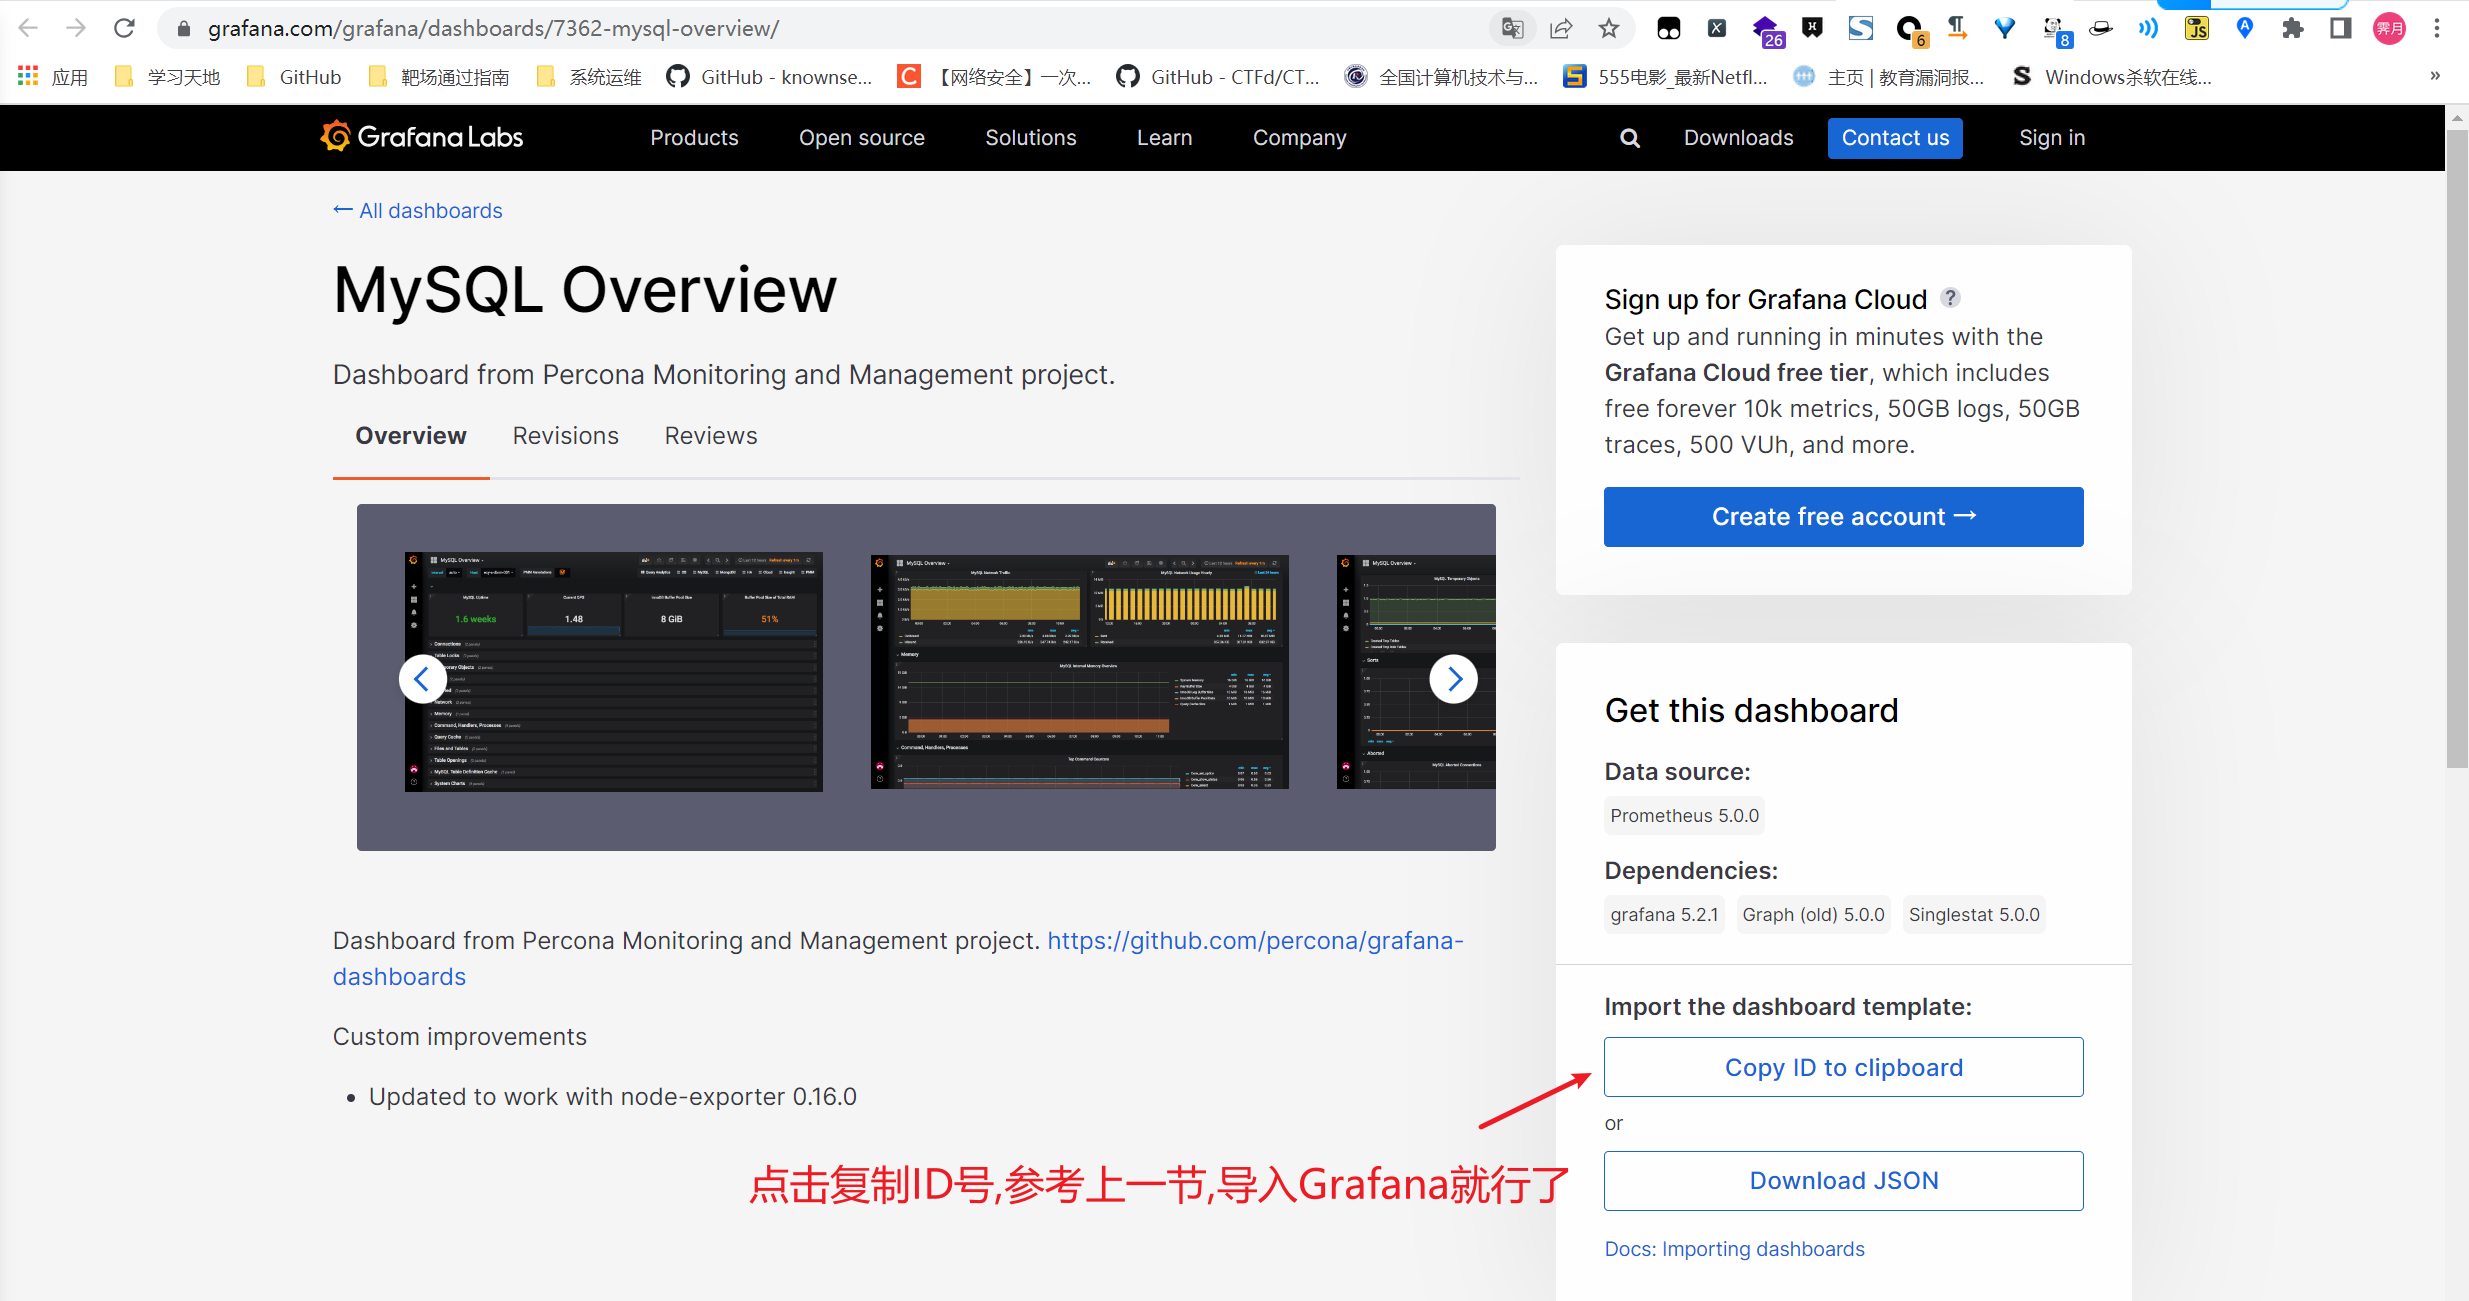
Grafana导入监控模板 Grafana图形显示Linux硬件信息
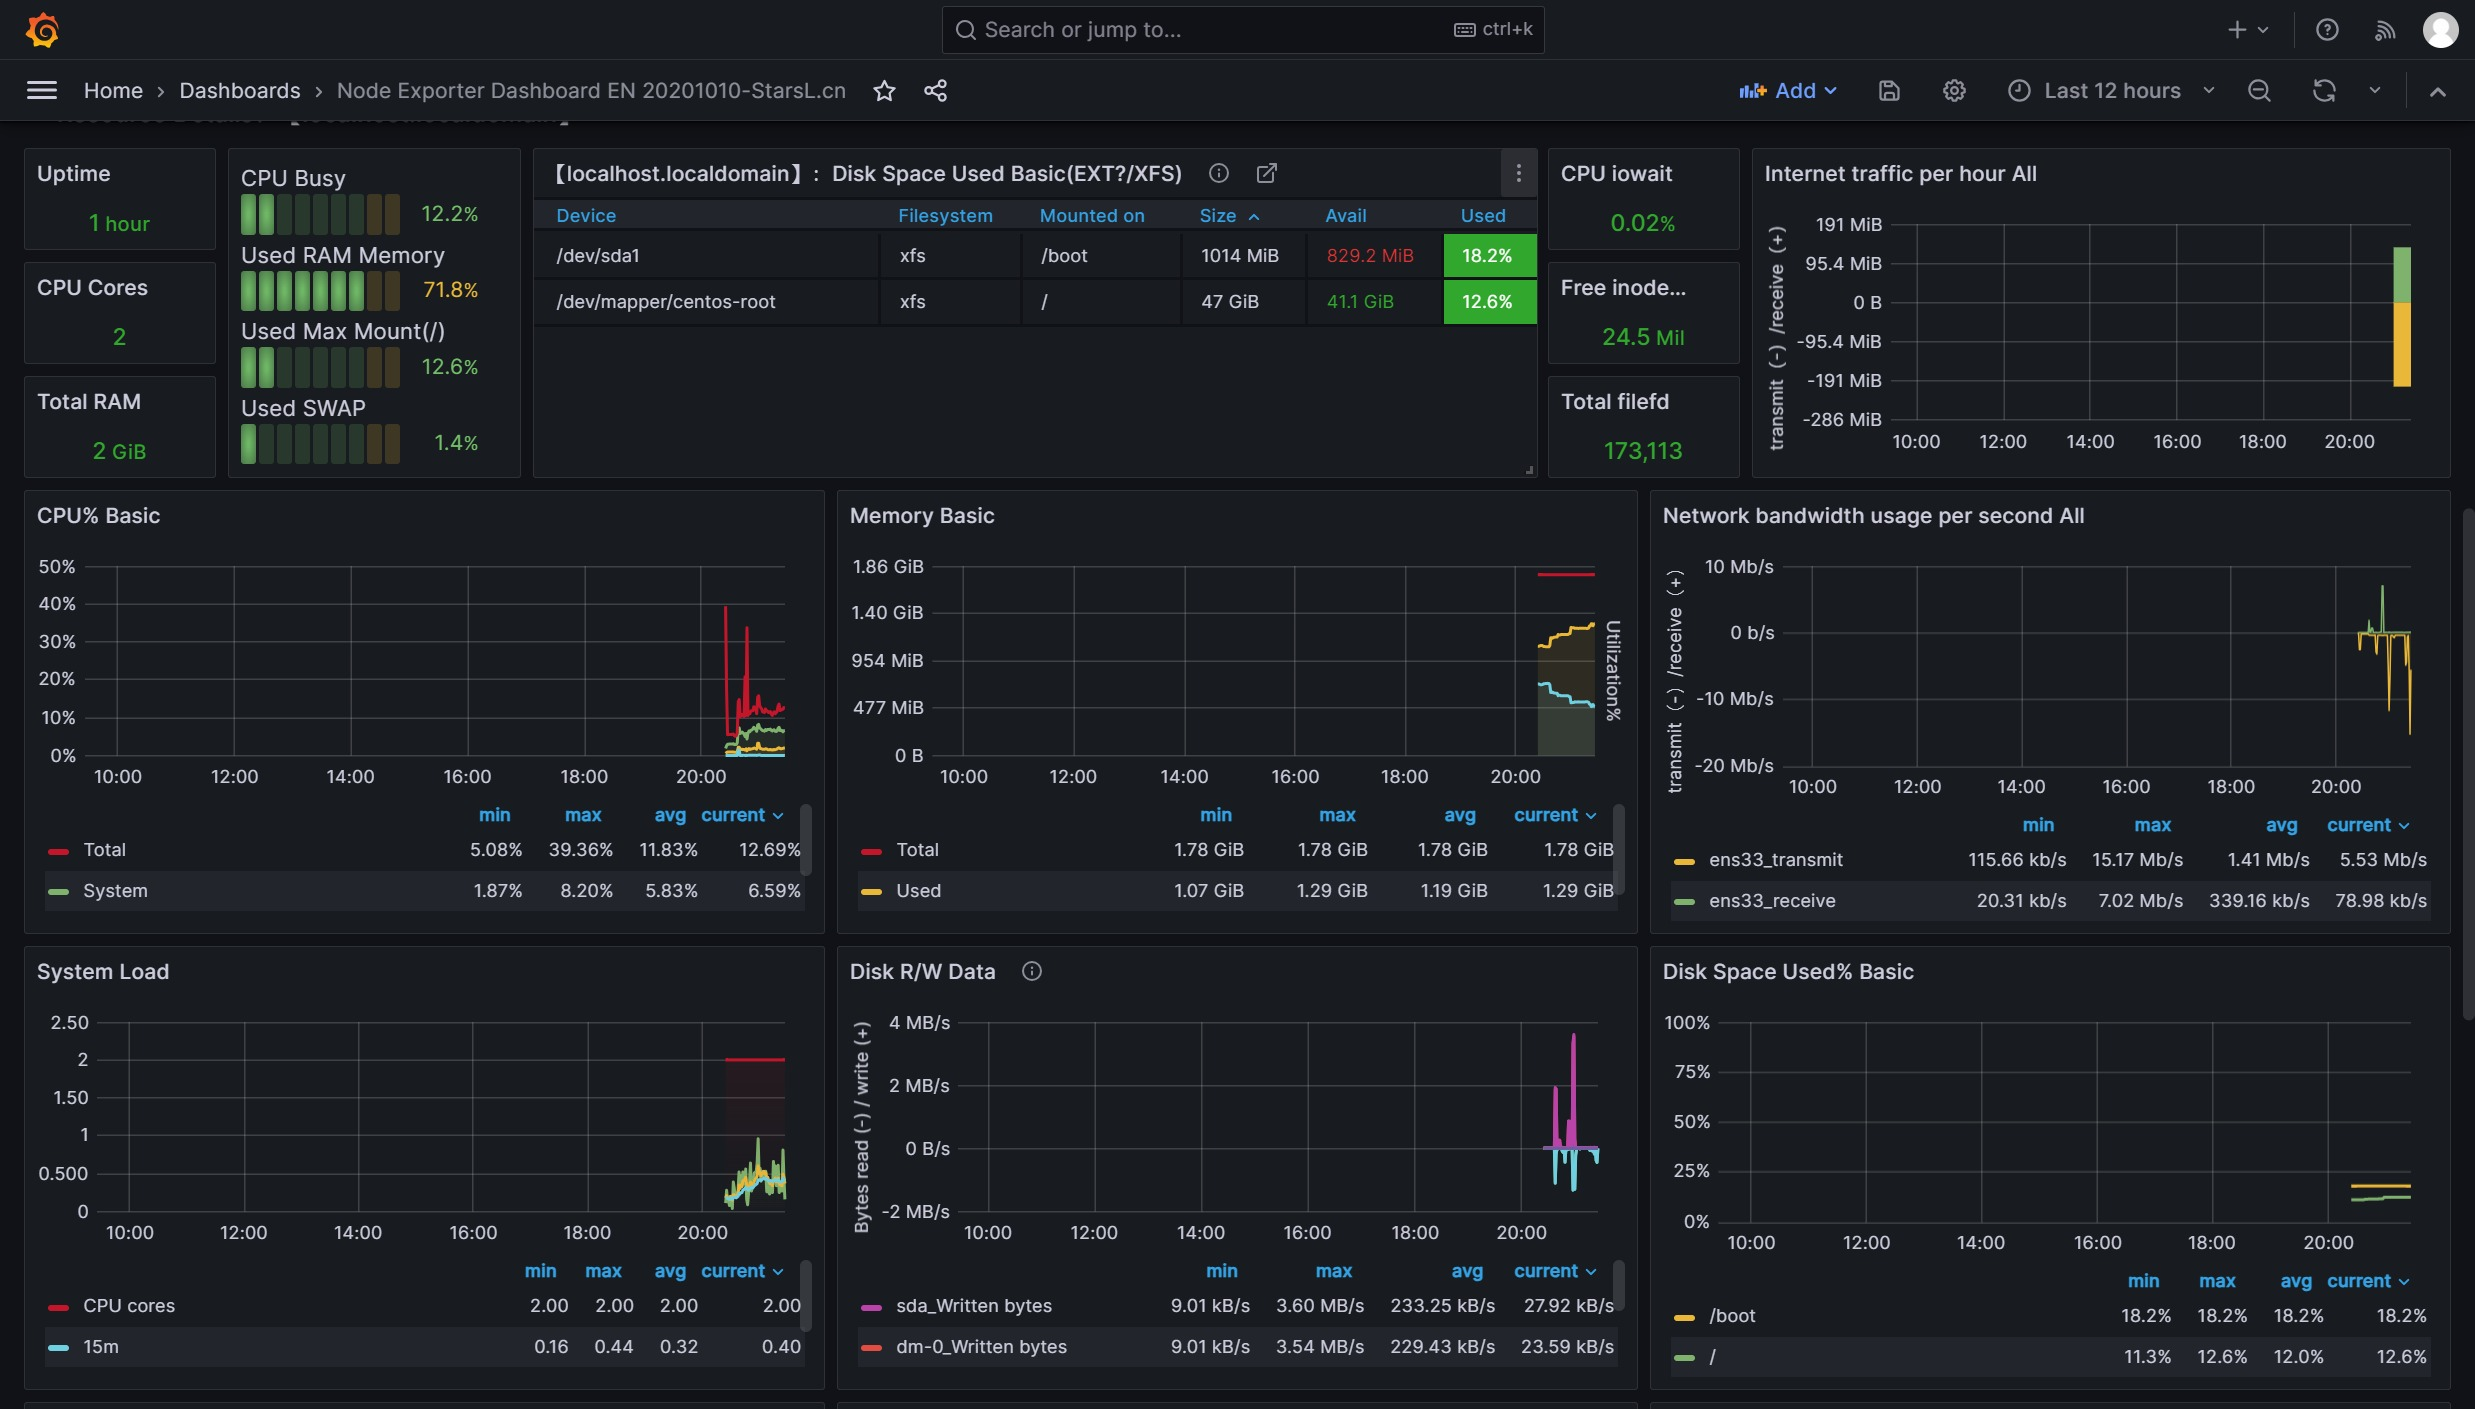
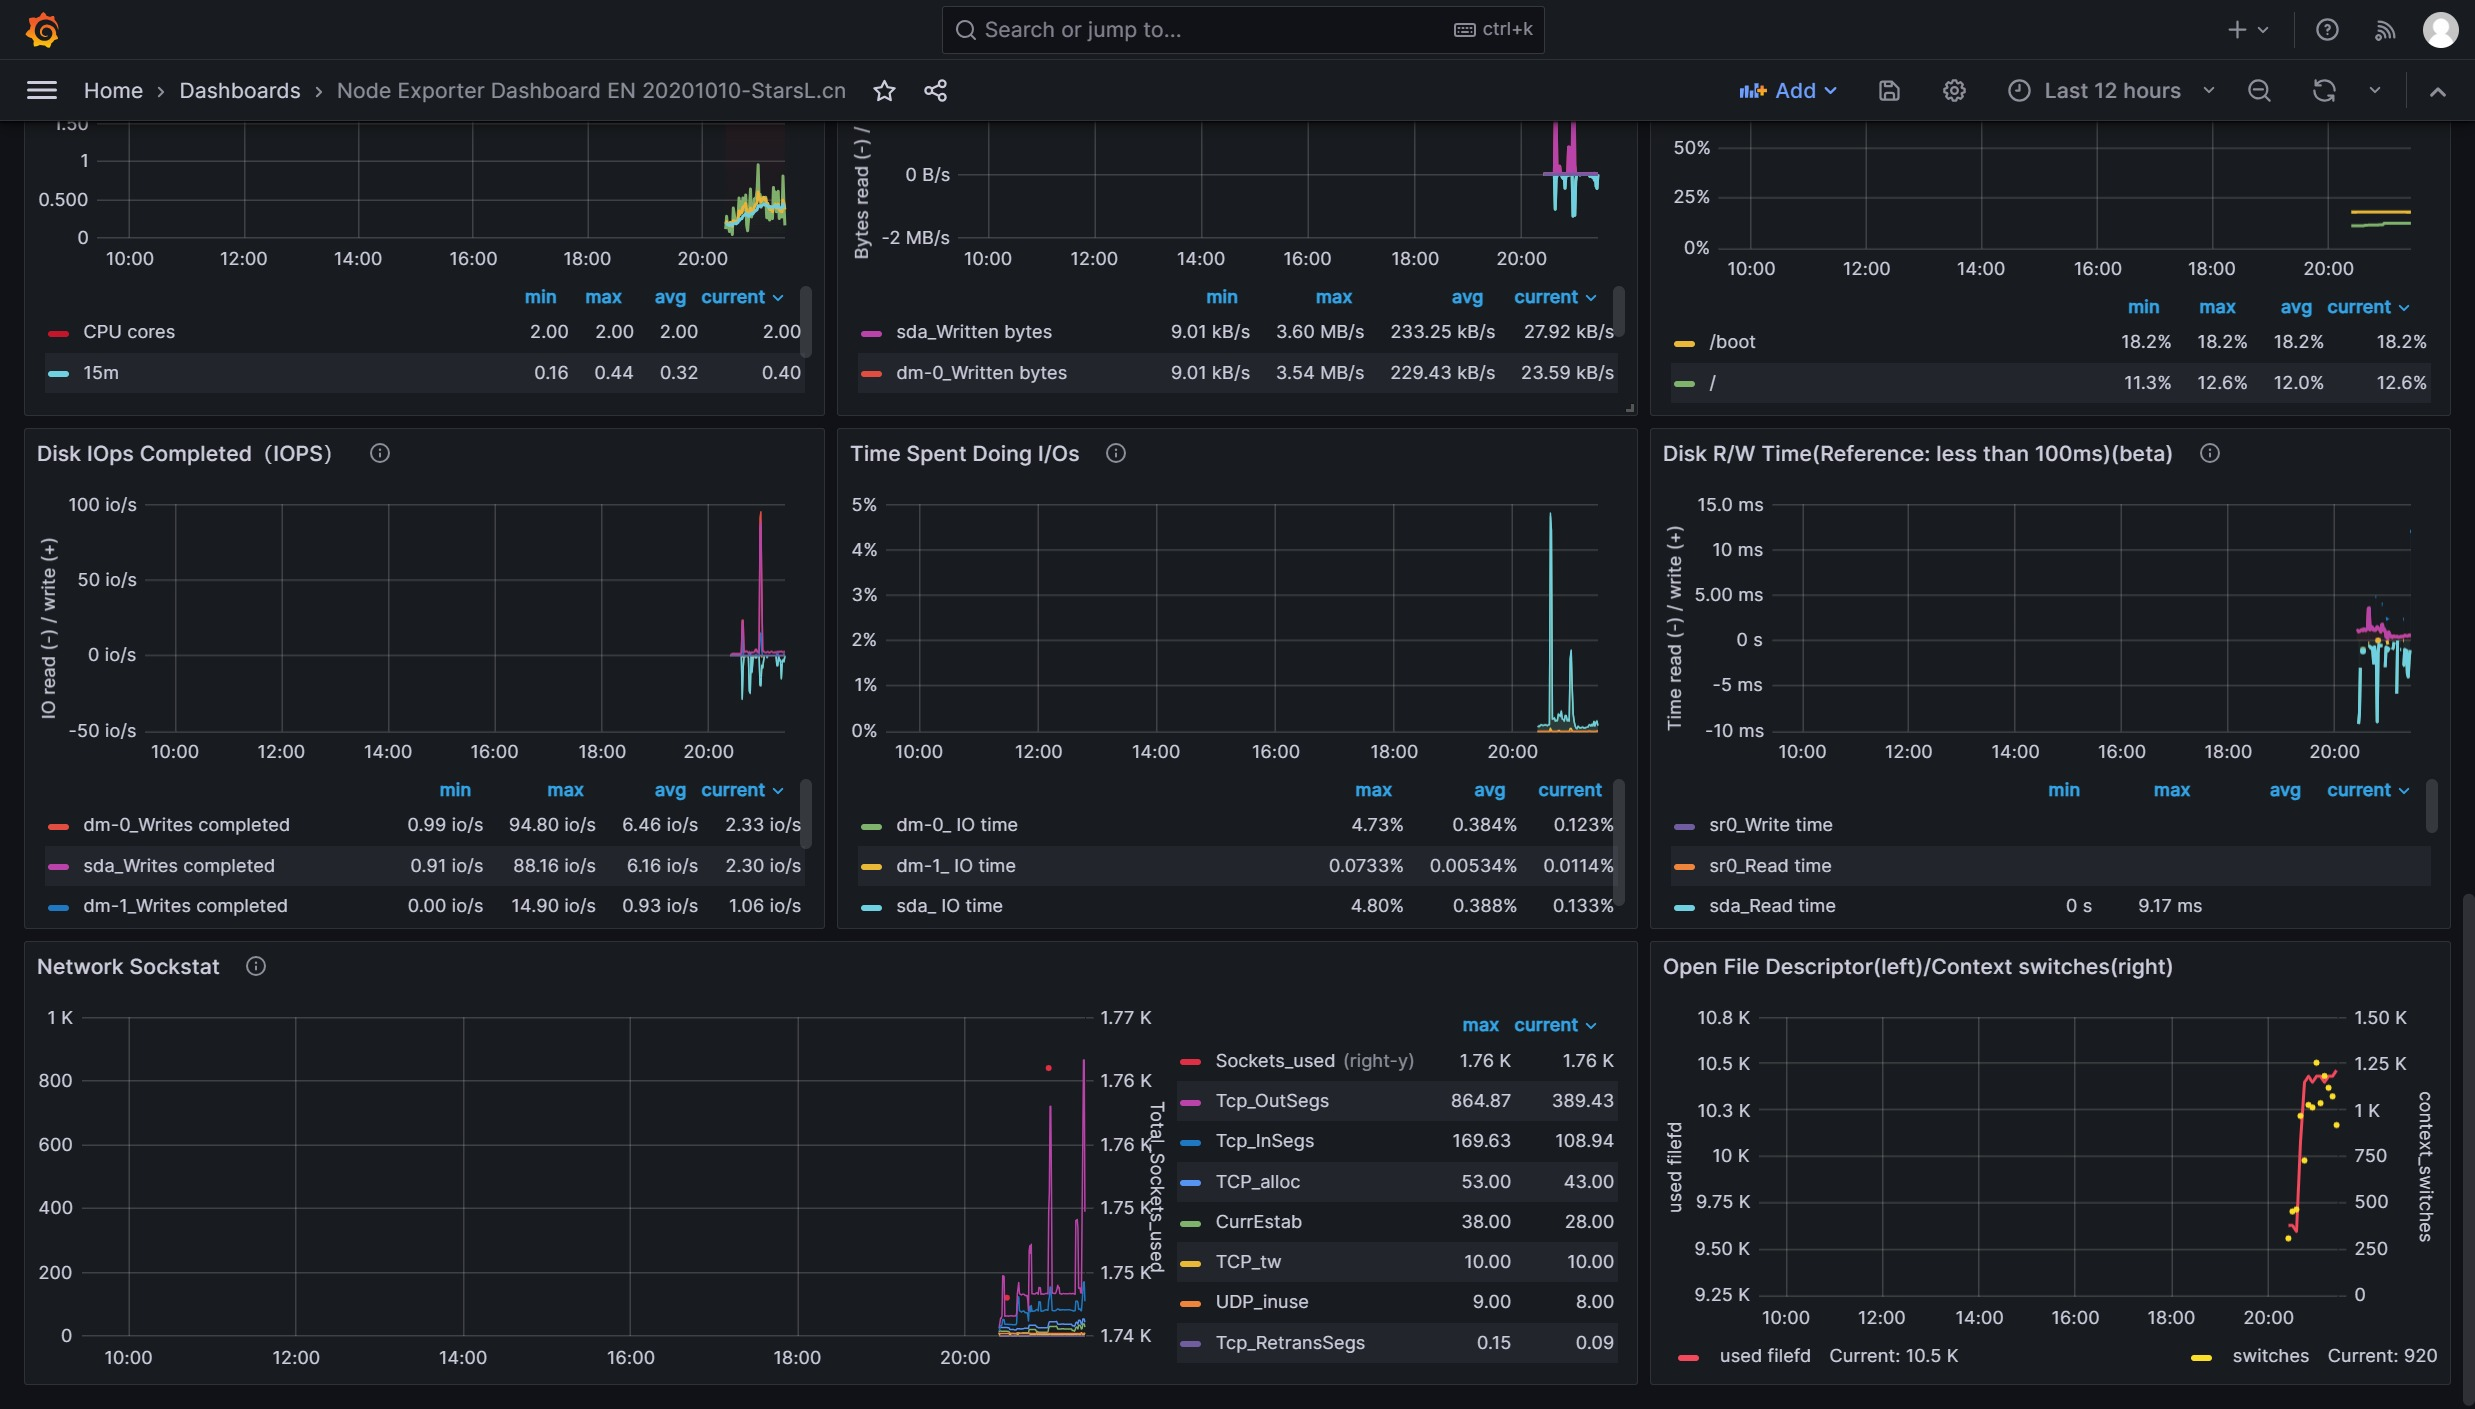
即可看到逼格非常高的系统主机节点监控信息
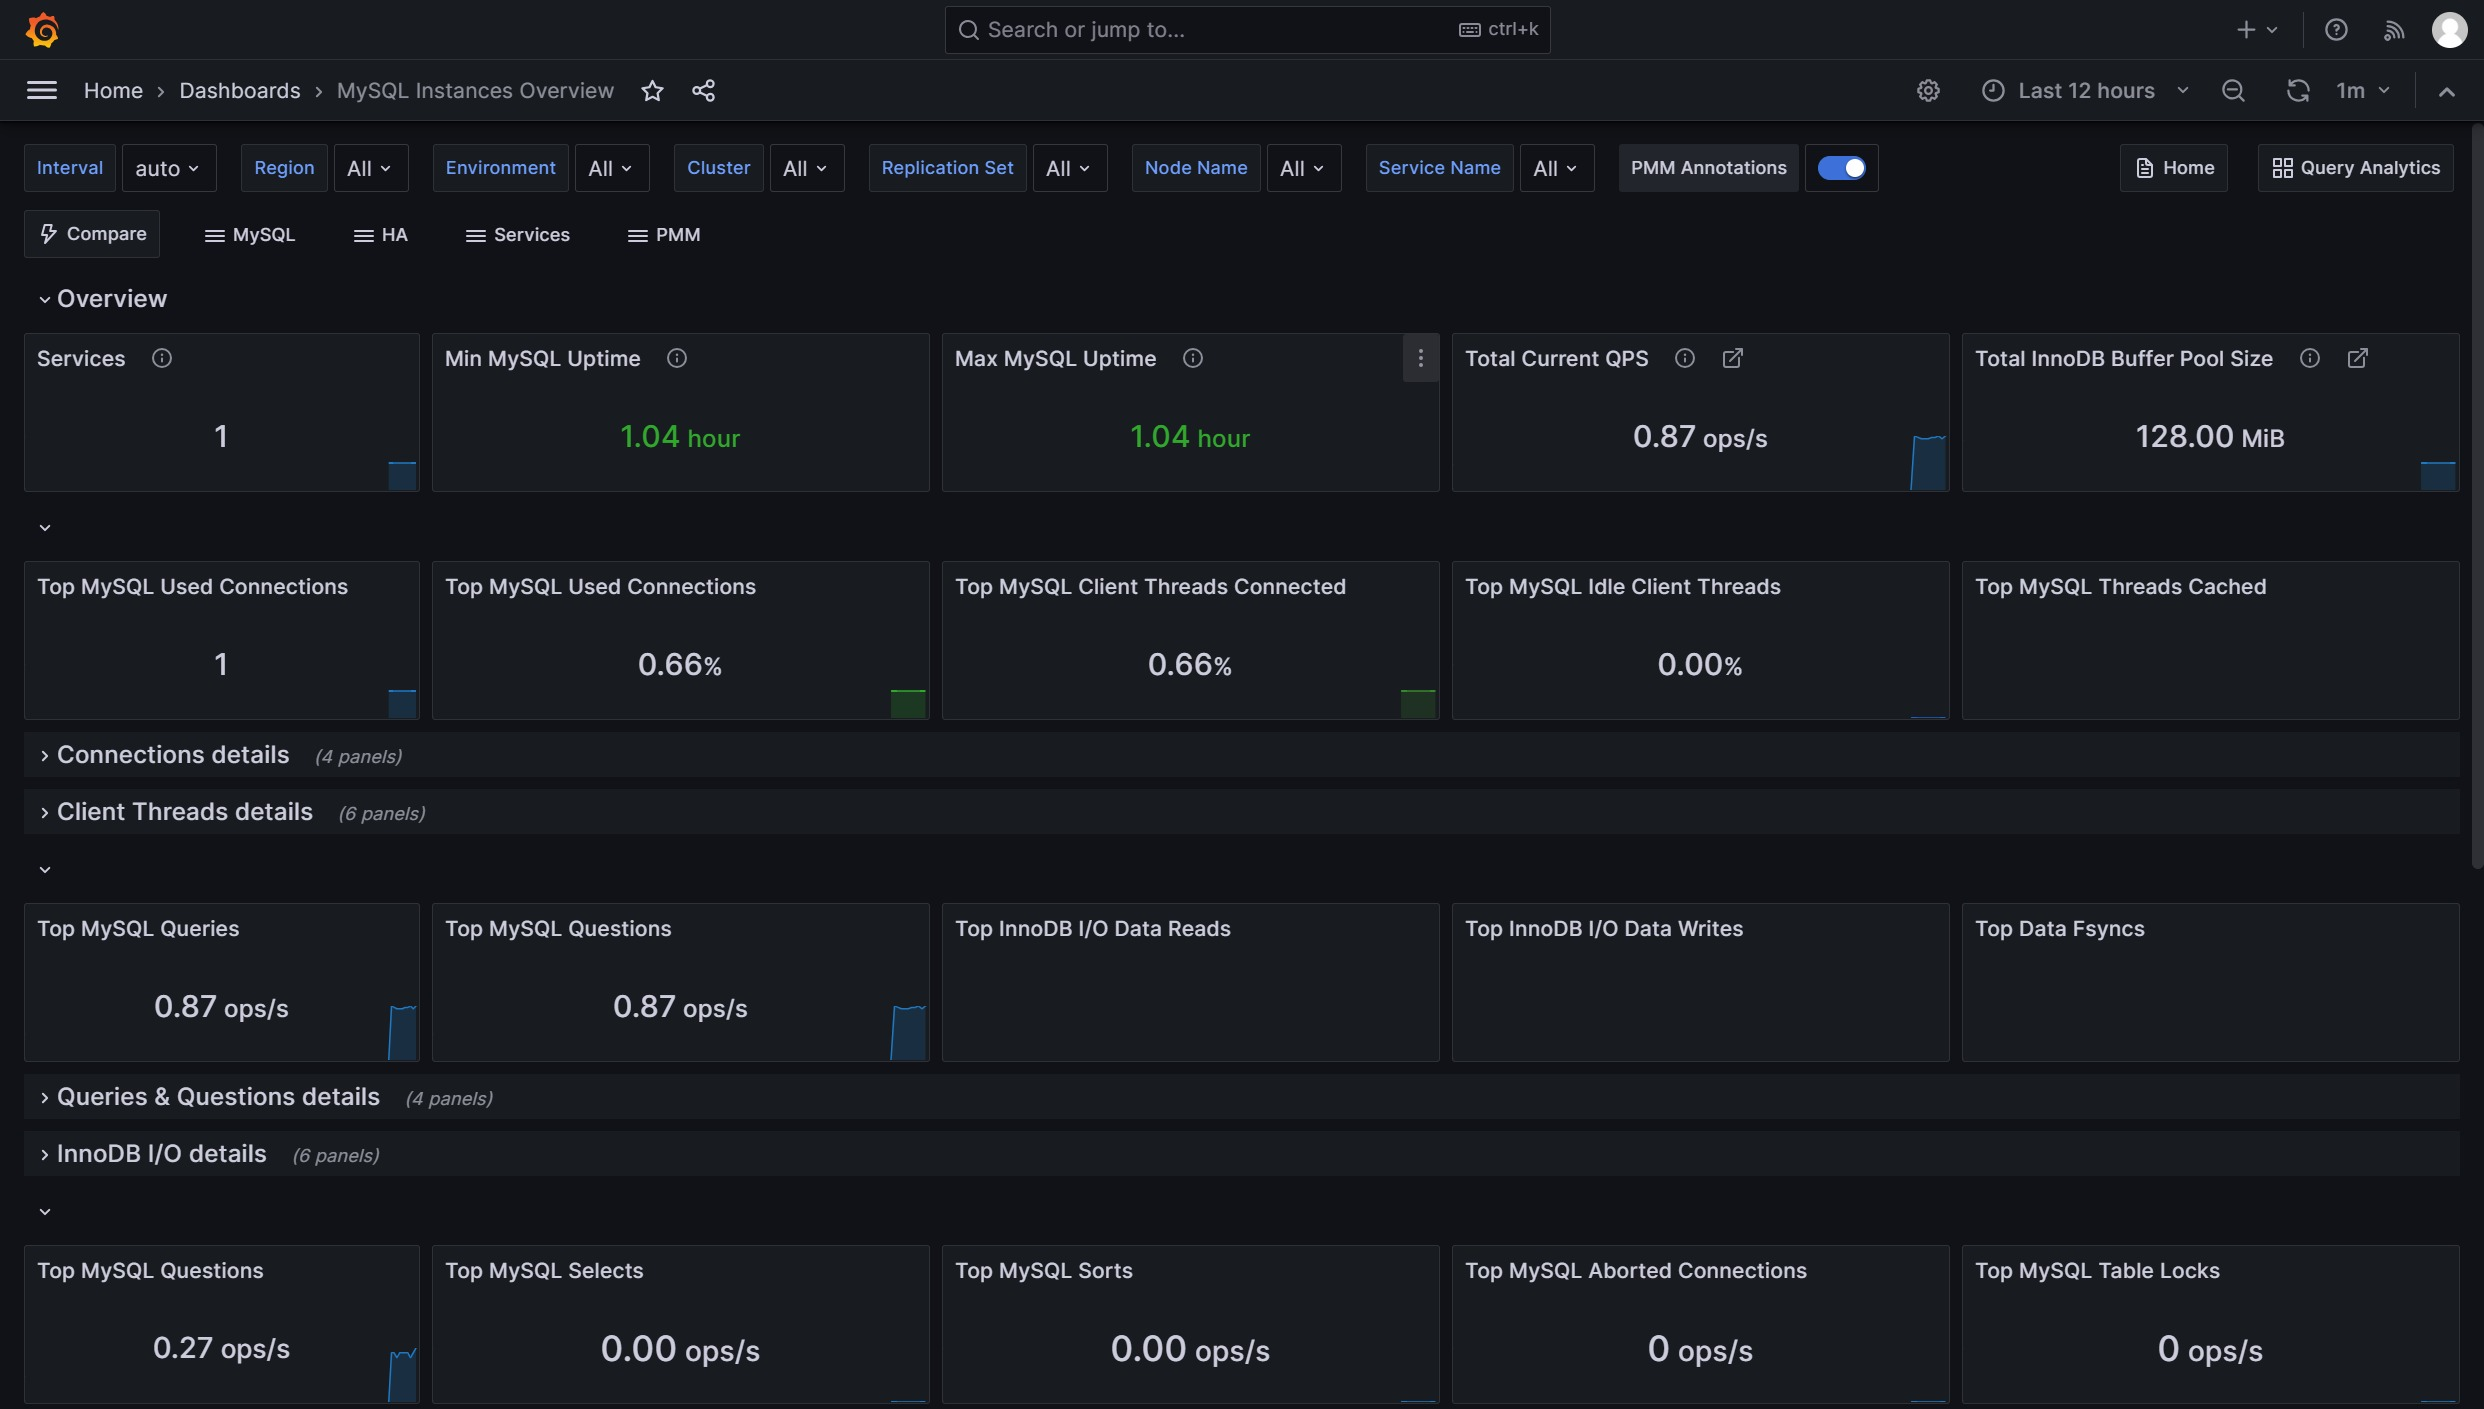
Grafana图形显示MySQL监控数据
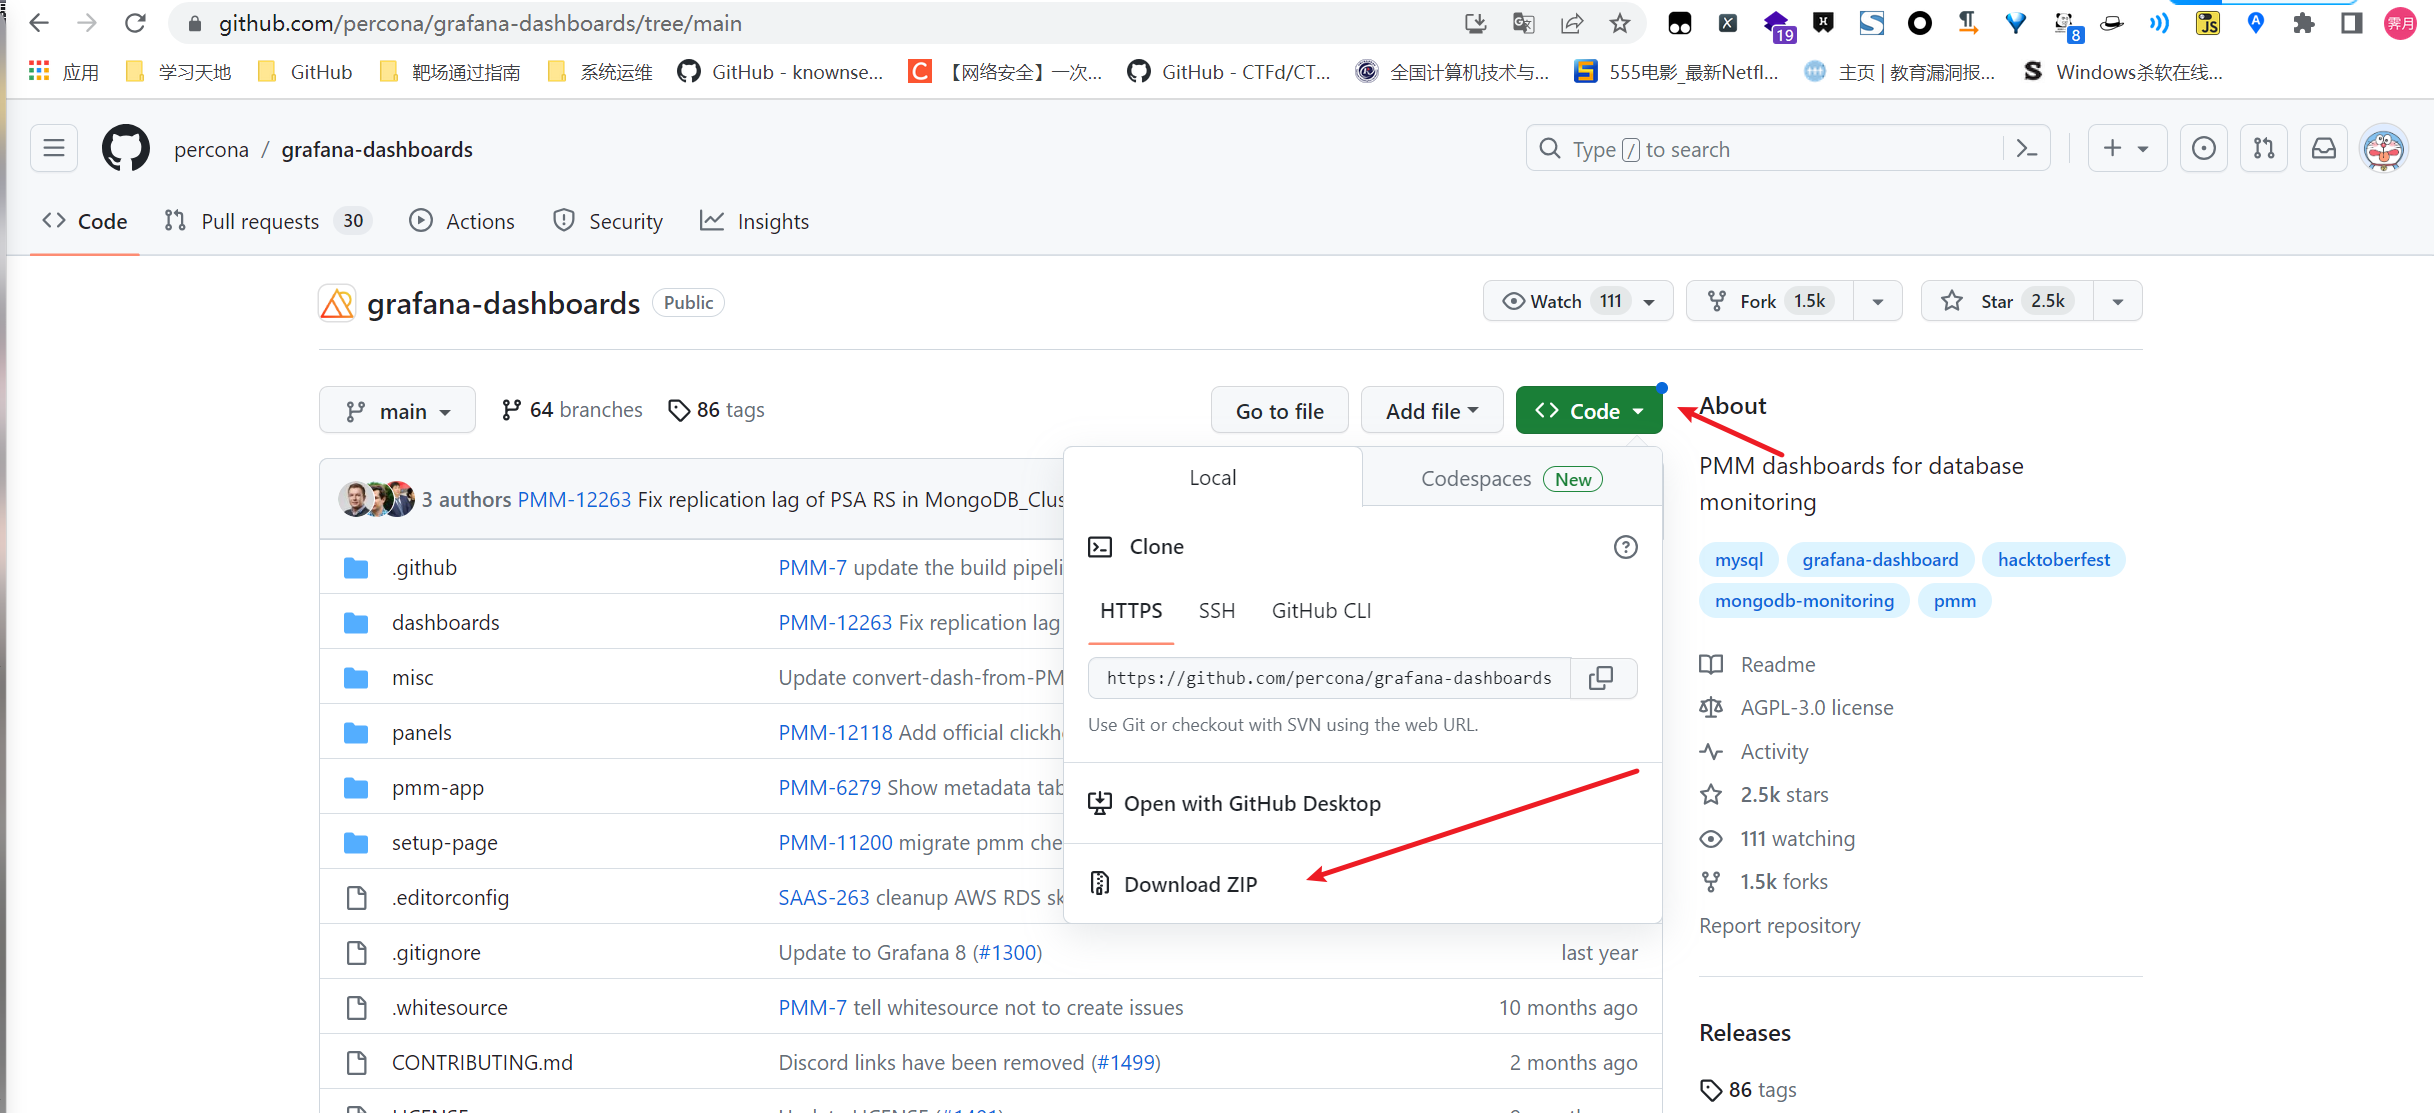
当然,这个更新的不及时,要体验最新的我们直接去项目地址下载安装mysql监控的dashboard(包含相关json文件,这些json文件可以看作是开发人员开发的一个监控模板)
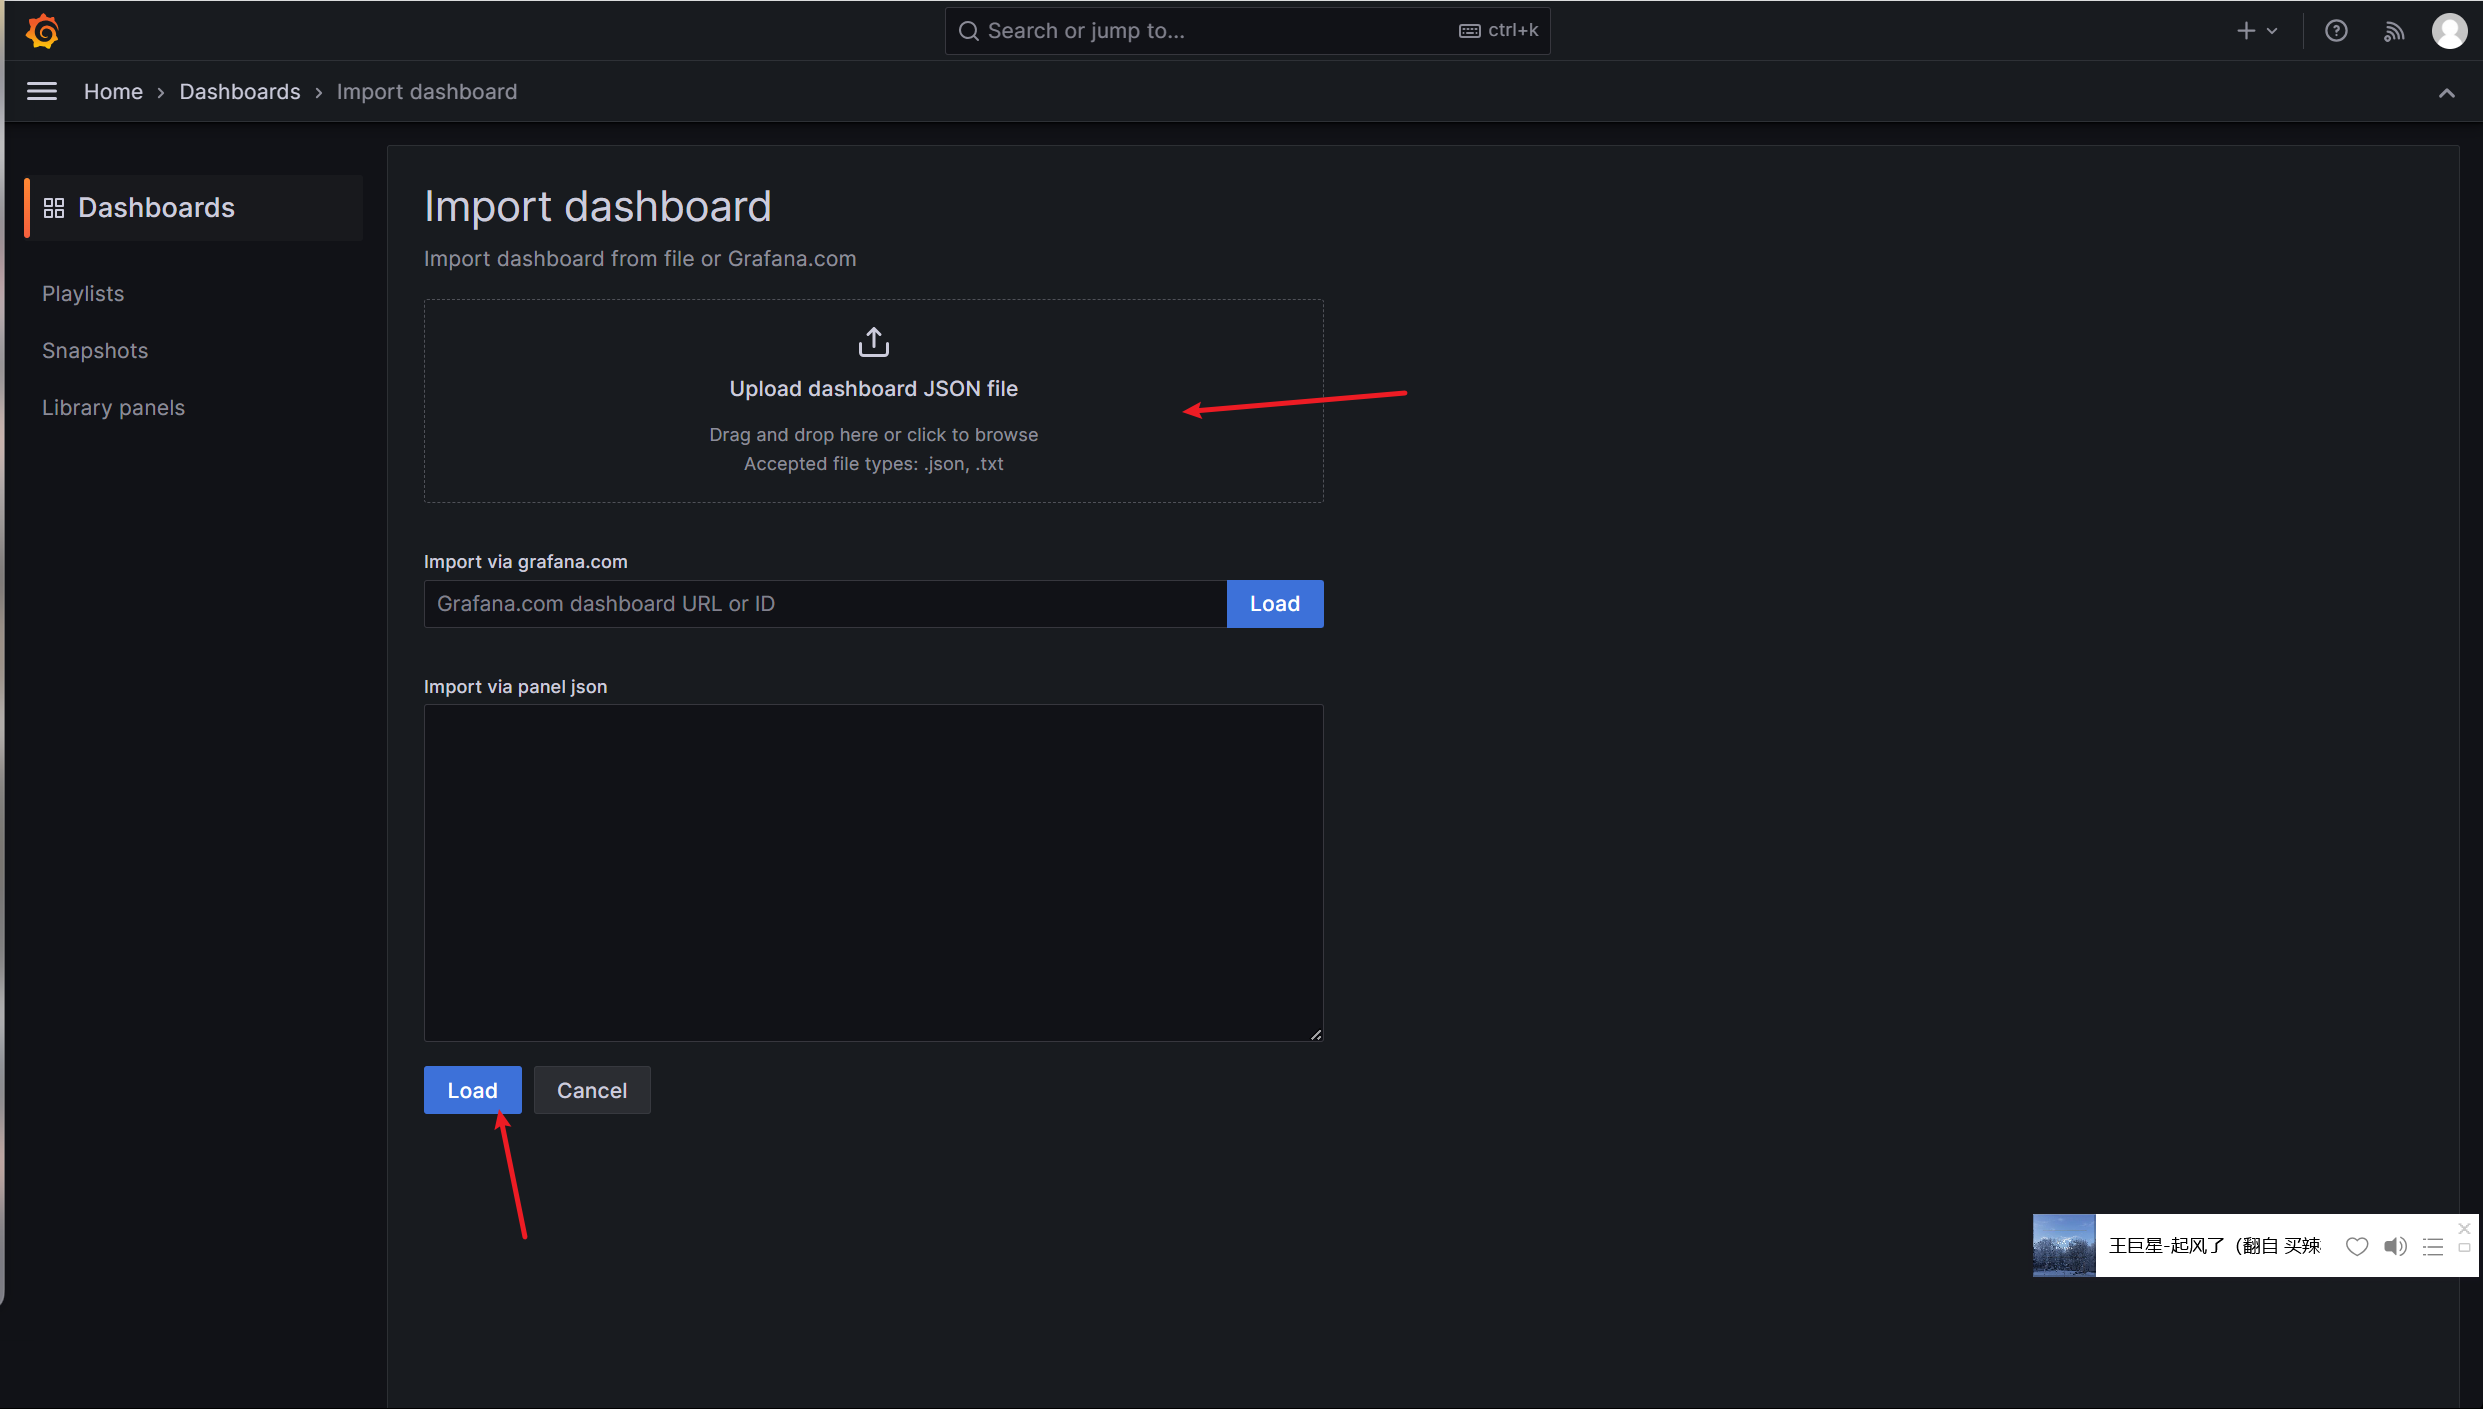
方式二:导入最新的json文件
下载最新json文件包
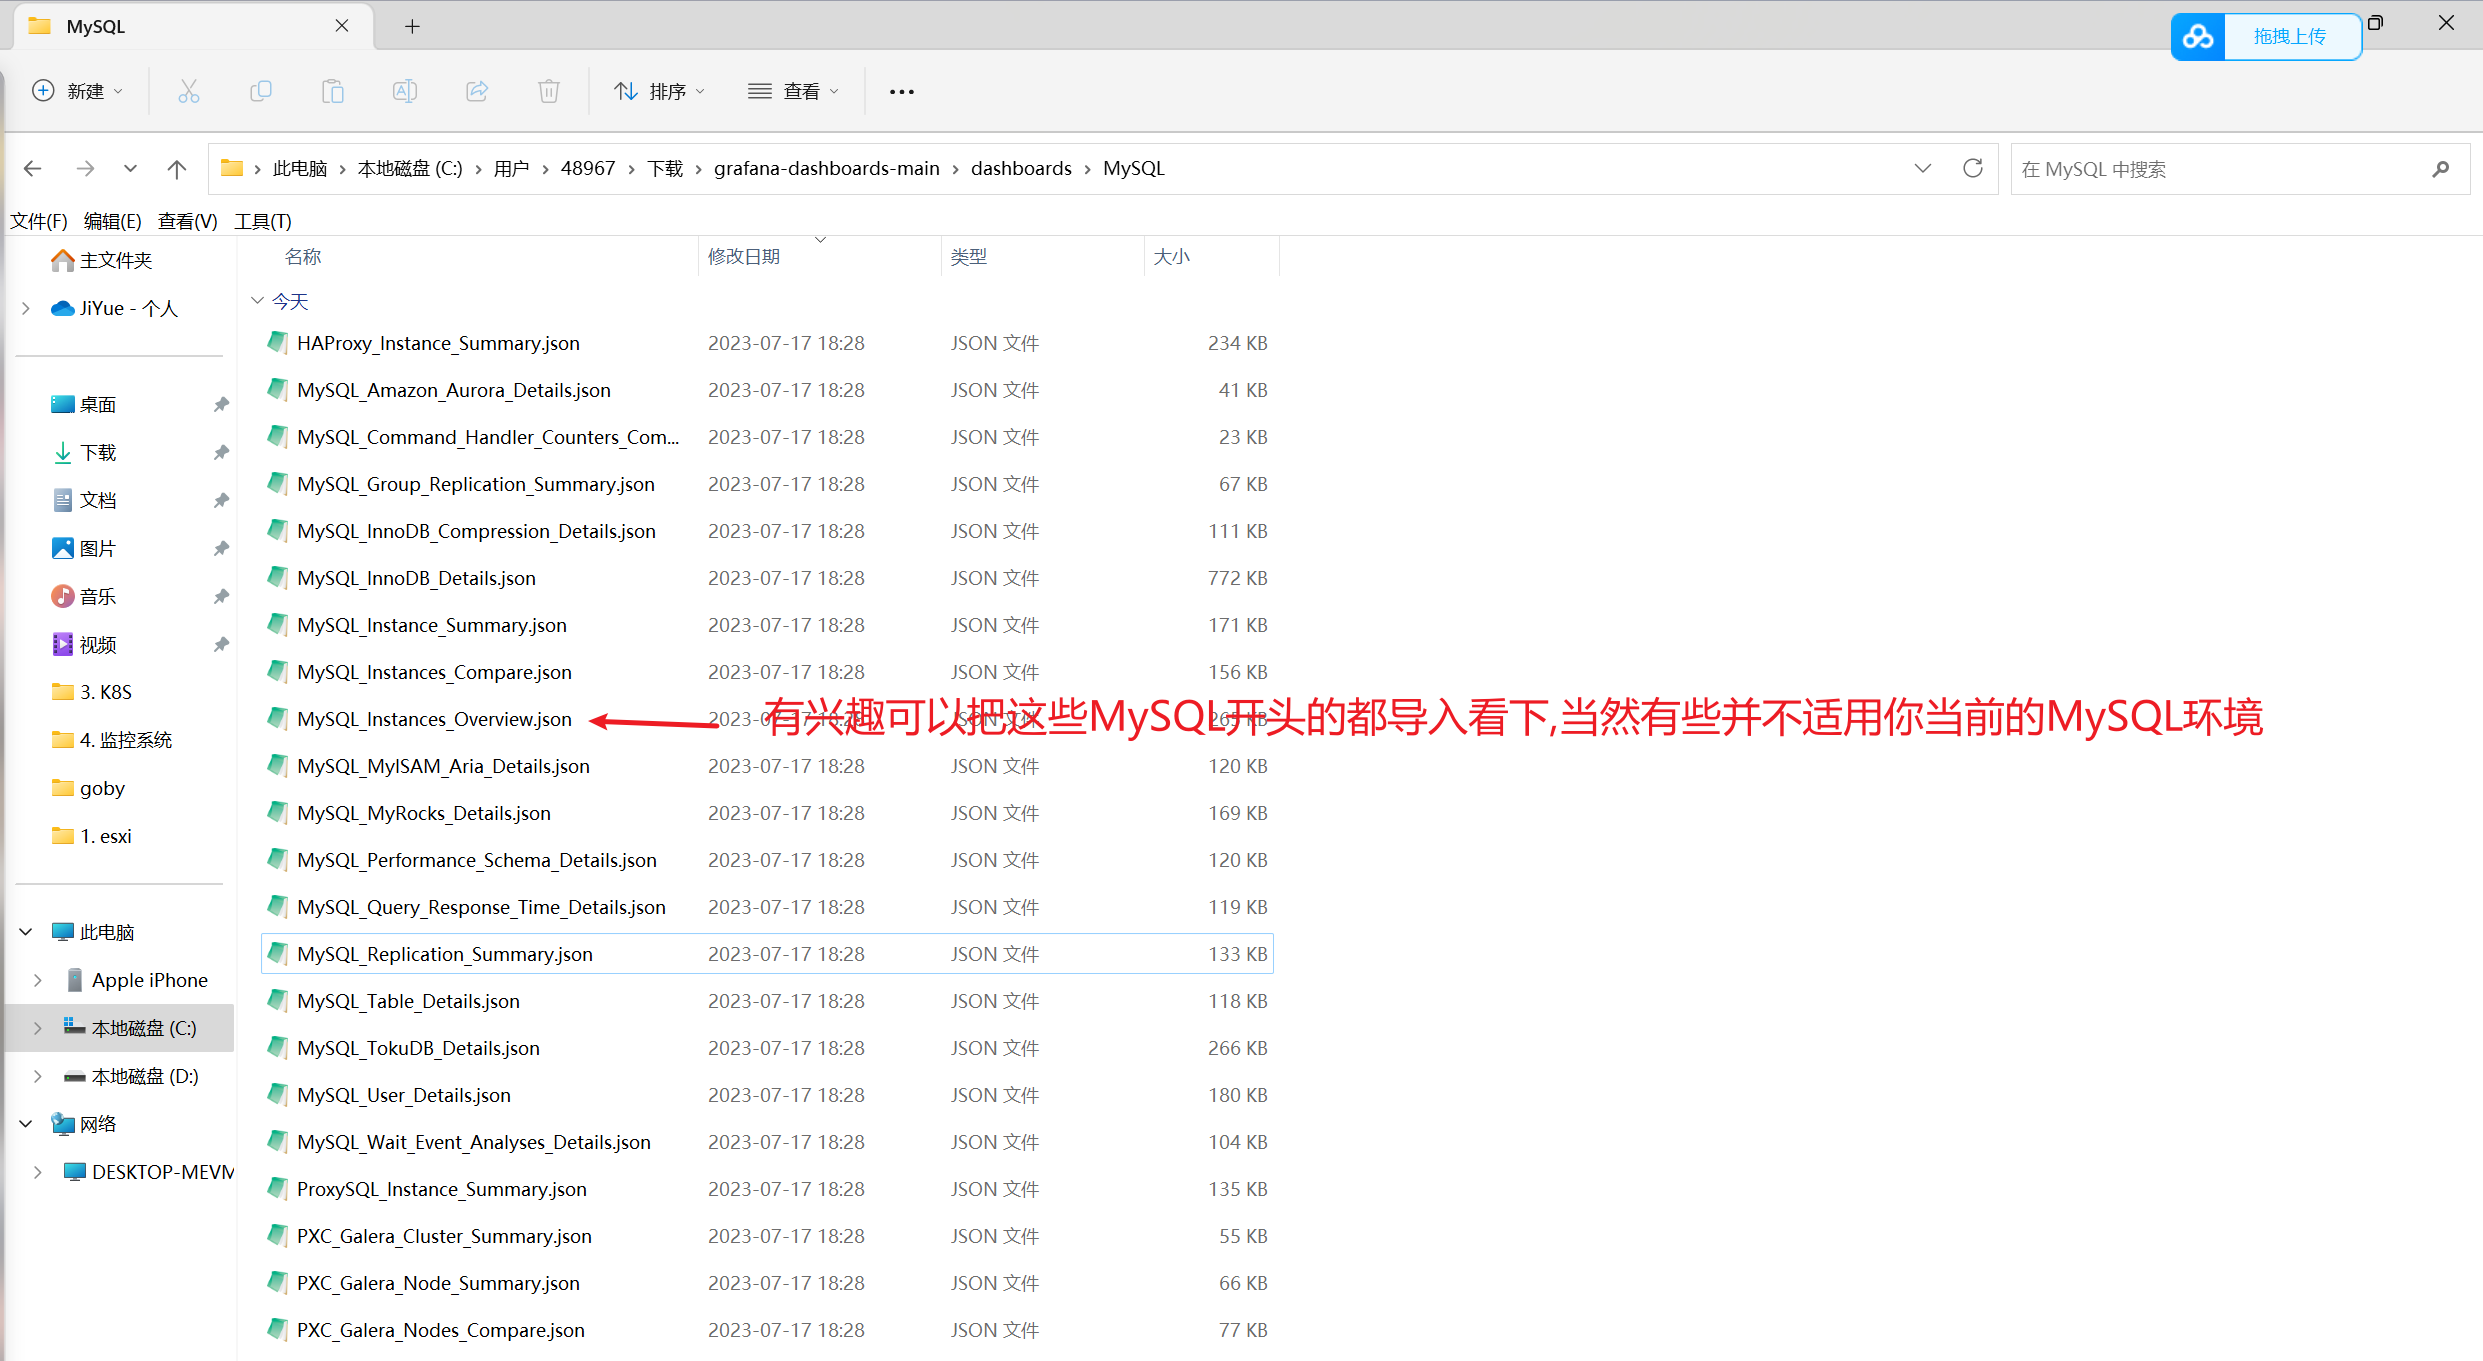
解压得到相关JSON文件
1
2
3
4
5
6
7
8
9
10
11
12
13
14
15
16
17
18
19
20
21
22
HAProxy_Instance_Summary.json: HAProxy实例的概览信息和关键指标. MySQL_Amazon_Aurora_Details.json: Amazon Aurora数据库的详细信息和性能指标. MySQL_Command_Handler_Counters_Compare.json: MySQL命令处理器计数器的比较和分析. MySQL_Group_Replication_Summary.json: MySQL Group Replication集群的概览和状态. MySQL_InnoDB_Compression_Details.json: InnoDB存储引擎的压缩策略和性能指标. MySQL_InnoDB_Details.json: InnoDB存储引擎的详细信息和性能指标. MySQL_Instances_Compare.json: 不同MySQL实例之间性能指标的比较. MySQL_Instances_Overview.json: MySQL实例的概览信息和性能指标. MySQL_Instance_Summary.json: 单个MySQL实例的概览信息和关键指标. MySQL_MyISAM_Aria_Details.json: MyISAM和Aria存储引擎的详细信息和性能指标. MySQL_MyRocks_Details.json: MyRocks存储引擎的详细信息和性能指标. MySQL_Performance_Schema_Details.json: MySQL Performance Schema的详细信息和性能指标. MySQL_Query_Response_Time_Details.json: 查询响应时间的详细信息和性能指标. MySQL_Replication_Summary.json: MySQL复制的概览和状态. MySQL_Table_Details.json: MySQL表的详细信息和性能指标. MySQL_TokuDB_Details.json: TokuDB存储引擎的详细信息和性能指标. MySQL_User_Details.json: MySQL用户和权限的详细信息和统计. MySQL_Wait_Event_Analyses_Details.json: MySQL等待事件分析的详细信息和指标. ProxySQL_Instance_Summary.json: ProxySQL实例的概览信息和关键指标. PXC_Galera_Cluster_Summary.json: Percona XtraDB Cluster (PXC) Galera集群的概览和状态. PXC_Galera_Nodes_Compare.json: PXC Galera集群节点之间性能指标的比较. PXC_Galera_Node_Summary.json: 单个PXC Galera集群节点的概览信息和关键指标.
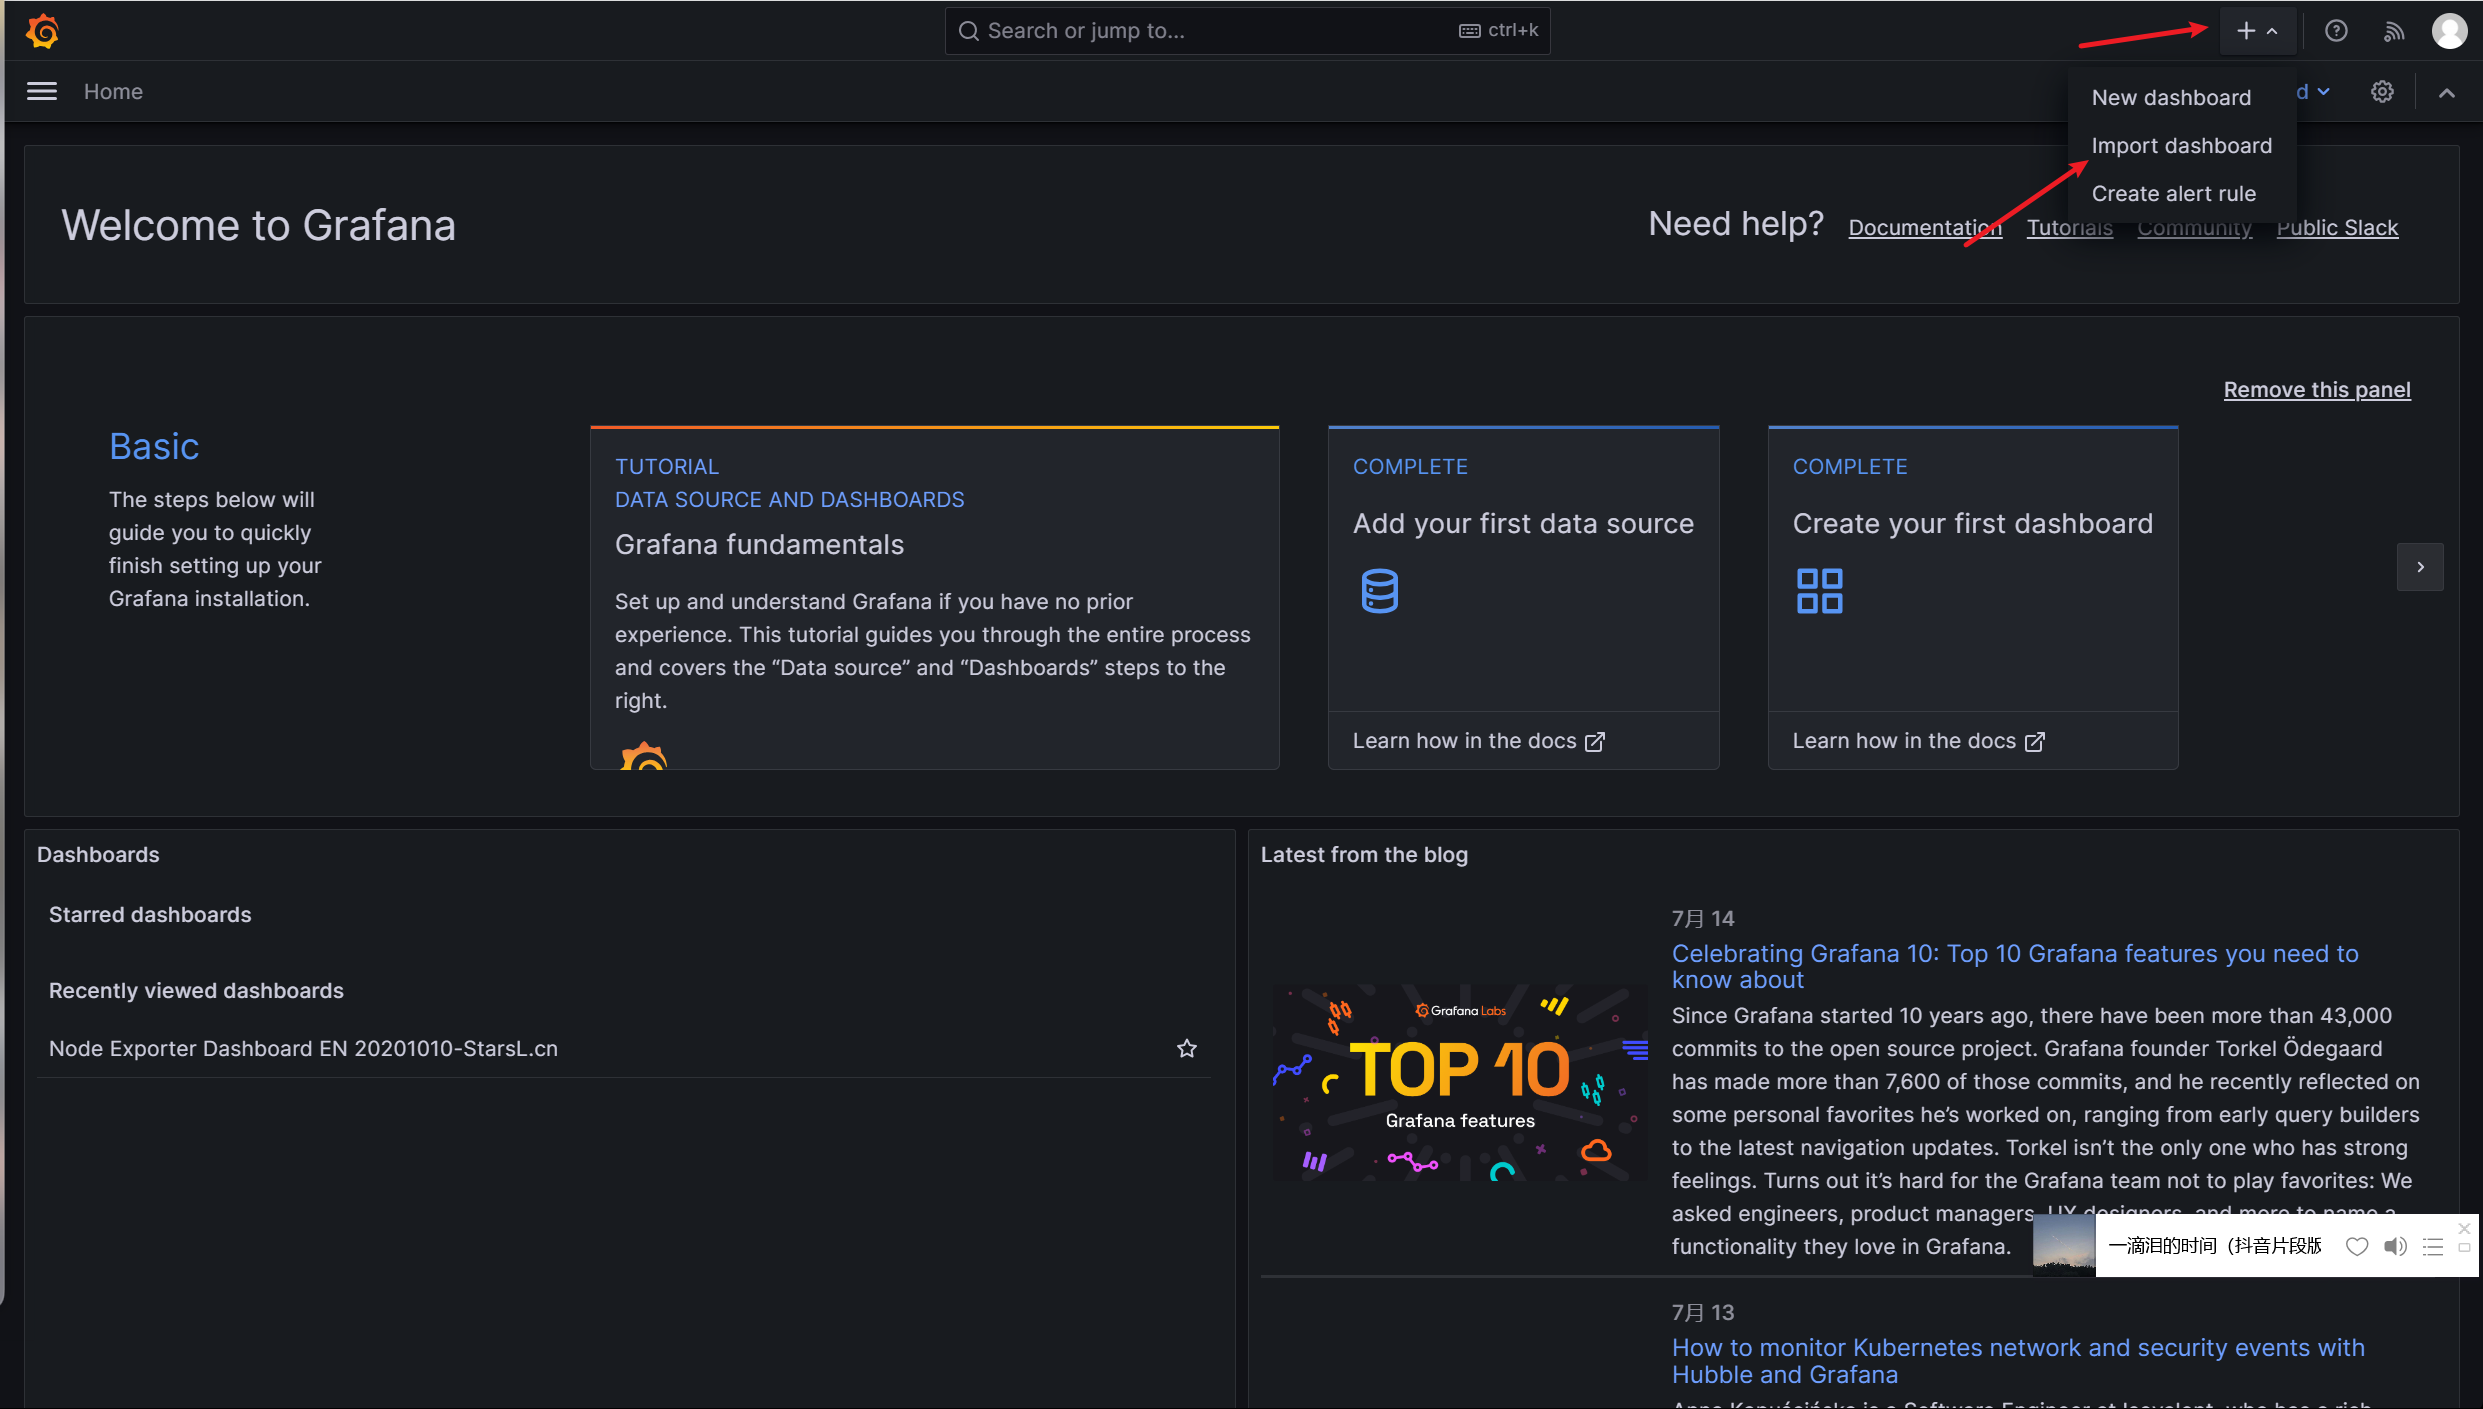
在grafana图形界面导入MySQL相关json文件
grafana展示MySQL相关数据
